 | The instructions in this article relate to Debtor Adjustment. The icon may be located on your StrataMax Desktop or found using the StrataMax Search. It is also accessible from with GLMax. |
Debtor Adjustment has been designed to easily carry out the following in a building's current year, as well as the old year:
- Move a single lot’s balance between the Levy Invoice Codes; so from the Admin fund to the Sinking/Capital Works/Maintenance/Reserve, or Other balance fund, whilst also including options for adding or removing discounts on previous levies.
- Move balances between a single lot’s main account and sub account, for example if an owner has paid their utility bill into their levy fund account.
- Move a balance between two different lots, including their main or sub accounts, and between difference Owners Corporations (OCs or Account Groups). This can come in handy where an owner owns two properties, and they’ve paid the levies for both properties into the one lot account (Transfer funds from Utilities to Levies account).
- Reverse interested charged.
- Allocation of funds will be based on the oldest debt's due date first, then for all items that use the same due date based on Levy Invoice Code priority.
Debtor Adjustment cannot be opened in the Old Year or the Historical Year. However, fund reallocations and interest reversals can be performed in the building's Old Year by entering the last date of the building's previous financial year, except for when reallocating funds between sub-group lot accounts, or if the building does not have an old year, or the audit flag for this year has been set via Building Information.
Before and after processing fund allocations or crediting interest, the lot balance should be checked for each lot. This can be done by producing a Ledger Card, or by producing an Account Dissection Report to show the balances for the lot by fund if required. This will assist in understanding the outcome before completing the action. If the fund allocations have resulted in a credit and a debit on the same lot, then a rationalisation of sub balances should be completed.
If there are any transactions that equal 0.00, Transaction Report Manager can be used to hide any transactions on the Ledger Card.
Debtor Adjustment Video
This video cover the reversal of interest and the reallocation of funds, both using the Debtor Adjustment menu.
Reallocate funds for a Lot, including allowing or disallowing discounts
This option should be used when balances need to be moved from one fund to another, or if a discount for previous levies needs to be added or removed. There may also be system created transactions to facilitate debit and credits for any reallocation of funds, and in instances where these need to be hidden, use Transaction Report Manager to stop these reporting on the Ledger Card or Transaction List.
Discount Reinstatement Example for Gross payment
Example: The 01/09/22-30/11/22 Admin, Sinking and Insurance levy was due 01/09/22. The Owner has paid above the Gross amount of the levy on the 28/09/22. The Committee have approved the discount reinstatement request.

- Search or select Debtor Adjustment and select the top radio button called Reallocate funds for a lot, incl..., and click Next.
- Select the lot by either typing the owner's name into the Lot field, or by clicking the more […] button to display the Account Code List window and double-click the lot.
- If this building is a multi-OC, with several account groups, you can also click the Account Group drop-down (directly under the Search field) to select the required Account Group.
- Change the Posting Date if necessary by typing in the date in the format of DDMMYY, or click the drop-down arrow to display a calendar and click the date.
- The date cannot be in the future.
- The date will affect its position on the owner’s ledger card as it is sorted chronologically.
- The transaction will remain in the general ledger in the current month.
- To post in the Old Year, simply select the last date of the old financial year.
- The date will restrict to the Current Year if Old Year does not exist or has been flagged as being audited in Building Information.
- Type some details (max. 20 characters) that will appear on the ledger card into the Details field, and click Next.
- Referring to the table of levy periods, tag the required discount period boxes. When tagging these levy periods, if the gross amount was paid when selecting each discount period, the credit of the discount will need to be added to another fund.
- In some instances, you may see that the figure under the 'Total Due' column is a standard amount, and not a credit (with a '-' symbol). You will need to adjust the figures in the 'Reallocation' field to accommodate this so that no amounts remain unallocated, and green ticks are next to each field.

- In some instances, you may see that the figure under the 'Total Due' column is a standard amount, and not a credit (with a '-' symbol). You will need to adjust the figures in the 'Reallocation' field to accommodate this so that no amounts remain unallocated, and green ticks are next to each field.
- If necessary, click the Add Fund button and add the credit balance to the 'Reallocation' field.
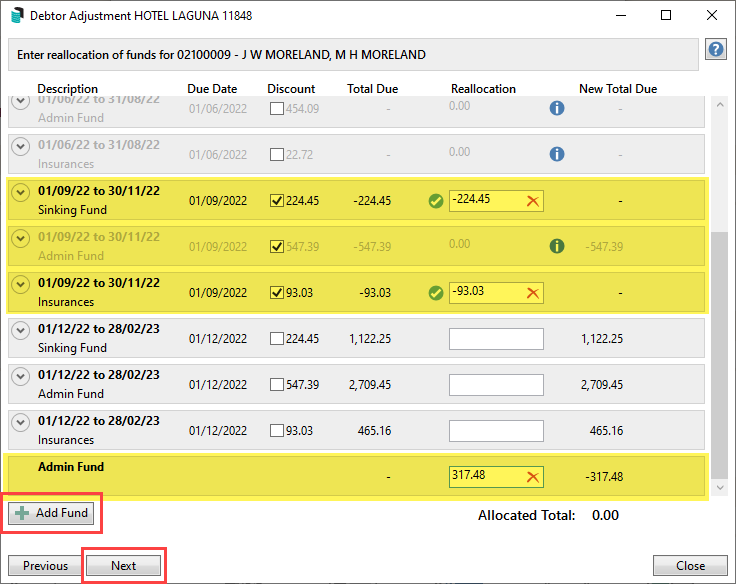
- Click Next and review the allocation and click Save.


The 'Reinstate Lost Disc' transactions have been created to allow the gross payment received for the Sinking and Insurance funds to be reallocated to the Admin Fund.

Discount Reinstatement Example for Net payment
Example: The 01/09/22-30/11/22 Admin, Sinking and Insurance levy was due 01/09/22. The Owner has paid below the Net amount of the levy on the 15/09/22. The Committee have approved the discount reinstatement request.

- Search or select Debtor Adjustment and select the top radio button called Reallocate funds for a lot, incl..., and click Next.
- Select the lot by either typing the owner name into the Lot field, or by clicking the more […] button to display the Account Code List window and double-click the lot.
- Change the Posting Date if necessary by typing in the date in the format of DDMMYY, or click the drop-down arrow to display a calendar and click the date.
- The date cannot be in the future.
- The date will affect its position on the owner’s ledger card as it is sorted chronologically.
- The transaction will remain in the general ledger in the current month.
- To post in the Old Year, simply select the last date of the old financial year.
- The date will restrict to the Current Year if Old Year does not exist or has been flagged as being audited in Building Information.
- Type some details (max. 20 characters) that will appear on the ledger card into the Details field, and click Next.
- Referring to the table of levy periods, tag the required discount period boxes. Based on the original receipt, if the levy period has been overpaid once the discount is given back, these credits will need to be shifted to another fund.
- In some instances, you may see that the figure under the 'Total Due' column is a standard amount, and not a credit (with a '-' symbol). You will need to adjust the figures in the 'Reallocation' field to accommodate this so that no amounts remain unallocated, and green ticks are next to each field.

After the discount has been given and the reallocation of funds.
- In some instances, you may see that the figure under the 'Total Due' column is a standard amount, and not a credit (with a '-' symbol). You will need to adjust the figures in the 'Reallocation' field to accommodate this so that no amounts remain unallocated, and green ticks are next to each field.
- Click Next and review the allocation and click Save.


The 'Reinstate Lost Disc' transactions have been created to allow the gross payment received for the Admin and Sinking funds to be reallocated to the Insurance Fund.

Reallocation of Funds Example
Example: Owner has been billed for Levies and an Invoice, with a recent payment made. This payment was intended for the outstanding invoice and needs to be reallocated all to the Other.

- Search or select Debtor Adjustment and select the top radio button called Reallocate funds for a lot, incl..., and click Next.
- Select the lot by either typing the owner name into the Lot field, or by clicking the more […] button to display the Account Code List window and double-click the lot.
- Change the Posting Date if necessary by typing in the date in the format of DDMMYY, or click the drop-down arrow to display a calendar and click the date.
- The date cannot be in the future.
- The date will affect its position on the owner’s ledger card as it is sorted chronologically.
- The transaction will remain in the general ledger in the current month.
- To post in the Old Year, simply select the last date of the old financial year.
- The date will restrict to the Current Year if Old Year does not exist or has been flagged as being audited in Building Information.
- Type some details (max. 20 characters) that will appear on the ledger card into the Details field, and click Next.
- Referring to the table of levy periods, enter the necessary allocations, then click Next.
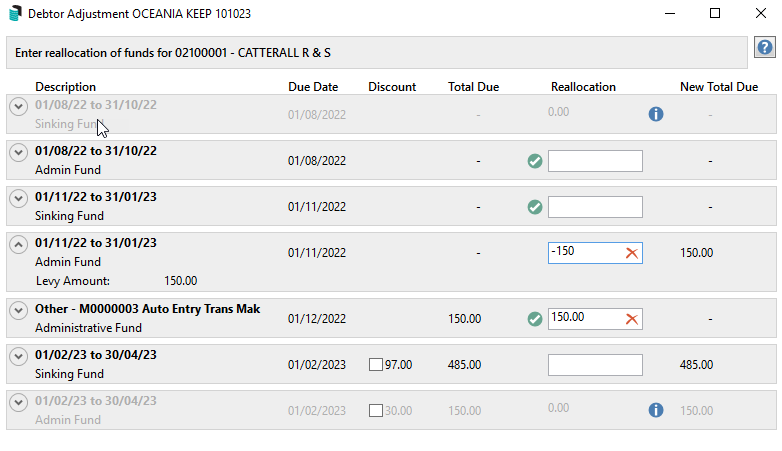
- Review the allocation and click Save.


Reallocate funds between Lots and Second Debtors
This is the appropriate option when moving balances between two different lots in the same building, in the main group, or between a lot and a second debtor.
- Search or select Debtor Adjustment and select the radio button Reallocate funds between Lots and Second Debtors, then click Next.
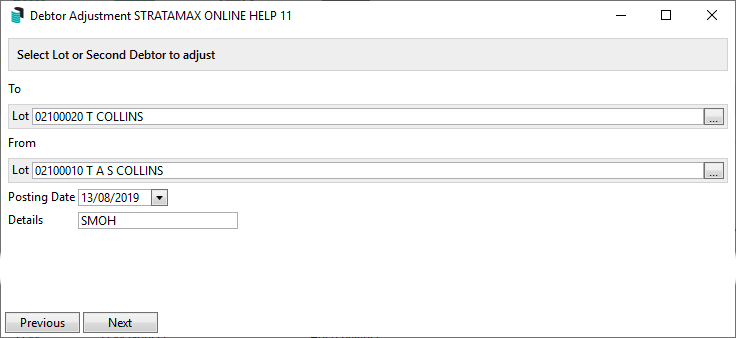
- Select the lot the balance is being moved to by clicking the more […] button and selecting the lot.
- If this building is a multi-OC, with several account groups, you can also click the Account Group drop-down (directly under the Search field) to select the required Account Group.
- Select the lot from which the balance is being moved by clicking the more […] button and selecting the lot.
- If this building is a multi-OC, with several account groups, you can also click the Account Group drop-down (directly under the Search field) to select the required Account Group.
- Change the Posting Date if necessary (this can be in the current or old year).
- The date will affect its position on the owner's ledger card as it is sorted chronologically.
- The transaction will remain in the general ledger in the current month.
- In the Details field, type the appropriate wording and click Next.
- This will appear in both lots' Details field on the ledger card.
- This field is limited to 20 characters due to limited space on the ledger card.
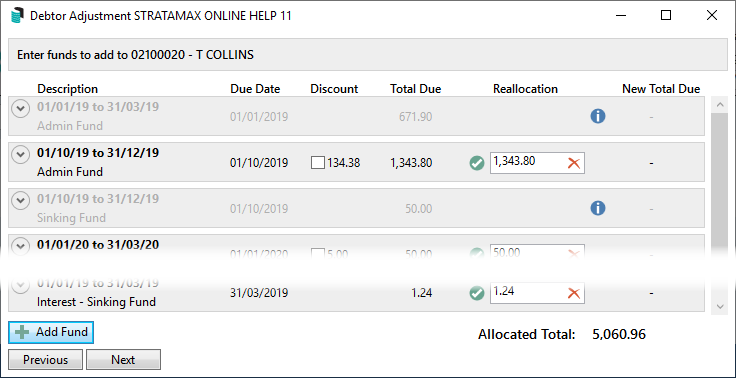
- In this screen, Enter the funds to add to…, enter the amounts that need to be added to the Lot, and click Next.
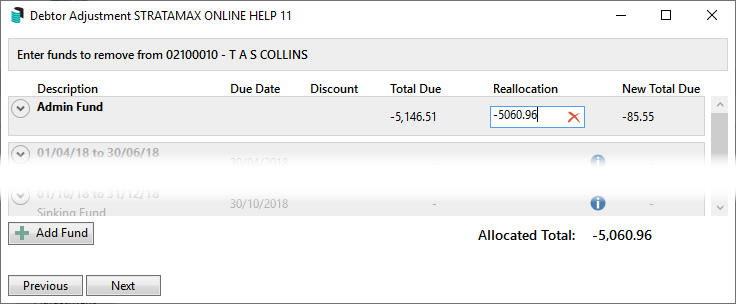
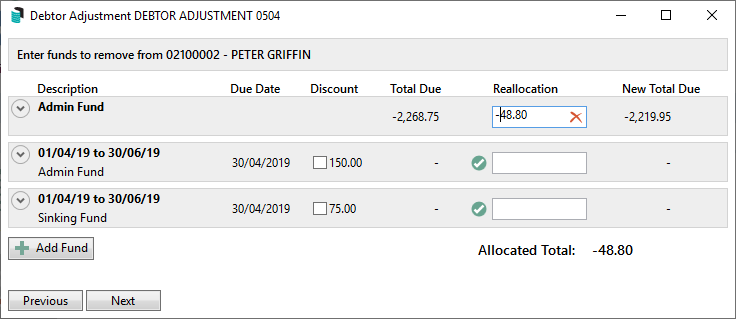
- In this screen, Enter funds to remove from…, enter the amounts that need removing from the Lot, and click Next.
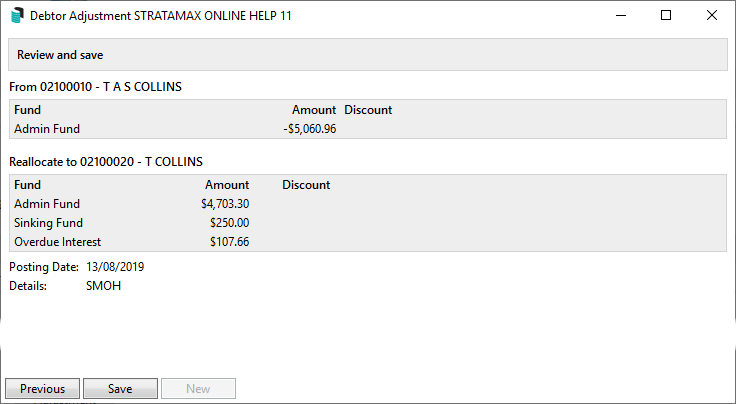
- This final screen, Review and save, gives you the last opportunity to check the balance movements before clicking the Save button to finalise.
- Once done, you can either click the New button to start another balance movement or close this window.


Reallocate balances between Sub Group Lots
This option will transfer a balance from a lot in the main group to/from a lot in the sub group. An example of when this will be used is when the lot owner makes a payment for both groups using the same reference number.
- Search or select Debtor Adjustment and select the radio button Reallocate between Lots and Second Debtors, then click Next.
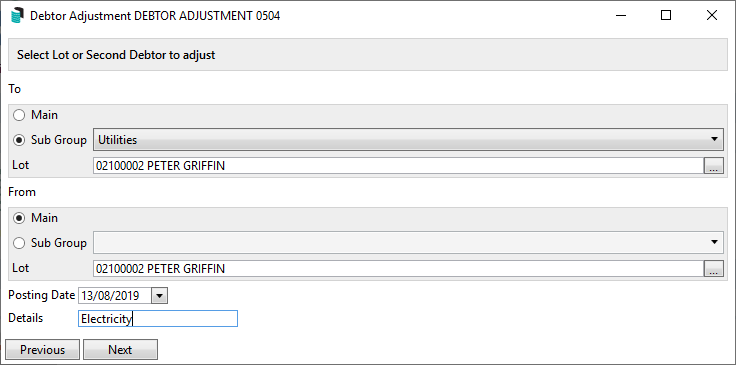
- Select the Sub Group radio button, and then use the drop-down to choose the Sub Group type, for example, Utilities.
- Select the lot the balance is being moved to by either typing the owner name into the top Lot field, which will display the lot list, or by clicking the more […] button.
- Select the lot from which the balance is being moved by either typing the owner name into the bottom Lot field, which will display the lot list, or by clicking the more […] button.
- Change the Posting Date if necessary.
- It must be in the current financial year and cannot be posted in the Old Year.
- The date will affect its position on the owner's ledger card as it is sorted chronologically.
- The transaction will remain in the general ledger in the current month.
- In the Details field, type the appropriate wording and click Next.
- This will appear in both lots' Details field on the ledger card.
- This field is limited to 20 characters due to limited space on the ledger card.
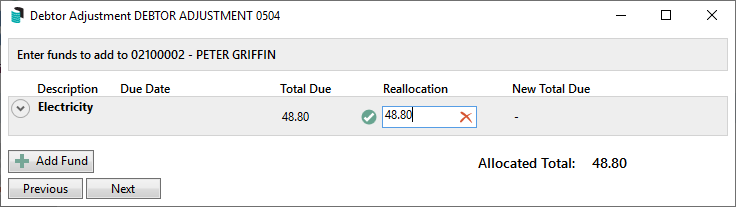
- Enter the funds to add to…, enter the amounts that need to be added to the Lot, and click Next.
- Enter funds to remove from…, enter the same amount in a fund to move the balance from the Lot, and click Next.
- Review and save allows you to check the balance movements before clicking the Save button to finalise.
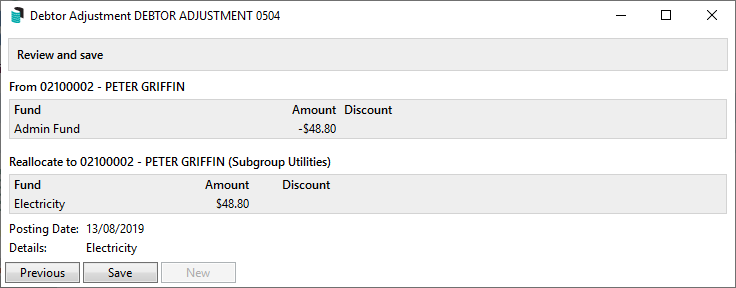
- Once done, you can either click the New button to start another balance movement or close this window.


Before and after processing fund allocations or crediting interest, the lot balance should be checked for each lot. This can be done by producing a Ledger Card, or by producing an Account Dissection Report to show the balances for the lot by fund if required. This will assist in understanding the outcome before completing the action. If the fund allocations have resulted in a credit and a debit on the same lot, then a rationalisation of sub balances should be completed.
If there are any transactions that equal 0.00, Transaction Report Manager can be used to hide any transactions on the Ledger Card.
Reverse Charged Interest / Credit Interest
This function is used to reverse or credit charged interest for a single lot. If the interest has been paid, when using this function and applying for the credit, there will be an additional screen to apply this credit balance to a levy fund.
- Search or select Debtor Adjustment and select the radio button Reverse Charged Interest, then click Next.
- Select the lot to reverse the interest by either typing the owner name into the top Lot field, which will display the lot list, or by clicking the more […] button.
- Change the Posting Date if necessary.
- The date must be in the current financial year, but it cannot be in the future.
- The date will affect its position on the owner’s ledger card as it is sorted chronologically.
- The transaction will remain in the general ledger in the current month.
- In the Details field, type the appropriate wording and click Next.
- This will appear in the Details field on the ledger card.
- This field is limited to 20 characters due to limited space on the ledger card.
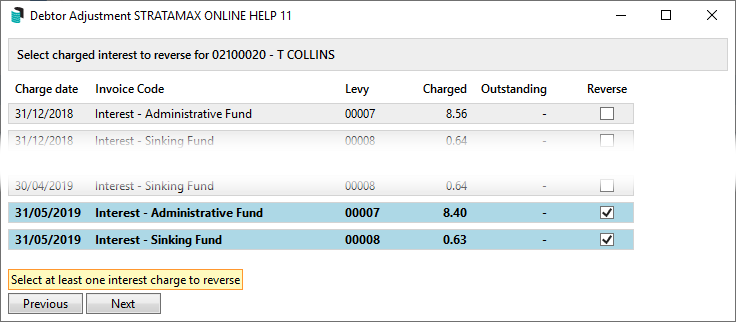
- In this screen, select the periods for interest reversal and click Next.
- If this interest has been paid, either using an existing fund or click Add Fund to allocate the credit balance to a fund. Click Next.
- In this final screen, Review and save, check the changes made one last time before clicking Save.

Before and after processing fund allocations or crediting interest, the lot balance should be checked for each lot. This can be done by producing a Ledger Card, or by producing an Account Dissection Report to show the balances for the lot by fund if required. This will assist in understanding the outcome before completing the action. If the fund allocations have resulted in a credit and a debit on the same lot, then a rationalisation of sub balances should be completed.
If there are any transactions that equal 0.00, Transaction Report Manager can be used to hide any transactions on the Ledger Card.
Debtor Adjustment in GLMax
Debtor Adjustment can be used in GLMax to easily reallocate funds within a building or reallocating funds between buildings. In order to access Debtor Adjustment in GLMax, you must have the 'Allow' permission in Security Setup.

Reallocate Funds for a Building
- From the Building Selector Tool, open your GLMax company.
- Search or select Debtor Adjustment and select the radio button Reallocate funds for a Debtor, then click Next.
- Select the building to adjust by typing the building name into the top Debtor field, which will display the building list, or by clicking the ellipsis […] button.
- Change the Posting Date if necessary by typing in the date in the format of DDMMYY, or clicking the drop-down arrow to display a calendar and click the date.
- The date must be in the current month.
- To post in the Old Year, select the last date of the old financial year.
- The date will be restricted to the Current Year if Old Year has not been audited.
- Type some explanatory notes into the Details field, and click Next.
- This will appear in the Details field on the general ledger.
- This field is limited to 20 characters.
- Enter amounts into the 'Reallocation' fields to the appropriate invoice code/s, or click the 'Add Fund' button in the bottom left to select another invoice code to reallocate.
- Click Next, and the Review and save screen will appear.
- Check over the amounts, and click the Save button to commit the changes, or click the Previous button to make further changes.
Reallocate Funds between Buildings
- From the Building Selector Tool, open your GLMax company.
- Search or select Debtor Adjustment and select the radio button Reallocate funds between Debtors, then click Next.
- Select the building the balance is going 'To' and the building the balance is coming 'From' by either typing the building name into their respective fields, which will display the building list or by clicking the ellipsis […] button.
- Change the Posting Date if necessary by typing in the date in the format of DDMMYY, or clicking the drop-down arrow to display a calendar and click the date.
- The date must be in the current month.
- To post in the Old Year, simply select the last date of the old financial year.
- The date will be restricted to the Current Year if Old Year has not been audited.
- Type some explanatory notes into the Details field, and click Next.
- This will appear in the Details field on the general ledger.
- This field is limited to 20 characters.
- In the Enter Funds to Add screen, enter the amount into the 'Reallocation' fields for the required invoice code/s or click the 'Add Fund' button in the bottom left to select another invoice code to reallocate. Then click Next.
- In the Enter Funds to Remove screen, enter the amount into the 'Reallocation' fields to the required invoice code/s, or click the 'Add Fund' button in the bottom left to select another invoice code to reallocate. Then click Next.
- In the Review and save screen, check over the amounts, click the Save button to commit the changes, or click the Previous button to make further changes.
