Utility Sub-Groups will allow a final bill to be issued to the debtor who has vacated and not yet paid the balance. This process is for finalising the debtors account and transferring the bill to a holding account (Second Debtor) until paid. Throughout this process, it will move the payment reference number from the debtor to the second debtor account to allow for easy payment to be made.
The final bill cannot be issued if the utility account is linked to an owner account, so the main Roll data link will need to be removed first.
Producing the Final Bill
The main Roll data link will need to be removed first if there is one in place, so that the Final Reading will move the balance of the account to a Secondary Debtor Maintenance record ready for invoicing. The original account is renamed as 'FINALISED' pending the insertion of a new name. The lot and unit number will be retained in the Finalised Debtor record, so when it is used again for the new owner / tenant, this detail is visible. The creation of the Finalised account occurs only when the bill is printed, so ensure the bill is printed.
Sundry charges will be removed from meter maintenance for the debtor code unless it is ticked in the Utility Billing > File > Configuration setting > Set No Delete Sundry Charges for Finalising Accounts.
Transaction Lists and Ledger Cards on finalised accounts may be printed using the Finalised A/C report, which can be accessed via Utility Billing > GoTo > Finalised Accounts Report. If there was a security deposit held for this account, it is transferred and credited to the finalised account.
Where there is a change of ownership in the Roll menu for a main account that is linked to a utility account, any balance on the utility account is retained and not transferred. The owner's name will be changed when the transfer goes through, and the new owner will be responsible for the payment of any balance on the utility account. This is done on the basis that an adjustment is made at settlement, or at least a suitable amount has been withheld.
- From the Utility Sub-Group open the Utility Billing menu.
- Select the Reading Entry tab.
- Enter the Reading Date (this will be the final reading date).
- Select the Supply Type from the drop-down menu in the bottom of the screen.
- Click the Change A/c button.
- Select the account to enter a final meter reading for, the click OK.
- The Meter, Tariff and Last Reading Date will be displayed for this account.
- Click in the New Reading cell for the account and enter the new meter reading.
- Press the Enter key or click in another cell to start the automatic calculation of kWh, Days, Months and Amount.
- Any sundry charges should automatically be applied to the account.
- If a Final Reading Fee is to be added to the bill, click the Add Sundry Charge button, and select the Final Reading Tariff.
- Tick the Final Reading box.
- Click the Save button.
- Click Yes when prompted 'This account has been set for final reading. Is this correct?'.
- Select the Process Billing tab and select this account to process the bill for it.
- Select the Print Bills tab and select this account to print the bill for it.

Refund a Finalised Account
This process is to apply when a refund is required for a finalised account in the Utility Group, after the final reading has been completed. A Refund Clearing Account needs to be setup for this process (see set up instructions).
- From the Utility Sub-Group open the Utility Billing menu.
- Click GoTo > Refunds.
- Highlight the Utility Account.
- Click Proceed.
- Check the details that appear, then click OK.
Retrieve From Finalised
If an account has been finalised but has been issued with an error, the account will need to be retrieved from second debtors back to the current debtors to enable a correction.
From the Utility Group.
- From the Utility Sub-Group open the Utility Billing menu.
- Click Options > Retrieve from Finalised.
- Select the debtor account to retrieve from Finalised Account, then click OK.
- Once the bill has been retrieved from finalised, reverse the last bill, then edit the current reading, ensuring to mark it as final reading, then proceed to process and print the bill.
Finalised Accounts Report
This report shows the aged balance of all finalised accounts.
- From the Utility Sub-Group open the Utility Billing menu.
- Click GoTo > Finalised A/c s Report, then click OK.

Managing Finalised Accounts / Second Debtors
It is recommended adding the second debtors into Legal Action, which will supply one report to work off globally.
- From the Utility Sub-Group open the Utility Billing menu.
- Select the Arrears tab, then click the Legal Action button.
- Click the Change Agent button to select the debt collection agents.
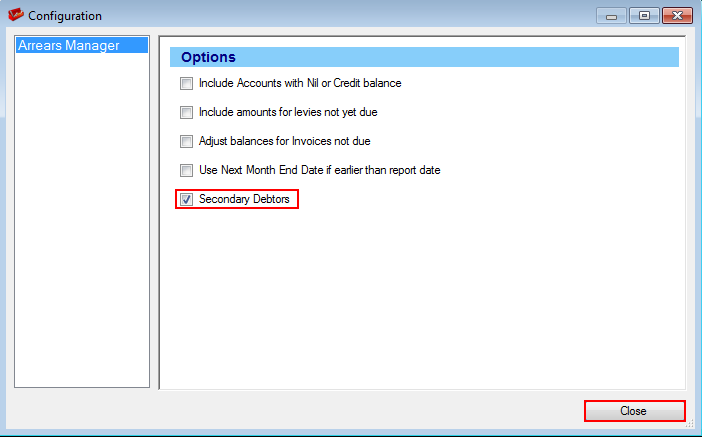
- Back in the Legal Action menu, click Options > Arrears Manager, and tick the Secondary Debtors box before clicking Close.
- The list of accounts in arrears will be displayed, which can be reviewed then closed.
- Now in the Legal Action menu, click the Add button.
- Select the building in the Building List, then click OK.
- Select the account, then click OK.
- Select Options > No Print or Email, to not send these reports to the debt collection agent.

Running the Global Overdue Report for Finalised Accounts
- From within the Legal Action menu, click Options.
- Select Agent Summary Report Only for a PDF report.
- Select Agent Summary Report Only to Excel for to open the report in Excel.
- Tag the agent (Utilities Finalised Accounts) that has been set up, then OK.
- Tag the utility buildings to include in the report, then OK.
Updating Activity on Legal Action (Utility Finalised Accounts)
For any payments that are being made by second debtors, having these accounts within the Legal Action menu will create an entry within the Process Bank Statements Log Manager (item 10) for the received payment. This process accompanies the notification process and will allow any activity to be updated on the account.
- From the Legal Action menu, select Options > Update Only.
- Click Yes when prompted 'Are you sure you want to Update Only?'.
- Tag the required debt collection agencies, then click OK.
- Tag the required buildings, then click OK.
- Balances on all finalised accounts will update with any new activity on these accounts.
- Any debtors with a nil balance can then be deleted from the schedule.
