 | The instructions in this article relate to Resubivision/ Reallocate. The icon may be located on your StrataMax Desktop or found using the StrataMax Search. |
The Resubdivision/Reallocation screen is used to simplify the resubdivision of lots and amend lot entitlements for one or more lots.
This menu provides step-by-step screens for data entry and reports to check data validity before processing, and once applied, will automatically update the Roll when the final step is completed.
There is also the capacity to add new lots without affecting the entitlements of the existing lots. In the case of a developer, information can be populated from the Roll of an existing lot for the new lots, providing time-efficient, accurate, and streamlined set-up procedures.
It is essential to review the registered plan and entitlement schedules before initiating any of the processes provided in this module, to ensure accurate input of the Date of Registration and entitlement schedule.
Normally, there will be a remaining balance on extinguished lots (resub lot), which must be reallocated via any of the four options. With these options, it is important to understand that once a lot has been created in StrataMax, it cannot be deleted/ removed but rather extinguished, resubdivided or amended for the overall entitlements.
Please also check out our video covering the new Resubdivision/Reallocate.
Important things to consider
The following areas require consideration before applying for any resubdivision or the addition of new lots.
- Action the changes as soon as the registered documents are received.
- Lock the building and keep it locked until the resubdivision process has been completed successfully.
- Data Storage, with a custom backup destination. Data Restore is not generally completed; this is a critical backup that can be used by the StrataMax Support if required as a last resort. If the building has been unlocked or there have been any transactions, restoring the data is not an option.
- Building Information / Audit field. You cannot adjust any levies that were generated in the old year, including the first quarter of the current year, as this process will change the audited financial account balances.
- Have a plan of what this process should result in, including a thought-out step-by-step document/notes to refer to. For example:
- The date of registration and the levy period that this will impact.
- Are there custom levy schedules involved? If so, future custom levies should be deleted and re-created once the resubdivision has been completed.
- Is there a balance lot, and if so, is there a balance on this lot? How will this balance be distributed?
- If there are two schedules to be adjusted, treat them as separate resubdivisions. For example, the contribution schedule, which affects Admin and Sinking Fund levies, should be treated as one process. And if the interest schedule changes, complete this as a separate resubdivision.
- Review Levy Registers, including the Summary, before commencing and understand how this date and new lots may affect future levies.
- Read the prompts on each screen, as they can affect the results of the resubdivision.
- Review the Summary Report at the last step before processing the resubvision; it can be reviewed at any stage once each screen has been completed.
- Please reach out to our Full Service team if you would like this process to be completed on your behalf (standard charges apply). This can be sent to fullservice@stratamax.com and should include a clear request with the registered documents.
Security Setup
This particular permission should be considered a high-level process and made available to experienced users only.
Access to this menu is held within Security Setup under the Roll menu category.
Resubdivision to Add New Lots
- Search or Select Resubdivision / Reallocate.
- From the Main Menu - select Resubdivide to add new lots.
- Enter the Date of Registration in Plan/ Resubdivision Date.
- Select Lot for Resubdivision by clicking on the box with …, and selecting the lot. The resubdivided lot will automatically have the Lot Type changed to 'Resubdivided' in the Building Information Lot Type Editor screen at the end of the process.
- Select Next to move to the next setup screen.

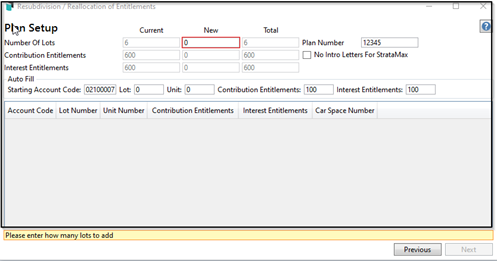
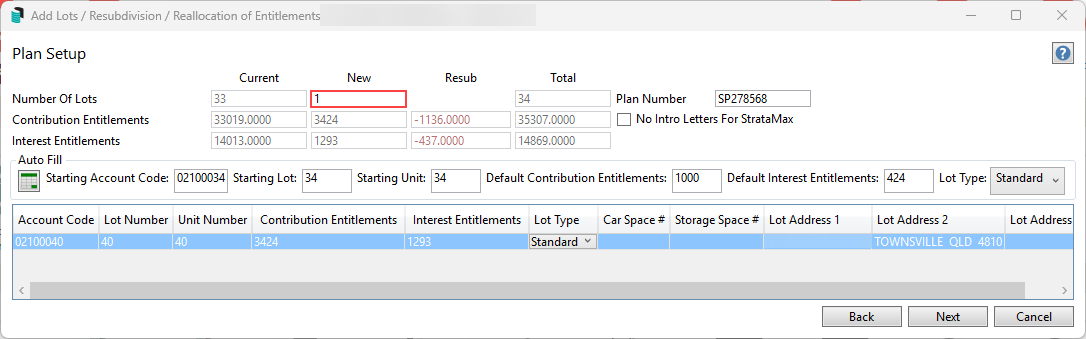
Plan Setup

- Enter Number of New Lots (total Lots will automatically update).
- Enter total of new entitlements - Cancellation of Resub entitlements is shown as a reduction.
- Tag No Intro Letter for StrataMax, as these are issued at a later stage when the Owners Info is updated to the purchasers of the New Lots.
- Auto Fill – enter the starting Account Number – ensure the account number entered matches the Starting Lot Number, enter the unit number.
- Enter the most common entitlement value for the new lots (contribution and interest). For some States there will be only 1 entitlement value per lot (entitlement liability).
- The table will automatically populate based on the Auto Fill information, with sequential numbers populating to the table.
- Click in each field that requires editing to enter the correct values, or on the keyboard press enter to move down to the next field.
- For staged developments there is usually a new balance lot – ensure the Account Code is edited to match the lot number.
- (See example above - Added lots 15 to 20 plus balance lot 101. The final new lot in the table is lot 101, so the account number code is edited to 02100101, as well as the lot number).
- Ensure all entitlements are correct as per the Registered Schedule of Entitlements, and edit where necessary.
- The entitlements total will update in the top section, as well as showing the reduction by the cancelling of the Resubdivision Lot. This provides a check point that the total entitlements agree with the registered schedule.
- Select Next to move to the next setup screen.
Owners Details
- This screen is where the owner's details for the new lots are populated.
- By selecting the Auto Fill arrow, a drop-down box appears with the option to Copy from Existing account (i.e. Resubdivided Lot) – information from the Roll for this lot will be copied to the new lots.
- There is also an option to select another lot from the existing Roll to emulate details for new lots.
- Alternatively, manual entry of owner details may be input for any or all new lots.
- Normally where a staged development is being setup, the new lots are in the name of the Developer until such time as sales are finalised, therefore at the setup stage the developer will be the owners of all lots.
- Select Next to move to the next setup screen.
Levy Adjustment
Once the levy adjustment process has been completed, these will create Pro-Rata entries in Levy Management. These should not be edited. Please contact Support if there an example where this is required.

- The Plan / Resub Date will automatically populate at top – based on the date entered in Screen 1, and will also populate the Date for Levy Adjustment.
- However, if the adjustment to levies is required to be affected from a future date (e.g. date of start of next levy period) the Date for Levy Adjustment may be edited to the required date.
- Each levy period is listed, including future levies, and can be included (or un-tick if recalculation is not required), with the pro-rata adjustments for the affected levy period highlighted in Green.
- The first line for each levy displays the original levy, showing cancellation of the full levy for the Resub Lot, and the New Lots are added and levied for the full period.
- A second line, highlighted in Green, shows the pro-rata debit for the resub Lot and pro-rata credit for the New Lots - calculated from the start of the levy period to the day prior to the date of Registration of the Resubdivision. Period shows the date range for the pro-rata adjustments. If the current levy is unticked for recalculation (i.e. the Date for Levy Adjustment is to be from the next levy period), the pro-rata adjustment line will be removed.
- The pro-rata adjustments are automatically calculated based on the number of days prior to the date of registration as a ratio of the days in the levy period.
- The Details button next to each Levy in the table can be clicked to display all details of the charges to the Lots.
- Any of the Levies may be unticked in the Include column to exclude that levy from recalculation. This is another option for excluding the current levy from recalculation.
- The future levies in the table will be updated to include the new lots at the appropriate entitlement for each, and set the Resubdivided lot to zero entitlements, and becoming inactive in the Building Information Lot Type Editor screen.
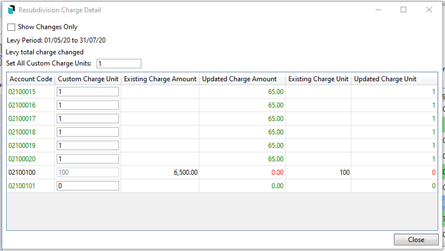
Custom Levies
- If there are Custom levies in the table, and the new Lots are to be included, the original levy will need to be edited by clicking on the Details button.
- A table showing the new Lots will appear, and any or all may be included for recalculation by entering a charge rate (either entitlement or appropriate charge rate as per the custom schedule) for each Lot to be added to the Custom levy. The Set all Custom Charge Units box can be utilised to auto populate the charge rate to all new Lots. For any Lot to be excluded from the Custom Levy the charge rate is entered as 0.
- Future Custom Levies will not automatically update, and will require the new Lots to be added by editing the relevant levy in Levy Management.
- Select Next to move to the next setup screen.

Reverse or Adjustment levy
When doing a Resubdivision or Change of Entitlements where levies are affected, there’s an option to choose how the adjustment is done. If, for instance, the current Entitlements per lot are 1 but should be 10, and this has been updated in the Entitlement screen when you are in the Levy Adjustment screen, the following needs to be taken into account:
Option 1 – Reverse
- Reverse the existing levy
- Create a new levy for the final amount
- In this example, it would have reversed the levy with 1 unit of entitlement and created a levy with 10 units of entitlement.
Option 2 – Adjustment
- The original levy is left behind
- Create a new levy with just the adjustment difference
- When this option is selected, it creates a levy with 9 units of entitlement, with the existing 1 unit to match the total of 10.
This is determined based on whether you click Reverse or not. The adjustment feature simplifies handling discounts and other scenarios, while presenting two distinct lines for levy periods on the certificate—an important consideration for preference on this document.
The Reverse option is limited when discounts are applied and is not applicable when the old year has been marked with a Y for an Audit in Building Information. It does provide one line for the certificate.

Resub Remaining Balance

- After the levy adjustment process has been completed, there is likely to be a remaining balance on the now extinguished (cancelled) Resubdivided Lot.
- This section provides 4 options by which the balance for this Lot can be cleared:
- Leave Balance on the Resub Lot. Often if the pro-rated levy had been paid in full the resub process will result in a credit balance remaining on the Lot. This may be left on the Lot for refunding to the Developer.
- Redistribute Evenly. This will distribute any Resub remaining balance on the extinguished Lot evenly to all new Lots (regardless of whether the balance is a debit or credit).
- Redistribute by Entitlement. This option will distribute the Resub remaining balance to the new Lots in relation to each lot's entitlement (contribution).
- Move to Lot. This option is commonly selected where there is a new balance Lot which will be retained by the developer.
- Select Next to move to the finalise screen.
Finalise
The very last screen provides a report for the purpose of checking all setup data prior to selecting the Process Resubdivide Lot button.

- It is strongly recommended that the Print Report button is clicked, and the report checked.
- The report is in 3 parts:
- Lot Changes: This details the new Lots added to the relevant levies for the selected Date for Levy Adjustment. i.e new Lots added and the Resubdivided Lot deducted. The methodology applied for the Resubdivision, is that the Resubdivide Lot is credited for the full Levy period, and the New lots are debited for the Full Levy period. The pro-rata adjustments (debit or credit) for the period prior to the date for Levy Adjustment are then shown in Levy Pro-Rata Adjustments.
- Levy Adjustments: This section details changes to the Resubdivision Lot for all levies. The levy for the Resub period is cancelled and the charge rate for future levies reset to 0.
- Levy Pro-rata Adjustments: This section details the Debit pro-rata charge for the Resubdivision Lot up to the day before date of Registration. In addition the pro-rata credit adjustments applied to the new Lots for the period from the start of the levy period to the day prior to the date of Registration (or Date for Levy Adjustment, if different).
- If any data entered is incorrect, click on the Previous button at the bottom to return to the appropriate setup screen to edit where required, then click Next.
- Tag Data Storage Before Process.
- Select Process Resubdivide Lot.
- Close.
All processes will be run to effect all the changes required to complete the Resubdivision. The Roll is updated to rename the Resubdivided Lot as Resubdivided, and include the new lots.
Ledger Cards will show the changes, and Levy Notices may be printed for the new lots, if required.
These are normally required if settlements are imminent for the purchasers of the new lots. After settlements are finalised and the Roll updated to the purchaser's name, it is normally the appropriate time to issue the Intro Letters for StrataMax.
Change Existing Lot Entitlements
This option is selected to change existing lot entitlements for one or more lots, as per the new registration document, or to amalgamate 1 or more lots. Note that an amalgamation will normally require all entitlements from one lot to be moved to another lot (normally both having the same owners), and therefore will process as a reallocation of entitlements.
When applying this process, if there is a change in entitlements, a reverse option will be available when the levies are presented. It is recommended to use that option. If you are adding new lots, follow the instructions below and do not reverse the levies.
If the registration of a new plan includes an original lot to remain but a change of the entitlements is to occur on the original lot and to include new lots as a result, this can be achieved by using the 'Add New Lots' process first, and then applying again to 'Change existing lot entitlements' for the original lot, which is a two-step process. The finished result should match the schedule of entitlements.
- Search or select Resubdivision/ Reallocation.
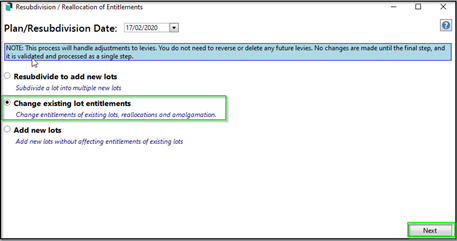
- Enter the date of Registration of the Change of Entitlements in Plan/Resubdivision Date.
- Select Change existing lot entitlements.
- Select Next to move to the next setup screen.

Change Entitlements Screen
- All existing lots are shown in the table and entitlements can be edited as per the new registration document entitlement schedule.
- As entitlements are amended the total at top of the pages is updated. The total after all entitlement changes have been updated should match what is shown on the registration document entitlement schedule. This is an important check before proceeding to the next screen.
- Select Next to move to the next setup screen.
Levy Adjustment
Once the levy adjustment process has been completed, these will create pro-rata entries in Levy Management. These should not be edited. Please contact Support if there an example where this is required.
The 'Levy Adjustment' screen shows the recalculated charges to the affected lots, with the system calculating the rate and adjustment of each levy based on the Plan/Resubdivision date entered in the main screen.
- The schedule of levies shows all levies from the Levy Management schedule, and details of the current and future levies can be viewed by clicking on the details button.
- The current levies have a pro-rata adjustment line detailing the adjustments to lots with a change of entitlements.
- Future levies are recalculated based on the new entitlements for each lot.
- Select Next to move to the finalise screen.
- Ensure to click Finish.

Finalise
Two reports are provided and should be checked prior to selecting Process Entitlement Changes
- New Lots: This lists the Lots that have had a change of entitlements and shows the new entitlements recorded for each lot.
- Levy Changes: Shows the new entitlements and levy charge for each lot where a change of entitlement has occurred. The report shows current and future levies.
- Click Finish.
- Close.
Add New Lots
This option allows new lots to be added to the scheme without affecting existing lots (i.e. there is no resub lot).
If the registration of a new plan includes an original lot to remain but a change of the entitlements is to occur on the original lot and to include new lots as a result, this can be achieved by using the 'Add New Lots' process first, and then applying again to 'Change existing lot entitlements' for the original lot, which is a two-step process. The finished result should match the schedule of entitlements.
- Search or select Resubdivision/ Reallocation.
- Enter the Registration date of the Addition of New Lots in the Plan/Resubdivision Date field.
- Select Add New Lots.
- Select Next to move to the next setup screen.

Add New Lots (Linked Debtors in Sub-Group)
If an existing Sub-Group is attached to the Main, there is an option to add these new lots (Debtors) to the Sub-Group simultaneously. If this is the case, tick Add Linked Debtors in Sub-Group. This will create a data link between each main Roll and the sub-group Debtor Maintenance record. Unlink the data links if these contacts are different between the groups.
- Search or select Resubdivision/ Reallocation.
- Enter the Registration date of the Addition of New Lots in the Plan/Resubdivision Date field.
- Select Add New Lots and tick Add Linked Debtors in Sub-Group.
- Select Next to move to the next setup screen.
Once the add new lots process has been finalised, using the below steps to go to the Sub-Group and add meters to the Utility Billing / Meter Maintenance area if these new lots are to be included in any utility billing process.
Plan Setup
- Check the new Plan number from the registration document.
- Enter Number of New Lots (total lots will automatically update).
- Tag No Intro Letter for StrataMax, as these are issued at a later stage, once the Owners' Info is updated for purchasers of the New Lots.
- Auto Fill – enter the starting Account Number; ensure the entered account number matches the Starting Lot Number, and enter the unit number.
- Enter the most common entitlement value for the new Lots (contribution and interest) – for some states, there will be only 1 entitlement value for each Lot.
- The table will automatically populate based on the Auto Fill information, with sequential numbers populating the table.
- Click in each field that requires editing to enter the correct values. Press enter to move to the next field down - this streamlines the data entry where large numbers of Lots are added.
- Select Next to move to the next setup screen.

Plan Setup - Import Excel spreadsheet
Depending on what how many lots are in the building, if this information is available via Excel there is an option to import this information at the plan setup screen. This information does need to be formatted with certain columns as per the example below before importing this spreadsheet.

- Tag No Intro Letter for StrataMax , as these are issued at a later stage when the Owners Info is updated to purchasers of the New Lots.
- Auto Fill – select the Excel icon and locate the completed spreadsheet and click Open.
- Check the new Plan number from the Registration document and enter this.
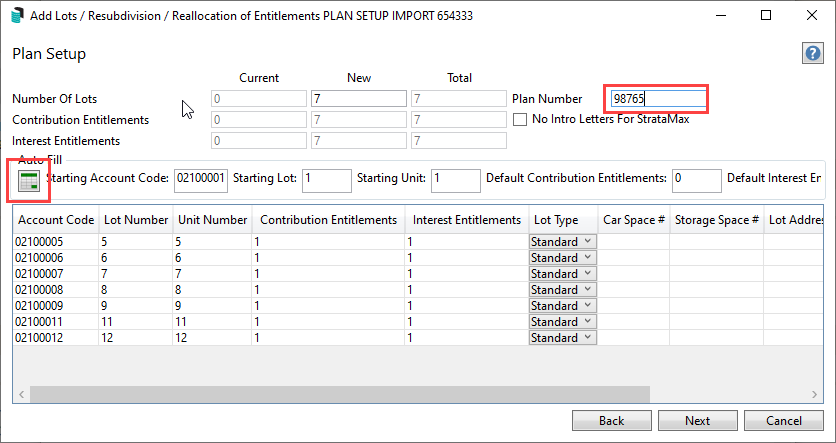
- Review the table of the plan setup and check that each entry is as expected.
- Click Next.

Owner Details
- This screen is where the Owner's details for the new Lots are populated.
- By selecting the Auto Fill arrow, a drop-down box appears with the option to Copy from Existing account. Select the Lot from the existing Roll to emulate details for new Lots.
- Alternatively, manual entry of Owner details may be input for any or all new Lots.
- Select Next to move to the next setup screen.
Levy Adjustment
Once the levy adjustment process has been completed, these will create Pro-Rata entries in Levy Management. These should not be edited. Please contact Support if there is an example where this is required.
- The Plan / Resub Date will automatically populate at top – based on the date entered in Screen 1 and will also populate the Date for Levy Adjustment.
- However, if the adjustment to levies is required to be affected from a future date (e.g. date of start of next levy period) the Date for Levy Adjustment may be edited to the required date.
- The 'Levy Adjustment' screen displays all levies from the Levy Management schedule.
- The original levies for the current period (in which the New Lots registration date occurs), showing the new Lots added.
- A second line, highlighted in green for the current levies, is inserted showing the pro-rata adjustments to be posted for the new Lots. If the current levy is unticked for recalculation (i.e. start of next levy period selected for date of Levy Adjustment) the pro-rata adjustment line will be removed.
- The pro-rata adjustments are automatically calculated based on the number of days prior to the date of registration as a ratio of the days in the levy period.
- The Details button next to each levy in the table can be clicked to display all details of the charges to the lots.
- Any of the levies may be unticked in the Include column to exclude that levy from adjustments. This is another option for excluding the current levy from recalculation.
- The future levies in the table will be updated to include the new Lots at the appropriate entitlement for each lot.
- Select Next to move to the finalise screen.
Finalise
The last page reports the proposed changes, in three sections:
- New Lots.
- Pro-rata adjustments for the new Lots for the period of the levy prior to date of Registration.
- When data is checked and correct, select Process Add Lots to complete the process.
Amalgamating Multiple Lots into One Lot
If multiple lots are to be amalgamated into one lot, the following process applies. It should be noted that having an action plan of how this process should finalise is recommended and will be done in multiple stages.
- Search or select Resubdivision/ Reallocation.
- Enter the Registration date of the Addition of New Lots in the Plan/Resubdivision Date field.
- Select Resubdivide to add new lots and ...button to select the Lot for Resubdivision.
- Select Next to move to the next setup screen.
Plan/Setup
- Check the new Plan number from the registration document.
- Enter Number of New Lots (total lots will automatically update).
- Tag No Intro Letter for StrataMax, as these are issued at a later stage, once the Owners' Info is updated for purchasers of the New Lots.
- Auto Fill – enter the starting Account Number; ensure the entered account number matches the Starting Lot Number, and enter the unit number.
- Enter the most common entitlement value for the new Lots (contribution and interest) – for some states, there will be only 1 entitlement value for each Lot.
- The table will automatically populate based on the Auto Fill information, with sequential numbers generated.
- Click in each field that requires editing to enter the correct values.
- Select Next to move to the next setup screen.

Owner Details
- This screen is where the Owner's details for the new Lots are populated.
- By selecting the Auto Fill arrow, a drop-down box appears with the option to Copy from Existing account. Select the Lot from the existing Roll to emulate details for new Lots.
- Alternatively, Owner details may be manually entered for any or all new Lots.
- Select Next to move to the next setup screen.

Levy Adjustment
Once the levy adjustment process is complete, these will create Pro Rata entries in Levy Management. These should not be edited. Please contact Support if there is an example where this is required.
- The Plan / Resub Date will automatically populate at the top – based on the date entered in Screen 1, and will also populate the Date for Levy Adjustment.
- However, if the adjustment to levies is required to be affected from a future date (e.g. date of start of next levy period) the Date for Levy Adjustment may be edited to the required date.
- The 'Levy Adjustment' screen displays all levies from the Levy Management schedule.
- The original levies for the current period (in which the New Lots registration date occurs), showing the new Lots added.
- A second line, highlighted in green for the current levies, has been inserted to show the pro-rata adjustments to be posted for the new Lots. If the current levy is unticked for recalculation (i.e. start of next levy period selected for date of Levy Adjustment) the pro-rata adjustment line will be removed.
- The pro-rata adjustments are automatically calculated based on the number of days prior to the date of registration as a ratio of the days in the levy period.
- The Details button next to each levy in the table can be clicked to display all details of the charges to the lots.
- Any of the levies may be unticked in the Include column to exclude that levy from adjustments. This is another option for excluding the current levy from recalculation.
- The future levies in the table will be updated to include the new Lots at the appropriate entitlement for each lot.
- Select Next to move to the next screen.

Remaining Balance

It is recommended to review an Aged Balance List or an Account Dissection Report to select the lot account with the largest balance for transitioning. This will reduce clicks in Debtor Adjustment with adjusting lot balances.
Finalise
The last page reports the proposed changes in three sections, which are important to review.
- New Lots.
- Pro-rata adjustments for the new Lots for the period of the levy prior to date of Registration.
- When the data is checked and correct, select Finish to complete the process.
Change of Existing Entitlements
Reopening the Add New Lots / Resubdivision / Reallocation of Entitlements window is where the other lots that have been extinguished are actioned as stage 2 of this process of amalgamating multiple lots into one.
- Search or select Resubdivision/ Reallocation.
- Enter the Registration date of the Addition of New Lots in the Plan/Resubdivision Date field. This will be the same date used in the first stage of the amalgamation process.
- Select Next to move to the next setup screen.
Change Entitlements Screen
With the amalgamation process having extinguished one of the lots, to create the new lot, the following process will allow the others to now be extinguished too, with the overall result being the correct entitlements for the building and new lot.
- All existing lots are listed in the table, and entitlements can be edited in accordance with the new registration document's entitlement schedule.
- As entitlements are amended, the total at the top of the pages is updated. The total after all entitlement changes are applied should match the amount shown on the entitlement schedule in the registration document. This is an important check before proceeding to the next screen.

Levy Adjustment
- The Plan / Resub Date will automatically populate at the top – based on the date entered in Screen 1, and will also populate the Date for Levy Adjustment.
- However, if the adjustment to levies is required to be affected from a future date (e.g. date of start of next levy period) the Date for Levy Adjustment may be edited to the required date.
- The 'Levy Adjustment' screen displays all levies from the Levy Management schedule.
- The original levies for the current period (in which the New Lots registration date occurs), showing the new Lots added.
- A second line, highlighted in green for the current levies, has been inserted to show the pro-rata adjustments to be posted for the new Lots. If the current levy is unticked for recalculation (i.e. start of next levy period selected for date of Levy Adjustment) the pro-rata adjustment line will be removed.
- The pro-rata adjustments are automatically calculated based on the number of days prior to the date of registration as a ratio of the days in the levy period.
- The Details button next to each levy in the table can be clicked to display all details of the charges to the lots.
- Any of the levies may be unticked in the Include column to exclude that levy from adjustments. This is another option for excluding the current levy from recalculation.
- The future levies in the table will be updated to include the new Lots at the appropriate entitlement for each lot.
- Select Next to move to the next screen.
Finalise
The last page reports the proposed changes in three sections, which are important to review.
- New Lots.
- Pro-rata adjustments for the new Lots for the period of the levy prior to date of Registration.
- When the data is checked and correct, select Finish to complete the process.
Debtor Adjustment
Any remaining balance on the change of entitlement lots should be reviewed and transferred to the new lot account. This will be done using Debtor Adjustment / Reallocate Funds between Lots and Second Debtors feature. Repeat this for any affected lots.

