 | The instructions in this article relate to Diary. The icon may be located on your StrataMax Desktop or found using the StrataMax Search. |
The below instructions relate to the Diary which offers basic automated reminders. Some of the features here require data to be populated in the nominated StrataMax fields for the alerts to prompt as expected. Examples include reminders for levy generation, contracts, building maintenance, meeting information and inspections events. Events can also be set for alerts not based around StrataMax data, for example: tasks, meeting preparation reminders, social events etc.
Dashboard information can another source of information that offers similar reporting.
Add an item to the Diary
The Alerts area must be completed for an Alert Date and Time and Users selected for the event to offer any prompts. This includes Auto and Global Entries. It is recommended to add diary entries for each event set by Auto and Global entries to ensure alerts are received as needed.
- Search or select Diary.
- To add an item, click on the day, right click and select New.
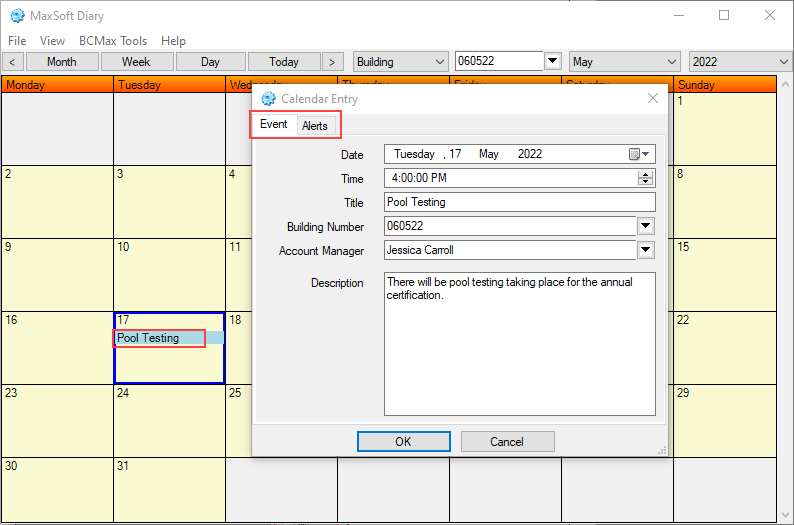
- From the Event tab, add the details as needed including the Time, Title, Building Number and Description, Account Manager field. The Account Manager field will auto-populate based on the manager set.
- Select the Alerts tab, click Alert Date and Time, select date and time and tag the staff (StrataMax username) that will receive the alert. THIS STEP IS IMPORTANT.
- Click OK.

Setup Auto Diary Features
The Auto Diary is a facility to setup diary entries for any scheduled event for a scheme. StrataMax will extract data across several areas including Levy Notice dates, Insurance Due dates, Financial Year Ends and Nominations closing dates, making them available to alert and remind in the Diary.
There are two types of auto diary entries available. The Global entries are customised alerts and do no rely on data sources. The Auto entries do rely on source data. Any auto entries set, it is important to regularly maintain the data in its respective area and generate the diary to ensure these events are not missed. Alerts can be set, tailored to the user, for how many days before the due date to prompt for the event.
Auto Entries
- Search or select Diary.
- From BCMax Tools, and Edit BCMax Auto Diary Entries.
- From the View on the right, select Auto to create a data source entry.
- Any pre-existing events will be displayed. Click New to create a new entry.
- From the Data Source selection, select the data source area.
- Set the Time, Conditions (will vary depending on the data source), enter Details and select the Frequency.
- For Building / Levies: Enter: +x months (where x is a number from 1 to 9).
- For Contracts: Select Contract Number.
- For Inspections: Select Inspection Number.
- For Insurance: Select Policy Type.
- Restrict Building Type: Enter B.F.P. or S.F.P. (as an example).
You may put as many items on condition line that will fit with a colon between items to separate them. If there is not enough room, create another entry with the same details and conditions as required.
- Enter the Notice Days, reviewing and selecting Countdown, Also on Event Date and After.
- Notice Days: The number of days before the even date which the calendar item will occur on.
- After: The number of days after the date.
- Countdown: This will create calendar entries for each date between the notice days and the event date.
- Also On Even Date: Always have a calendar entry on the event date.
- Click Save.
- Create any further auto diary entries (if needed). Click Close.
- From the building list, tag the required plans or Ctrl + A to tag all buildings / OK. This will create the auto diary entries as needed.

Generate Auto Diary
Once the auto entries have been set, these will need to be generated. Keeping in mind, that whichever data source is set, the data must be entered to populate. When tagging in the building list, note that you cannot search for building name or number and suggested to select all buildings.
- Search or select Diary.
- From BCMax Tools, and Generate BCMax Auto Diary.
- From the building list, tag all buildings and click OK.
- Events will report in their respective days on the calendar.
Global Entries
- Search or select Diary.
- From BCMax Tools, and Edit BCMax Auto Diary Entries.
- From the View on the right, select Auto. Any pre-existing events will be displayed. Click New to create a new entry.
- Set the Event Date, Time, enter a Title, Detail and set the Frequency.
- Enter the Notice Days, reviewing and selecting Countdown, Also on Event Date and After.
- Notice Days: The number of days before the even date which the calendar item will occur on.
- After: The number of days after the date.
- Countdown: This will create calendar entries for each date between the notice days and the event date.
- Also On Even Date: Always have a calendar entry on the event date.
- Click Save.
- Create any further auto diary entries (if needed). Click Close.
- From the building list, tag the required plans or Ctrl + A to tag all buildings / OK. This will create the auto diary entries as needed.

View the Diary
The diary offers a view of this information by Day, Week or Month. This view can also be adjusted for Building, User, Manager (account manager)
- This is the general view of the diary. Select a period to change the view and if building view is to be adjusted, drop the selection and pick another view.
- Use the forward > or < back arrows next to period selection to go forward or back. Or use the Month / Year drop down list to select a different period.
- View will also give an option to change the period view.

Print the Diary
To print the diary which may be useful to refer to as a paper copy, complete the following.
- Search or select Diary.
- File / Print.
- Set the Template from the drop down selection.
- Set a Date Range or select from the Presets available.
- Within the Filters area:
- Building Number to select multiple building. Select the first building, click Shift and select the last building for multiple buildings.
- Event Detail to select from a particular even. Select the first record, click Shift and select the last record for multiple events.
- Username to select a particular user. Select the first record, click Shift and select the last record for multiple users.
- Account Manager to select a particular manager. Select the first record, click Shift and select the last record for multiple managers.
- Set the Printer for all Diary Printing and select the appropriate printer.

