 |
The instructions in this article relate to Rental Certificates. The icon may be located on your StrataMax Desktop or found using the StrataMax Search. This article should be used in conjunction with the main Certificates article when creating or setting up certificates in StrataMax. |
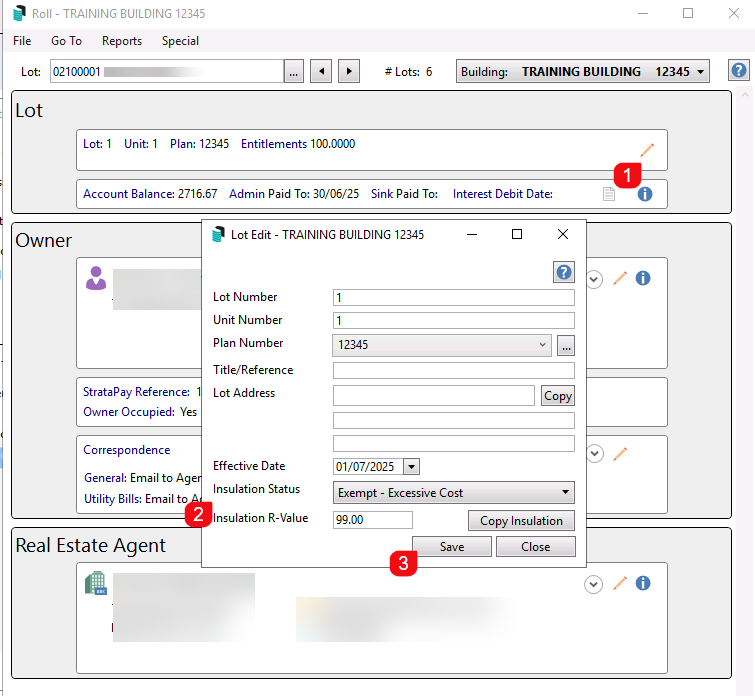
The Unit Titles Management Act 2011 requires landlords to provide a rental certificate to tenants before a new or renewed lease for a unit or townhouse within a unit title complex in ACT. Information specific to the lot is merged from the Lot Editor section of the roll, which can include the insulation status and R-Value if applicable, while building-specific information is added via Info Editor in the Certificates or from the Certificates Info section in Building Information. Document Inclusion, which is within the configuration of the Rental Certificate.
View this quick video for steps on setting up and producing a Rental Certificate.
Rental Certificates | Configuration
For more information see Certificates | Configuration.
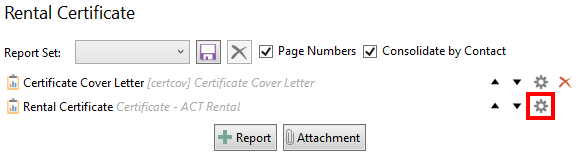
- Search or select Rental Certificates.
- Click the configuration icon to the right of Rental Certificate.

Insulation Status and Value
Within the Lot area of the Roll, there are fields that can assist with recording the Insulation Status and Insulation R-value. These fields are used in the output of information required for the ACT Unit Plan Rental Certificates.
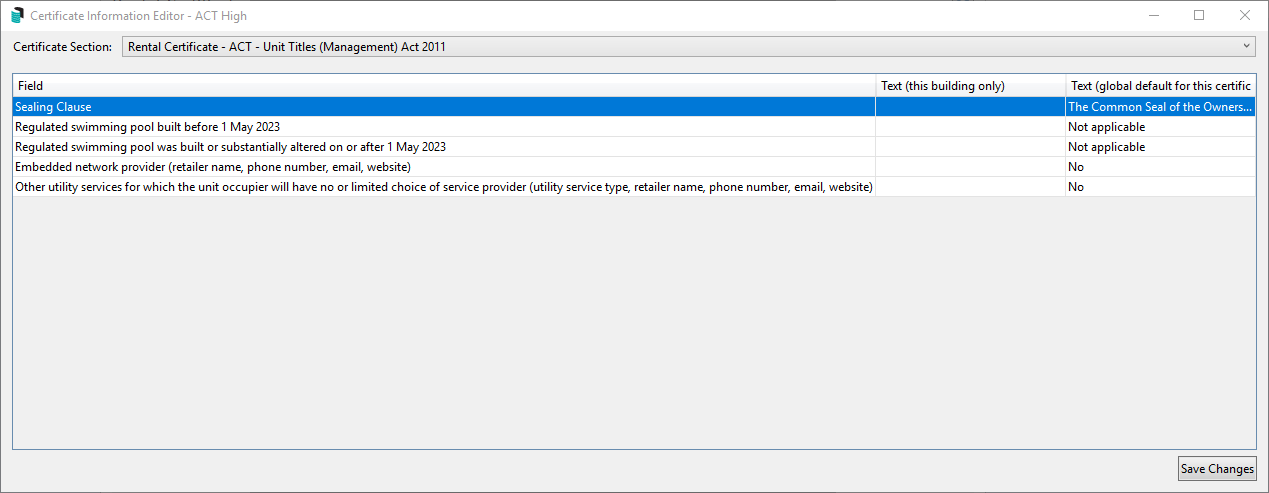
Info Editor for Rental Certificate
Info Editor is used to populate data for particular sections of a certificate, some fields may be text fields while others are selection lists that then may allow the text to be updated. If global text is populated, this will be used for all buildings with the exception of those that has text populated in the (this building only) column. The same field information for this building only is available in Building Information / Certificate Info section.

Sealing Clause
If using a seal, populate wording to accompany the seal. The below merge fields can be used within the sealing clause.
| {BodyCorpManager} | The name of the Body Corporate/Strata Manager from Office Bearers. |
| {Title} | The Strata Plan Number or the name of the building. |
| {Name} | Name of the building. |
| {PlanType} | Plan Type in Building Information. |
| {CTSNumber} | CTS Number field in Building Information. |
| {RegMod} | Regulatory Module set in Building Information (if None, this will be left blank). |
| {FullPlanType&Number} | Same as {Title} or the Plan Type and Number. |
| {PlanNumber} | Plan Number field in Building Information. |
| {Date} | Date in the format of DD Month YYYY (e.g. 23 April 2019). |
Regulated swimming pool built before 1 May 2023
Select from the four options available in the dropdown list. Documents being referred to as attached should be added via Document Inclusion. Text can be edited if required.
Regulated swimming pool was built or substantially altered on or after 1 May 2023
Select from the four options available in the dropdown list. Documents being referred to as attached should be added via Document Inclusion. Text can be edited if required.
Embedded network provider (retailer name, phone number, email, website)
Select from the two options available in the dropdown. If a utility embedded network provider exists, populate the relevant details into the text.
Other utility services for which the unit occupier will have no or limited choice of service provider (Utility service type, retailer name, phone number, email, website)
Select from the two options available in the dropdown. If a utility embedded network provider exists, populate the relevant details into the text.
Instructions for Inserting wording to Info Editor
- In the Rental Certificates click the configuration icon next to Rental Certificate or for this building only is available in Building Information / Certificate Info section.
- Click on Info Editor. This will display the fields for 'Rental Certificate - ACT - Unit Titles (Management Act) 2011'. If it doesn't, select this from the drop-down list.
- Double-click the required field to enable editing. The wording can be entered in either the field for 'this building only' or 'global default for this certificate'.
- Click Save Changes and the edited field will become inactive again. Close the 'Certificate Information Editor' window.


Email &/or Printing a Rental Certificate
A Rental Certificate can be emailed &/or printed for one or multiple lots within a building. Prior to issuing a Rental Certificate it is recommended to setup the email template in the Email Template Manager menu, the template type is called Certificate Rental.
Prior to issuing a Rental Certificate, lot insulation information must be entered via Lot Editor, the required documents must be attached via Document Inclusion, and Info Editor used to populate information relating to swimming pools and embedded networks.
The Rental Certificates menu uses the Report Distribution interface.
- Search or select Rental Certificates.
- Ensure the appropriate information has been entered into Document Inclusion & Info Editor if required.
- Tag the lot/s required.
- Ensure the settings within Distribution Method are as required.
- Select Proceed.
- Review the preview and click on Proceed to email &/or print.
A copy of the Certificate will be available in DocMax if Save Report was ticked in Distribution Method.
A Rental Certificate remains valid for 5 years from the date of issue. It is recommended to use a DocMax Profile and tick save report in the Distribution Method when issuing Rental Certificates, so a copy is stored in DocMax. When the document is stored in DocMax, the added date is automatically populated and therefore can be used to track the expiry date. Alternatively within the DocMax profile, the merge field {Today} can be used to populate into other DocMax fields.
