This article covers the tasks that managers need to complete after they have transferred a new building into StrataMax - where a building is transferred from one StrataMax drive to a different StrataMax drive. See the Building Transfer article for more information.
Building transfers are offered as a chargeable service by the StrataMax Support Team, who ensure that the export and import of the data is completed correctly. This charge is dependent on the number of lot count of the building. Please note that the existing building transfer costs listed below still apply. We have focused development on making the experience of the building transfer more seamless and transparent to both parties. Note that we are still performing checks and version adjustments on all building transfers between both parties:
- 19 lots and under: $120
- 20 - 60 lots: $180
- 61+ lots: $240
Every time a new building is transferred to your portfolio, please refer back to this article to review the Post-Transfer Checklist, which is updated regularly. Our full service team can also complete these tasks, which is chargeable at $180 per hour. To request the Full Service Team, email them at fullservice@stratamax.com and provide any specific instructions.
Due to various versions of StrataMax, please note that manual transfer of a building using a Zip file is not possible for transferring data between one manager and another. Please see the instructions for the Transfer Out (for the outgoing manager) or the Transfer In instructions if receiving the data.
Once you have received your new building through the Building Transfer, you should review and complete each step in the Post-Transfer Process (see the table below) before any changes are made; These steps should be undertaken immediately to ensure integrity of data and also that the transferred building is included in any global processes. The Master Chart and associated master lists allow StrataMax to utilise its efficiencies in processing and reporting.
If these areas are not considered after a building is transferred to your portfolio, issues in the following areas may appear:
- Payments to your Manager account - Management Fees may not be processed until the Manager Creditor has been reviewed.
- Reporting - Buildings may be missed or excluded if local codes are not updated.
- Templates - Reports, such as work orders, levies, arrears notices, etc., may be issued on templates that are not in accordance with the rest of the portfolio.
What are the advantages of a building transfer?
- Lot owner’s StrataPay IDs remain the same.
- Direct debits can be carried over as the ID number hasn’t changed.
- The owner’s login to the StrataMax Online Portal will still be active.
- All history/data/records are transferred.
- Immediate access to use the building (after completing the post-transfer setup tasks below).
What is included with a building transfer?
- StrataMax – Local (Building) Chart of Accounts.
- StrataMax – Local (Building) Supplier / Creditor list. Default Account Codes will be populated where possible.
- Transactions – Current Year, Old Year and Historical Years.
- Budgets - Current Year, Old Year, and Historical Years.
- Roll (Owner) Records, preferences and history.
- Agents and other contacts (representatives, tenants, power of attorney, nominee, etc.).
- Building Information, Registers (excluding Returned Mail), Contracts, and Inspections.
- Levies.
- StrataMax IDs.
What is not included with a building transfer?
- TaskMax: Current Work Orders, Quotes, and History.
- DocMax building document details:
- Profile (as these are client specific).
- Statuses.
- Custom Properties.
- Upload to Portal (will not be selected – to be reviewed as part of transfer).
- Document Source (will reflect document added from ‘Building Transfer’).
- DocMax internal documents.
- Management Fees.
- TRMax.
- Bank Account Details (cleared at transfer).
- GLMax.
- Returned Mail Register.
- Other Registers.
- Key Register.
- Legal Action records.
- Contact Management, reviewing records that may need to be split into single contacts or merging of duplicate contacts.
- Meeting Hub meetings (if the notice and minutes have been generated, then they will still be in DocMax).
- Invoice Hub invoices.
What are the disadvantages of a building transfer?
- Having to complete post-transfer setup tasks to ensure that the new building is in line with the rest of your portfolio and doesn’t get excluded from global processing and reporting.
- The data from the prior manager will need to be thoroughly checked.
Post-Transfer Checklist
These are areas that will affect global processes and reporting. Review the steps below thoroughly to determine what areas need to be updated based on current office procedures.
In addition to the below checklist, we recommend setting up an Event Task in the Task Management screen, which will automatically create a task with a checklist of the recommended steps to be completed.

If you would prefer the print out this checklist, simply click the 'Print' icon at the top of this page, to the right of the article's main header. 
| Critical Tasks | Completed by |
| Complete a Data Storage. | |
| Update critical details in Building Information. | |
| Bank Account Change. Set up new bank account in Bank Account Setup. | |
| Review owner Direct Debits. | |
| Use Change Code Number to change any codes to align with the codes in the Master Chart. Run report from Search Local Accounts. | |
| Use Change Code Number if your creditor account code is the same as the previous strata manager's code. | |
| Use Creditor Maintenance to add your creditor account to the building. | |
| Import the new building into GLMax using Import Buildings as Debtors. | |
| Add your management fees in Management Fees Setup. |
| Recommended Tasks | Completed By |
| Update additional details in Building Information. | |
| Use Contact Management to split combined owners or merge duplicate contacts. | |
| Check Office Bearers has the correct contact for the Body Corp Manager position. | |
| Update insurance policies in Insurance to match the Master Chart. | |
| Check, and amend, if necessary, templates in various areas (levy notices, ledgers cards, etc.). | |
| Check Levy Management to determine levy due date, and if the most recent issued levy needs to be resent to Owners. If the bank account has changed and is not using StrataPay, new reference numbers will have been allocated. If loading levies from another manager who has issued the levies, select Prior Manager. | |
| Check Arrears Notice Setup to ensure the schedule, its templates, and cover letters are correct. | |
| Check Arrears Fees Setup to ensure it's using the Global settings & review File / Arrears Fee Setup. | |
| Check Levy invoice Code Setup and amend or delete as necessary. | |
| Note the Second Debtors totalling account. | |
| Check codes in Budget Summary Setup and delete or insert codes as required. | |
| Ensure clearing account codes in Account Maintenance match the Master Chart. | |
| Merge and delete 'Categories' in DocMax. | |
| In DocMax, review the 'Document Group' and 'Remove from Portal After' fields before uploading. | |
| Review and manage any Sub-Groups. | |
| Ensure any codes in any used registers (Inspections, Contracts, Asset, etc.) match the rest of your portfolio. | |
| Use Creditor Maintenance and run Compare, then delete any Creditor Accounts or merge as necessary using Change Code Number. Also use Search Creditors to produce report if required. |
Post-Transfer Tasks
This section of this help page provides the necessary steps for each task that you should complete after the building transfer. Each task has its own section, containing a link to another page where appropriate, and any requirements or recommendations suited to a building transfer.
Complete a Data Storage
This will create a backup of the building data before you complete any of the tasks on this help page. That way you can restore this backup just in case an irreversible error is made. For example, if a large quantity of general ledger account codes are deleted by mistake.
See Conduct a Data Storage for steps on how to complete a data storage, making sure that:
- You tick the box 'Include DocMax documents'.
- Do not tick the box 'Overwrite existing backup'.
Enter Building Information
Information that is entered into Building Information varies greatly between management companies, but we recommend that as much data as possible is kept up to date for reporting purposes and ready to review by staff using StrataMax. The more information you enter into the Building Information screen, the better. For a building transfer specifically though, the below fields need to be checked:
- Search or select Building Information.
- Search for the relevant fields to update or check.
- Biller Code: Type STRATAPAY to use StrataPay deposit slips, or SPAY to use hybrid StrataPay / DEFT deposit slips.
- Auto OK to Pay Creditors: An ‘N’ means all saved creditor invoices will be placed on hold. If the building is using the Invoice Hub, then this should be ‘N’.
- This relates to directly to settings in Creditor Invoices, which should also be checked under GoTo > Set OK To Pay Accounts (Local).
- Taken On: Select the date the management agreement starts.
- StrataPay Only: If a ‘Y’ is in this field, it will disable the StrataMax Portal along with VoteMax/Meeting Hub access for this building, so amend as required.
- Registered for BAS/IAS (GST) is needed to determine whether the building is GST registered or not and affects all transactions in StrataMax. It is most likely already populated, but a good idea to check. Other registered tax types can also be reviewed in this section.
These are additional fields that we recommend checking, and filling in if possible:
Account Manager |
Grace Days |
Account Manager Assistant |
Entitlements |
GST Registered & Other registered Tax Types |
Tax File Number |
Audit / Audit Done / Auditor |
Last AGM |
Australian Business No. |
Bank Branch / Bank Name |
Overdue Levy Interest Rate |
Bank Name |
StrataPay Only |
Overdue Interest Start Date |
Bank Branch / Account No. |
Credit Card Approved / Date |
Interest Days |
Taken On |
Date of Registration of Plan |
Grace Days |
ATO Default Creditor account |
Financial Year Start / End |
Returned Cheque Fee |
GST Reporting Style |
Enter New Bank Account Details
When a building is transferred to your portfolio, its old bank account details are removed, so the bank account will change. Therefore, a new bank account should be requested as early as possible so that the building's levies can be issued as soon as possible, and creditors can be paid. See New Account Request | Operating for steps on opening a new SCM operating account from within the StrataCash Hub.
Once the SCM account has been opened, it will appear in the Process Bank Statements screen, in the section 'Additional StrataCash Management accounts not set up in StrataMax'. Clicking the blue icon under the 'Set up' column will instantly enter the bank accounts details into the Bank Account Setup screen.

If the building uses any other bank than SCM, then the bank account details will need to be entered manually into the Bank Account Setup screen, by following the steps in Enter a New Operating Bank Account.
Transfer In Initial Deposit
Once the bank account has been set up in StrataMax, you should expect the initial deposit of the buildings funds to be deposited within a few business days. When that happens, you will need to reconcile the deposit in StrataMax. Please refer to Opening Balance Transferred Buildings for guidance on this critical step.
Direct Debit
If the lot owners of the transferred building have direct debits set up with StrataPay, the transfer has temporarily cleared any lot owner’s Direct Debits. These will be reinstated once both points below have occurred after the building transfer. Also, levy notices should not be printed / emailed until after both points below have occurred.
- The automatic upload of the building to has occurred.
- The next Direct Debit email (sent Mondays) is processed.
Restrict Access Unused Global Account Codes
This process will restrict access to all codes that are in the Master Chart alongside those in the transferred building that have the same account code number, and that haven’t been used in either the current or old year. Codes that have transactions against them in the current or old year, and system codes will not be affected. For more information, see the Restrict Access guide.
This tick box is controlled by a permission in Security Setup called 'Edit restrict access'.
- Search or select Account Maintenance.
- To review Hidden/Restricted accounts, tick 'Show Hidden/Restricted'.
- Locate the account code.
- Adjust the 'Restrict Access' box as required.
- Click Save.
Add Standard Account Codes From Master Chart
Any standard account or creditor codes, such as Management Fee accounts or account codes used by a global banking legend, should be added to the building from the Master Chart to ensure that any entries created from auto-posting processes have these nominated accounts available in the building. See add account code from Master Chart.
Changing Account Codes
This process will move all transactions from the old expense or income code in the transferred building into a code in your Master Chart of accounts and delete the original code from the transferred building. This will consolidate transactions and bring the new building's Financial Statements in line with the rest of your portfolio.
Use Search Local Accounts to review any codes that do not match the Master Chart building, and either edit the name of these account codes or merge them using the Change Code Number screen to match the Master Chart building.
Add Creditor to Master Chart
As part of a building transfer, creditors from the building who match a Master Chart creditor will have the 'Default Account Code' field populated.
Matching criteria are BSB, Bank Account Number and ABN or Contact Name.
When a creditor in a building has an account code different from what is recorded in the 'Default Account Code' field, either record can be edited to update the details.
If the 'Default Account Code' field is blank, this is because no matching creditor was identified during the Building Transfer In; you can untick the Hide box, and the next Master Chart account code number available will be created.
The use of the Change Code Number remains relevant only for creditors set up in StrataMax, as the configuration is based on account codes. This includes the creditor used for GLMax links which impacts Mangement Fees and other areas like the Arrears Fee Setup.
For GST registered buildings that use a different Australian Taxation Office (ATO) creditor, there may be a different system flag warning. This will need to adjusted in the GST Setup in Building Information, first and then the change code process can apply.
A report can be produced by Search Creditors to check the Master Chart Status.
Creditor account codes need to be added to the Master Chart to ensure there are no duplicates or mismatches in the creditor codes (0820...) imported from the transferred building. For example, in the transferred building, the creditor code 0820005 belongs to "Dave's Plumbing", but in your Creditor Master List, 0820005 belongs to "Andy's Cleaning Services". The process below will add the local creditor to the Creditor Master List using the next available global creditor account code, then re-import the creditor into the transferred building.
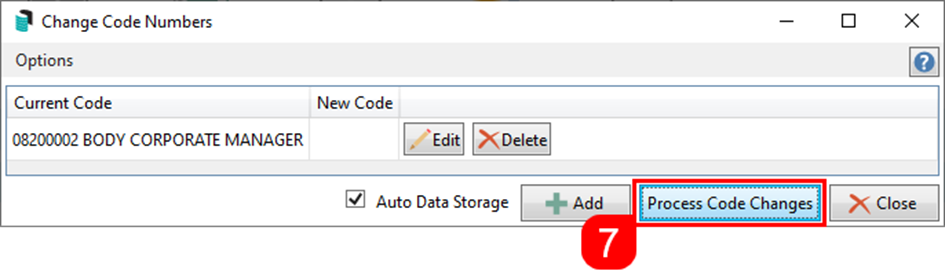
If the prior Strata Manager is still a creditor with the same account number as your company (08200002), complete the process below, then open Creditor Maintenance in the transferred building to add your company's account from the Master Chart. By not doing this, there will be issues when processing recoveries and management fees.
- Search or select Change Code Number.
- Click the Add button.
- Enter the code of the transferred building in the Current field. Either type the account code name or number, or click the ellipsis button […] to search for the Current Code from the local list.
- In the New Code field, either type the account code name or number, or click the ellipsis button […] to search for the Current Code from the local list. Tick the Add to Master Chart as New box.
- Click the Save button.

- Repeat for all required Creditor account code changes.
- Click the Process Code Changes button to complete.


Change Codes Troubleshooting / Additional Options
The following messages may appear when using the Change Code Number screen and relate to Tax Codes, Account Groups, Trading Funds, or the Australian Taxation Office (ATO) Creditor.
Creditor Compare
The Creditor Compare window identifies duplicate or unused creditors and allows creditor records to be merged, hidden, or deleted. This is particularly useful when a property has been transferred from another StrataMax manager.
In addition to using Creditor Compare, report on the Master Chart Status field in Search Creditors to identify whether a creditor account is included in the Master Chart.
During the transfer-in process, the Location ID field is cleared. This allows more creditor records to be identified and merged with the corresponding Master Chart creditor, reducing the need for manual updates. This will work if both the Master Chart and Local Creditor account do not have a Location ID field set.
- Search or select Creditor Maintenance.
- Click Compare.
- Select Not Recently Used, Account Code Different To Master and No Master Account settings at the top of the screen.
- Review list of Creditor Accounts provided and select Delete Where Possible to remove unused Creditor Accounts.
- Review Creditor Accounts listed with the option to Merge to Master, to add to your Master Chart, click Merge to Master.
- Change Code Number will open with the Creditor Account pre-filled, then select Process Code Changes.
Import Building Into GLMax
In order for the management fees and recoveries to be processed, the new building first needs to be imported into GLMax. See the Import Buildings as Debtors for the full process.
Management Fees Setup
In order to process your management fees in GLMax, they must first be set up in the transferred building, in the Managment Fees Setup screen. See the Management Fees Setup article for the full overview and process to add your fees.
NOTE: If this is a building which has been transferred internally between drives, the original management fees must be terminated before import into GLMax. Then new current fees can be setup to align with the linked GLMax Company and ensure that the next invoice date is in the future.
Contact Management
Each agent and mortgagee record will be included in the building transfer as a contact directly associated with the lot account. After the building transfer, you can manage these records in Contact Management. Completing this task will ensure accurate reporting, the correct delivery of correspondence and levies, and ensure Office Bearers are linked to the correct owner record.
- Refer to and complete the Split Combined Owners function.
- Refer to and complete the Merge Duplicate Contacts function.
Office Bearers
The Body Corporate Manager information should have been updated automatically when the building was transferred in. However, we recommend that you check Office Bearers to ensure that this has updated correctly, and make any necessary amendments. See the steps in Edit an Office Bearer if you need assistance.
Updating Insurance
The Insurance screen needs to be updated to be line with the rest of your portfolio (codes in the master chart). You will need to delete some of the local codes in the transferred building so that you can then add the global codes. For example, in the transferred building the code '903' might be named 'Public Liability Insurance', but for the rest of your portfolio, '903' is 'Common Property Insurance'. This means you would need to delete the local code '903' in the transferred building and add '903' again from your master list.
If you're not familiar with the Insurance screen, we highly recommend reviewing the Insurance article.
- First it would be helpful to compare the codes in the transferred building against the rest of your global codes, i.e. those in the Master Chart building. To do this, you can either produce a report in the Master Chart building, or simply take a screenshot of the code list in the Master Chart building.
- After identifying all the codes that need replacing, open the Insurance screen in the transferred building, then delete all those codes.
- Then you need all the new codes in the transferred building to replace the ones you just deleted. See how to add a new policy for guidance.
Templates
Templates will differ between management companies, and differences will not be limited to just the levy notice or arrears templates. To ensure that the templates in the transferred building suit your requirements, you should produce and check the reports listed in this section, below. Remove any unwanted local templates, and check that the printer and letterheads are correct.
Before making any amendments to templates, letterheads, and/or printer settings, double-check and confirm them with your office manager:
- That the templates should be changed to be in line with the rest of your buildings (i.e. not left as local).
- Which template is correct for each report.
- Which letterhead should be used for each report (there may be several letterheads available).
- The correct printer and printer tray for each report (which paper tray in used for the deposit slip paper, for example).
Levy Notice
Check that the Levy Notice template is set correctly.
- Search or select Levy Notice/Reports.
- Click the ellipsis button to the right of the Template field.
- If there are local template selections, these can be removed by clicking Options > Remove Current Local Selection.
- This should leave Global selections for both the Levy Template and Deposit Slip.
- Click the Close button.
- Click the ellipsis button to the right of the Printer field to change the printer if required.
- Click the Letterhead drop-down menu to select ‘Default’ if necessary.
It is recommended that a test is carried out.
- Search or select Levy Notice / Reports and tag a Lot in the Select Lots tab.
- Tag a previously issued Levy in the Select Levies tab.
- Ensure that the Screen radio button is selected.
- Click the Proceed button to preview the levy and check that it is as per your requirements.
Ledger Card
This template should be checked to ensure it also matches normal internal template setup.
- Search or select Ledger Card.
- Click the ellipsis button in the top right of the Template field.
- If there are local template selections, these can be removed by clicking Options > Remove Current Local Selection.
- This should leave Global selections for both the Ledger Card Template and Deposit Slip.
- Click the Close button.
- Click the ellipsis button to the right of the Printer field to change the printer if required.
- Click the Letterhead drop-down menu to select ‘Default’ if necessary.
It is recommended that a test is carried out.
- Search or select Ledger Card and tag a lot in the Select A/c's tab.
- Ensure that the Screen radio button is selected.
- Click the Proceed button to preview the ledger card and check that it is as per your requirements.
Invoice Printing
- Search or select Invoice Printing.
- Click the ellipsis button in the top right of the Template field.
- If there are local template selections, these can be removed by clicking Options > Remove Current Local Selection.
- This should leave Global selections for both the Invoice Template and Deposit Slip.
- Click the Close button.
- Click the ellipsis button to the right of the Printer field to change the printer if required.
- Click the Letterhead drop-down menu to select ‘Default’ if necessary.
- It is recommended that a test is carried out by printing an invoice that was already printed. Follow the steps outlined in Reprinting a Printed Invoice.
Roll Details Confirmation
- Search or select Roll Details Confirmation.
- Click the ellipsis button in the top right of the Template field.
- If there are local template selections, these can be removed by clicking Options > Remove Current Local Selection.
- This should leave Global selections for the Roll Details Confirmation Template.
- Click the Close button.
- Click the ellipsis button to the right of the Printer field to change the printer if required.
- Click the Letterhead drop-down menu to select ‘Default’ if necessary.
- It is recommended that a test is carried out by previewing a form.
Other
There are other areas that should be checked, although these might be templates that are not used quite as frequently or may be for internal reporting only (i.e. not client reports). These are, but not limited to:
- Aged Balance List
- Bank Slip Report
- Transaction List
- Aged Balance (Second Debtors)
- Print Deposit Forms
- Creditors Info List
- GLMax Invoice Printing
Arrears Notice Setup
If you use a global arrears schedule for your portfolio then you must check the schedule in the transferred building to ensure it doesn't have a local schedule.
- Search or select Arrears Notice.
- Click Tools > Arrears Notice Setup.
- If a local schedule exists then it will automatically be displayed.
- Select each reminder/row in the schedule and click the Delete button.
- Answer ‘Yes’ to ‘Delete this record?’
- Click the Global Settings button (it will turn green) to review the global setup if required.
Arrears Fees Setup
- Search or select Arrears Notice.
- Click Tools > Arrears Notice Setup.
- In Arrears Notice Setup, click File > Arrears Fees Setup.
- Check which radio button in the bottom left is selected; Global or Local.
- If local, click the Delete button and ‘yes’ to delete local settings.
- Ensure that the Global radio button is now selected and then click Save and Close.
Levy Invoice Codes
When the levies are generated, the system refers to the Levy Invoice Code Setup screen to generate and report all levy information. We recommend you review the Levy Invoice Code Setup article to become familiar with this screen so you can make any changes you need.
Budget Summary Setup
The purpose of this feature is to allow any additional funds to calculate on the Lot Budget Summary report which can be included as an additional report via the Financial Statements
- Search or select Budget Update.
- Click GoTo > Budget Summary Setup.
- Review, delete and insert (if required) any account codes to be set up within the ‘Accounts for Budget Report’.
Change GST Style and Setup
Check to ensure all clearing account codes selected in Account Maintenance matches the account codes used in the Master Chart. To check the GST style of the building:
- Search or select Building Information and locate the Tax section to confirm the GST style i.e. if Gross or Net.
- If the style is not correct, this can be amended and saved. To update the transactions from Gross to Net or vice versa (this only updates the reporting for the current year).
- Review the Financial Statements after the amendment has been saved to confirm the accounts for Income and Expenses are as expected in the current year.
DocMax | Merge Filing Categories
The building transfer process will bring in all documents based on the associated DocMax Categories. Where the Categories match exactly, the documents will automatically be located in the same; however, if the category is not an existing one, the system will create these new categories. The 'Merge and Delete' function can then be used to transfer to the correct category.
See Merge and Delete a Category for steps on using this function.
DocMax | Online Portal
Transferred DocMax documents will have the ‘Upload to Portal’ tick box cleared. This will allow the ‘Document Group’ and ‘Remove from Portal after Date’ to be reviewed and amended prior to uploading.
- Search or select DocMax and select the Online Portal Uploads menu on the left.
- Select the transferred building from the Building drop-down menu.
- Review documents to be updated by Document Group.
- Click the Results Layout button in the top left of the ribbon and select Show Results with Properties.
- Multi select documents to be changed (use the Ctrl or Shift key to highlight).
- Click the Online Portal arrow to expand the section and tick the Upload to Portal tick box.
- Click the Document Group drop-down menu to select the correct group.
- Select the Remove from Portal after Date.
- Click Save Changes.
Utility Sub-Groups
If sub-groups are transferred it should be determined whether or not they will continue to be used. If the sub-group is to be used, search or select Utility Billing and select the Tariff Maintenance to review any tariffs, in particular those that have not transferred. See the Utility Billing | Setup Tariffs, Sundries, Rebates article for more in-depth details.
If it’s not then the sub-group can be deleted following these steps:
- In the transferred building, search or select Delete Sub-Group.
- The sub-group will be selected by default, so click the Delete button.
- Click the Yes button when prompted to confirm.
- Another prompt will appear asking whether or not to ‘remove all links’, click Yes.
- Once finished processing, the Sub-Group Manager screen will appear, and can be closed.
Registers / Contracts / Inspections
There are registers in StrataMax, which are used for reporting. It is recommended to review the coding of items that have been transferred, to ensure they match the current global setup.
If you're using global reporting, you should delete the transferred data so that the global list is used and matches the rest of the portfolio. This way all registers will report correctly.
For example, in Inspections, in the transferred building, the entry "Pool Inspections" uses code 601. However, in the rest of the portfolio, an entry called "Pool Safety" uses code 608.
