 | The instructions in this article relate to Communication. The icon may be located on your StrataMax Desktop or found using the StrataMax Search. |
Many areas in the StrataMax can send emails and SMS. Any reports that come to the screen can be emailed from StrataMax. There is also a facility to use the email address already stored in some of the areas in StrataMax to send these reports. These areas include Owners, Creditors, Committees, Agents, Others (Applicants) and Account Managers. Instructions are included below to explain how to use the various email functions included in StrataMax. In addition, Search Roll, Search Office Bearers, Search Creditors can assist with producing global lists of email addresses.
The StrataMax Support Team enables and configures emailing in StrataMax, which is called Email Server. Once the email server has been installed, each StrataMax user account is created with an email address, which is visible afterwards in Security Setup.
Check out the Email Deliver-ability article to learn more about how emails work in StrataMax.
Compose Email
StrataMax has various ways to pick up the recipient's details if entered into other areas of StrataMax. If this information is not entered, e-mail addresses can be manually typed or copy & pasted into the To... or Bcc... fields. This area is designed to include the contact information for each individual.
To send an email to a large number of recipients, such as all creditors or owners, a list of these email addresses can be produced by using the corresponding Search screen in StrataMax. These lists can be for owners (Search Roll), committee members (Search Office Bearers), or creditors (Search Creditors) and can be produced for multiple or all buildings.
- Search or select Communication.
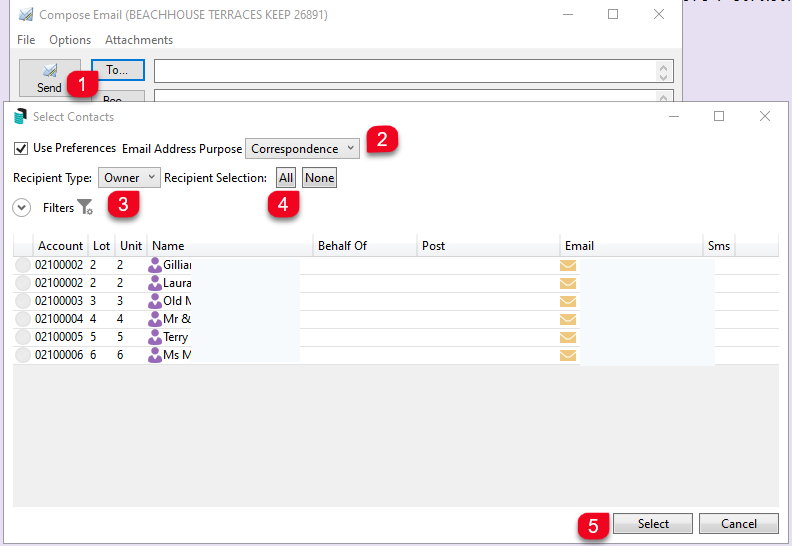
- Click the To... and/or Bcc... buttons to display the 'Select Contacts' window where recipients can be selected.
- Ticking the Use Preferences box will ensure the email is sent to the contact's preferred e-mail address. This is used in conjunction with the Email Address Purpose drop-down menu and will affect which recipients are displayed.
- The Email Address Purpose drop-down menu will observe the contact's preferred delivery method for emails and will affect whether or not they are displayed in the list of recipients and can be used in conjunction with the Use Preferences tick box, which will further affect the list of recipients.
- The Recipient Type drop-down list can be used to display contacts from the following areas, and will alter the options available in the Filters:
- Owners: Roll / Lot Accounts.
- Other Debtor: Second Debtor / Debtor Maintenance (available from Sub-Group).
- Letting Agents: Letting Agents added to a lot within the Roll.
- Tenant: Tenant contacts added to a lot within the Roll.
- Creditors: Creditor Maintenance.
- Office Bearers: These are the members assigned in Office Bearers.
- Applicant: Applicant Maintenance records used for various areas.
- Resident: Any contact flagged as Owner Occupied in the Roll.
- Internal Users: Any internal user configured in Security Setup with a valid email address will be available in this area.
- Click All to tag all recipients or click None to remove tags so that individual recipients can be tagged as needed.
- Review the tagged records and click Select (use Ctrl + X to deselect all; for more keyboard shortcuts, click here).
- Click the Filters option will display a variety of options and tick boxes to further alter the list of recipients.
- The filters available will vary depending on the selection from the Recipient Type drop-down.
- An email subject can be typed in the 'Subject' field.
- For attachments, see the Attachments Menu section below.
- In the body of the email, text formatting can be changed using the toolbar above the email body, provided Use HTML is selected in the Options menu or the Communication Setup window.
- A spell check function will underline words that have been spelt incorrectly.

- A spell check function will underline words that have been spelt incorrectly.
- Click the Send button to send the email.
- A warning may appear to notify you if the email is being sent to more than 20 recipients, just as a precaution in case it gets caught by spam filters, and you can choose to continue or not.
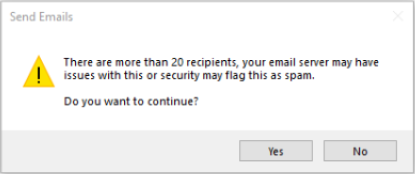
- A warning may appear to notify you if the email is being sent to more than 20 recipients, just as a precaution in case it gets caught by spam filters, and you can choose to continue or not.


Attachments Menu
You can attach multiple files to StrataMax email, but only one attachment can be added.
Each email sent from StrataMax has a total file size limit of 10 MB.
Within the Compose Email window, click the Attachments menu and then one of the sub-menus.

Add File
It will display the usual Windows Open File prompt where you can navigate to the file.
Add from DocMax
It will display the Select Document window in DocMax, and will already display a list of current documents belonging to the building. You can also use the Advanced Search function as well.
Clear
It will remove all of the attachments in the email.
Options Menu
This section covers the various functions and items under the Options menu.

Communication | Signature
StrataMax emails support signatures, which can be specific to the user or global for all users. Signatures are created and saved in the bottom section of the Compose Email screen, the default screen appearing when you open the Communication menu.
The global email signature is restricted in the Security Setup menu. The permission is 'Edit the global email signature'.

Personal vs Global Signature
The below instructions apply to both a Global Signature and a Personal Signature.
When running any global processes, for example, Levy Distribution, Levy Arrears, or distribution of Meeting Agenda Packs, the global signature may be required. If this is the case, then follow step 2 below. A personal signature can be set up and used for any singular emails sent.
To change either to a Personal or Global signature:
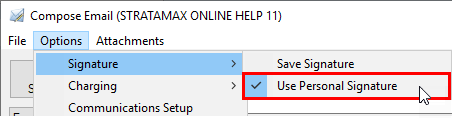
- Click Options > Signature and tick Use Personal Signature option.
- When ticked, the personal signature will be used on any emails sent from this user, and any changes made to the signature on the screen will only apply to the personal signature.
- Click Options > Signature and remove the tick from the Use Personal Signature option. When not ticked, the global signature will be used, and any changes made will be saved to the global signature only.

There are several ways to insert a signature, including images, text, web links, HTML, lines and tables. It also supports multiple font types for your text, which can be copied and pasted from other programs.
Creating Email Signatures
The StrataMax Communication screen supports the .NET technology, meaning signatures can be copied and pasted from Outlook without much need for further formatting. Please be aware that the Use HTML setting should be enabled in either the Options menu or the Communication Setup screen in order to be compatible with this functionality, and that this setting is controlled separately for each user.
When inserting images, they need to be saved in a shared directory first (we recommend the StrataMax folder on your server's shared drive) and then inserted from there.
Communication | Charging
The charge options in the Communication menu will only apply to emails and SMS messages sent manually. Automated communications will be charged as per the settings in the Disbursements screen.

Record Set
Will record only a single email or SMS sent from the Communication menu, regardless of how many recipients are in the To... field. For example, one email to fifty recipients will only record a single email or SMS.
Record To Each Recipient
Will record every email sent from the Communication menu, for each recipient. For example, one email to fifty recipients will record all fifty emails.
Record Each Page
Will record each page of an attachment sent through the Communication menu.
Once all required options have been set, the menu must be opened again to click Save Settings as Default.
Communication Setup
- Search or select Communication menu.
- Click Options > Communication Setup.
Communications Sender Details
The Sender Name and Email Address are configured under Security Setup, you may need to discuss with your StrataMax Administrator in your office to arrange for this detail to be updated.

- Sender Name (User Setting configured under Security Setup): The name that will appear as the sender in the recipient's email client. Refer to our Seturity Setup article under the Sender Name heading for details on how to set this to be different from your login email. Emails will appear to recipients as coming from the selected Sender address, and any replies will be directed to that inbox.
- Email address: This will act as the 'Sender' email address that the email will appear to be from. This field is synchronised with the 'Sender' email address in Security Setup. Refer to our Seturity Setup article under the Sender Name heading for details on how to set this to be different from your login email. Emails will appear to recipients as coming from the selected Sender address, and any replies will be directed to that inbox.
- SMS Email (User Setting): The email address that will appear as the sender on the SMS at the recipient's end.
- Personal Signature (User Setting): Tick to enable insert the personal signature for all emails. This is effectively the same as clicking Options > Signature > Use Personal Signature.
- Use HTML (User Setting): Allows the formatting and framework of an email to be displayed in a graphic / link supported message type. This affects both the body of the email and the signature field beneath it. When not enabled:
- The formatting toolbar will not be displayed.
- The signature will revert to a simple text signature, which can still be edited or deleted if necessary.
- Please be aware that the Use HTML setting should be enabled in either the Options menu or the Communication Setup screen in order to copy & paste signatures from Outlook, and that this setting is controlled separately for each user.
- Receipt Required (User Setting): Requests an email receipt for emails sent manually from the system. This does not include global or bulk functions like Levies or EFTs Remittance Advices.
- Always BCC Account Manager (User Setting): When ticked it will ensure all emailed are BCC'd to the building's account manager.

Installation (Pausing and Delay Messages)

- Pause Messages by Default: Will allow emails and faxes to be viewed in the Communication Log, and will not be sent without manual confirmation.
- The Security Setup permission for this is named 'Pause Messages'.
- Delay Messages: Will place a delay on all emails sent within StrataMax. It should be used in conjunction with the Delay Message Time field. Any emails that are subject to a delay, will appear with a ready Status in the Communication Log until the delay timer expires (Global setting).
- The Security Setup permission for this is named 'Delay Messages'.
- Delay Message Time: Used in conjunction with the above setting. The field format is in days.hours:minutes:seconds.
Set Default Font
This opens the Font window where the default font for the body of the email can be chosen.

- Select the Font.
- Select the Font Style.
- Select the Size.
- Select the Script (Western is the default).
- Check that the Sample looks like what is required.
- Click OK.
Use HTML
This is ticked by default and should be left enabled. It is also controlled separately for each user. When not enabled:
- The formatting toolbar will not be displayed.
- The signature will revert to a simple text signature, which can still be edited or deleted if necessary.
- Please be aware that the Use HTML setting should be enabled in either the Options menu or the Communication Setup screen in order to copy & paste signatures from Outlook, and that this setting is controlled separately for each user.

Receipt Required
When ticked, a delivery receipt will be requested from the email recipient. Similar to the Request a Delivery Receipt setting found in Outlook.
Check Spelling
StrataMax can also check the spelling of emails before being sent. Just click this option right before click the Send button.
- If any misspelled or unknown words are detected, it will display the content of the email, with any unknown/misspelled words in red.
- To change the word you can either type the replacement word manually into the Replace with: field or click one of the words in the Suggestions: field, then click the Replace button.
- Click the Replace All button to replace this word throughout the whole email.
- Clicking Ignore or Ignore All ignore the spelling error.
- Clicking Add will add the word to the dictionary and it will no longer be flagged as an incorrect word in future emails from the Communications menu.
- The Options will display the general options available for how the dictionary in StrataMax works, and what configuration is available.
File | View Log
The Communication Log displays a history of any email that has been sent from within StrataMax. This includes emails that were sent manually or via various processes, such issuing of levy notices, this log can be checked to see what has been emailed. This can be used to check email addresses and dates for troubleshooting emails that an owner claims they didn't receive for example.
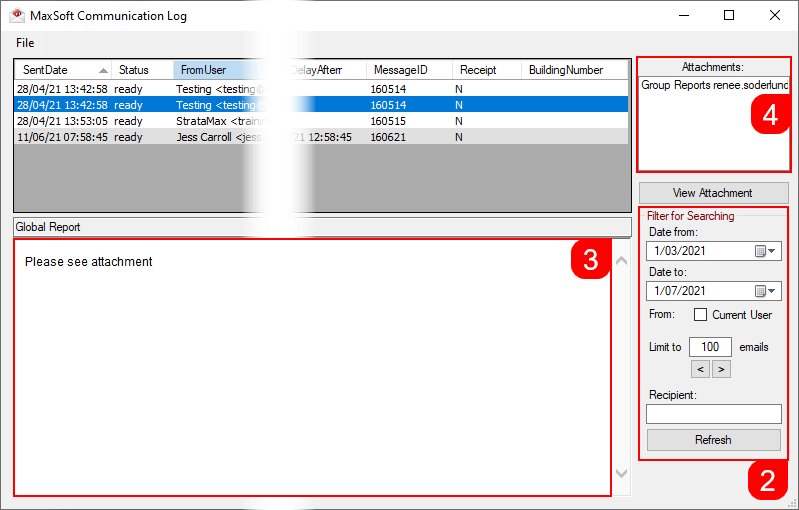
The top section displays a list of emails in a table with various headers. An important header to make a note of is the Status header. Different Status' have different meanings, which affect which actions can be performed on that email. The bottom section contains the body of the email.
- From with the Communication window, click File > View Log.
- Use the filters on the right side:
- Date from: and Date to: fields to select a date range.
- From: Current User tick box should not be ticked to display email from all StrataMax users.
- Limit to # emails field to display a certain number of emails.
- Recipient: Field to enter part of or the whole name of a recipient, which will search the Recipient column after clicking the Refresh button.
- The body of the email will be displayed in the bottom section of the screen.
- The Attachment field in the top right will display any files that are attached to the email selected from the list. Double-click the file to open it, or click the View Attachment button.
- Right-clicking an email in the list will display a sub-menu with contextual options, so some of them won't always be available:
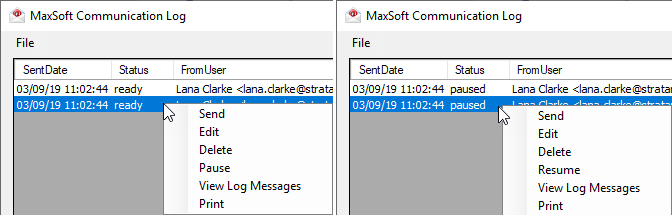


Send
Will send an email that has a Status of ready, or if it has a status of Sent it will ask you if you would like to send it again.
Edit
Will let you edit the body of an email that has a Status of ready or paused. The editing is done in the bottom section of the screen, and the Save Changes button must be clicked before sending the email. Click the Cancel Edit button to discard any changes.
Delete
Will place the email into a deleted Status. A confirmation will display before deletion. If the email was previously in a ready Status, it will not be sent after the delay expires.
Pause/Resume
Changes an email Status of from ready to paused, or vice versa.
View Log Messages
Displays a more detailed breakdown of the different stages of the email.
Print
Will print the body of the email. The Windows printer dialogue will appear first to let you change any preferences.
View Log | File Menu
 Export to file
Exports the current log to a .xml file, which can be opened in Excel.
View all errors
If there are any errors in the log, using this option will open a new window with only the emails that have errors.
Resend Todays Failed Messages
Will attempt to resend any messages that failed that day.
File | Search Logs
This menu has been designed for users to locate specific emails by apply filtering criteria, and narrow down the searches to specific buildings and/or users. Columns, Sort Order, and the maximum number of results can be limited from 10 to unlimited. Results can be restricted with the following fields:
- Building Number
- Date/Time
- From
- Id
- Receipt Requested
- Send Delay After
- Send Status
- Subject
- To
- Type
- User (this will only be available if the user searching has permissions to search other users)
- Open the Communication menu and click File > Search Logs.
- By default, some Filters are already added, so if those meet your requirements, simply click the Refresh button.
- If more Filters need to be added, proceed to the next step.
- Click the green 'plus' button to add another filter or the red minus button to remove a filter.
- Select the required Field from the drop-down list.
- Select the relevant Condition, which is dynamic and will vary depending on which Field you have selected.
- Select the appropriate Value, which is dynamic and will vary depending on which Field and Condition you have selected.
- Click the Advanced button to reveal these tabs:
- Columns lets you choose which columns you'd like displayed in the results window.
- Sort Order lets you choose the order in which you'd like your results displayed. Newest to Oldest, by building number, etc.
- Advanced has a drop-down menu to choose Maximum Number of Records to Retrieve, varying from 10 to unlimited.
- After clicking the Refresh button, the results will be displayed.
- Click on one of the emails to display its contents as well as a links to any attachments in the preview window on the right.
- Click the Export button to export the table of results to Excel.

Search Logs | Saved Searches
'Saved Searches' are designed for convenience so that you can save a selection of fields, columns, and a specific sort order so that it can be loaded later. There is also a tool to assist with quick-finding fields of text information. Use the top right corner and enter text into this field to search. Click Find First or Find Next to locate results.
'Saved Searches' can also be set as the 'default' search for the selected screen. This means that the selection of fields, columns, and specific sort order will be the one chosen whenever the menu screen/icon is selected.
'Saved Searches' can be saved for the current user, globally (accessible to all users), or for a specific user group.
If a Saved Search is loaded/opened this will be noted at the top of the search screen.

Saved Searches | Security Setup Permissions
A security permission will either allow or deny individual Users or User Groups access to create or delete a search. The permission is called ‘Save Group and Saved Searches’ under the 'Menus' category in Security Setup. You can also type the word ‘Search’ into the filter field and click the Filter button to see the permission.

If the User or User Group do not have the permission set to 'Allow', then the ability to save a search for all users or a user group will be inactive.

Saved Searches | Set up a new Saved Search
- Configure the required fields and click the Refresh button to display the required data.
- Optionally click the Advance button to also configure the displayed columns, and specific sort order.
- Click the Refresh button to display the data.
- Click the Save Search As button, and the 'Save Search' window will appear.
- Enter a 'Name'.
- Select one of the three radio buttons, depending on your requirement:
- Available to current user only will save the search for the current user only.
- Available to users in security group will save the search for the User Group selected from the drop-down (this radio button is only available if you have the right permission, and the User Groups available in this list are limited to the User Groups that you are a member of).
- Available to all users will save the search for all StrataMax users (this radio button is only available if you have the right permission).
- Optionally tick the Save as default box to load this 'Saved Search' whenever the menu screen / icon is opened.
Saved Searches | Load or Delete a Saved Search
- At the bottom of the screen, click the Load/Delete Search button.
- In the 'Load Search' window, click the blue Load button to load the Saved Search, or click the red cross button to delete the Saved Search.
- If you click the Load button, the 'Load Search' window will disappear, and the screen will refresh automatically and load the Saved Search data.
- If you click the Delete button, a confirmation pop-up will appear; Click Yes to confirm the deletion.
When a Saved Search is loaded/opened, the Saved Search name will be noted at the top of the search screen.
Saved Searches | Edit a Saved Search
- If the Saved Search you want to edit has been set as the default search, it should be on screen already, and you can proceed to the next step. Otherwise click the Load/Delete Search button.
- In the 'Load Search' window, click the blue Load button.
- Now make any changes required to the required fields and optionally click the Advance button to also configure the displayed columns, and specific sort order.
- Click the Refresh button to display and check the data.
- Click the Save Search button to save the applied changes.
SMS Functionality
To enable the SMS functionality within StrataMax you will need to establish an account with a telecommunications service provider to send a message. The StrataMax Support team will then need to configure the provider's domain address to forward emails to for conversion into SMS messages. The service provider then forwards these messages to a mobile phone as an SMS.
When speaking with the service provider, please be fully aware of the costs involved in sending messages via SMS, as costs vary depending on the account type as well as how many SMS you plan on sending each month. All charges to both the building and the recipient should be confirmed at the time of arranging an account with a telecommunication service provider.
The Australian Communications and Media Authority (ACMA) has announced new anti-scam rules effective as of 1 July 2026.
If SMS messages are being sent using a branded sender ID, such as a company name appearing instead of a mobile number, a sender ID may need to be registered with the telco or messaging provider.
From 1 July 2026, unregistered sender IDs will appear as “Unverified” rather than the business name and may be grouped alongside potential scam messages.
This could impact:
- appointment reminders
- account notifications
- payment alerts
- security verification codes
- delivery or maintenance updates
- customer communications sent via SMS platforms
With scam activity continuing to rise, these reforms are designed to help consumers identify legitimate communications and reduce impersonation fraud. Further information is available from the ACMA website.
After speaking to the service provider, please email the StrataMax Support Team at support@stratamax.com.au to initiate the setup of the SMS functionality in StrataMax.
StrataMax takes no responsibility for high usage or volume charges encountered as a result of this service. It would be worth considering charging a fee to owners or recipients to warrant utilising this feature.
This option must be investigated to its full potential for integration between StrataMax and the SMS service provider to ensure connectivity.
See the SMS Broadcast website for more information: https://www.smsbroadcast.com.au/
Important information for sending an SMS through StrataMax:
- There is no Subject line on an SMS message, only text from the body of the email window.
- Formatting will not be kept; like standard SMS messages, it will be treated as one line, as this is how the recipient will receive it.
- The Report Distribution window will allow multiple buildings to send an SMS based on the SMS template set.

- The alternative method is available via the Communications menu, which is a per building option.

