 |
|
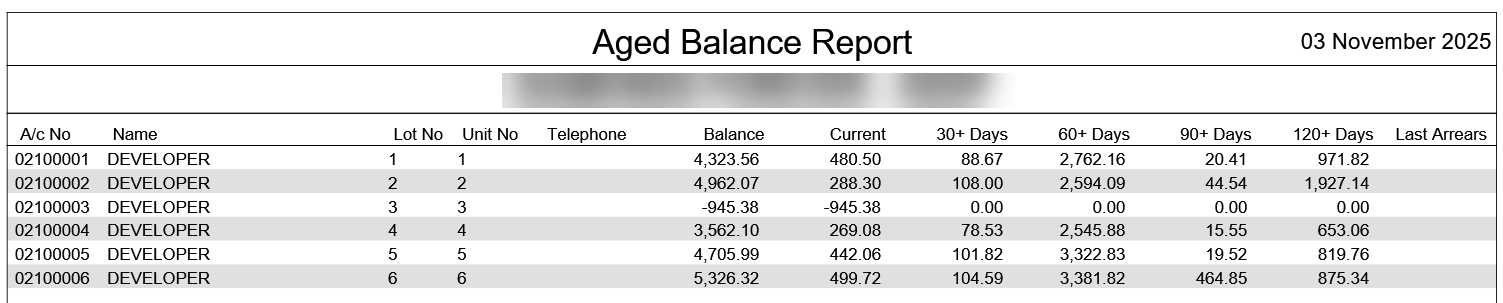
The Aged Balance List reports on all debit or credit balances, displaying the age of any outstanding amount(s) for all owners and is available for Aged Balance List (Second Debtors) who are non-owners.
When a lot has been put into legal action, it will show the asterisk (*) symbol at the end of the owner's name and also after the last arrears date. Due to a lack of space, the date will display as 010123 instead of 01/01/23 while in legal action.
Aged Balance List / Aged Balance List (Second Debtor) Configuration
An Aged Balance List for Owners or Second Debtors (non-owners) can be included individually or as a Report Set. Each report has the same configuration available.
- Search or select Report Set.
- Search or select the Aged Balance List or Aged Balance List (Second Debtors) report.
- Click the cogwheel, then review the settings that allow Nil Balance Items, including Not Due Levies and Amount Start/Finish Fields.
- Set Report Output Order as required and the Template for standard Aged Balance or Second Debtors.
- Click Close once set.

Aged Balance List /Aged Balance List (Second Debtor)
These reports can be generated locally or globally. This can be useful when running for Owner's and Non-Owner balances, and is available in the Sub-Group. If accessing from the Sub-Group, use Merge Letters to access the reports.
- Search or select Report Set.
- Search or select the Aged Balance List or Aged Balance List (Second Debtor) report.
- Click the cogwheel, review the settings and template where required.
- Click Close once set.
- This can be saved as a report set with further reports by clicking +Report button and adding further reports. Once all reports are available, click the Save icon. Enter a Report Set name and click OK.
- To run this across multiple buildings, use the Building selector area and tag the buildings.
- The default recipient will be the internal user.
- Drop the recipient type if required, and select the appropriate type. If for sending to a recipient, tag this contact and click Proceed to preview.
- In the preview window, click Proceed to finalise the distribution, click the save icon to save the report to a file location, click the email icon to use Communications, or click the DocMax icon to save to DocMax.
Example: Aged Balance List
Example: Aged Balance List (Second Debtors)

Aged Balance List
To produce an Aged Balance List report for balances in the selected building;
- Search or select Aged Balance List.
- In the top left of the Report Setup screen, there are three radio buttons to choose from:
- Screen: Produces an on-screen preview of the report.
- Printer: Prints the report without any preview.
- Excel: Exports the report to Excel.
- In the top right, you can choose the template you want by clicking the top ellipsis button [...] next to Template.
- There is also an ellipsis button [...] to choose a Printer, how many copies of the report you would like to print, and the paper source.
- Set any limits by double-clicking the blank cell next to the corresponding fields.
- Select Codes: Presents a list of lot accounts to select. Tag the required lots and click OK.
- Name Start: Type the first single or few characters of the first name of a range to search for.
- Name Finish: Type the first single or few characters of the last name of a range to search for.
- Amount Start: Type the number of the first value of a range to search for.
- Amount Finish: Type the number of the last value of a range to search for.
- Report Nil Balance Item (YN): If left blank it will not include any lots without a balance.
- Include Not Due Levies: This will increase the Balance and Current columns in the report, as it includes any levies generated with a due date after the report date.
- Current and Over: Type a 'Y' to display lots accounts that a have an arrears balance that is current and older. The system does this by default.
- Thirty Days and Over: Type a 'Y' to only display lots accounts that a have an arrears balance that is 30 days and older.
- Sixty Days and Over: Type a 'Y' to only display lots accounts that a have an arrears balance that is 60 days and older.
- Ninety Days and Over: Type a 'Y' to only display lots accounts that a have an arrears balance that is 90 days and older.
- Over Ninety Days: Type a 'Y' to only display lots accounts that a have an arrears balance that is current and older.
- Click OK.
