 | The instructions in this article relate to Legal Action. The icon may be located on your StrataMax Desktop or found using the StrataMax Search. |
It is recommended to complete the Legal Action Setup prior to adding any lots.
Once an owner has been added to Legal Action, no further arrears notices will be issued. The system also warns that this owner is in Legal Action or Payment Plan in the following places:

Create Agent
Creating a collection agent is maintained via Applicant Maintenance and accessed via the Change Agent button. This button manages each respective agency, including the internal Payment Plan types.
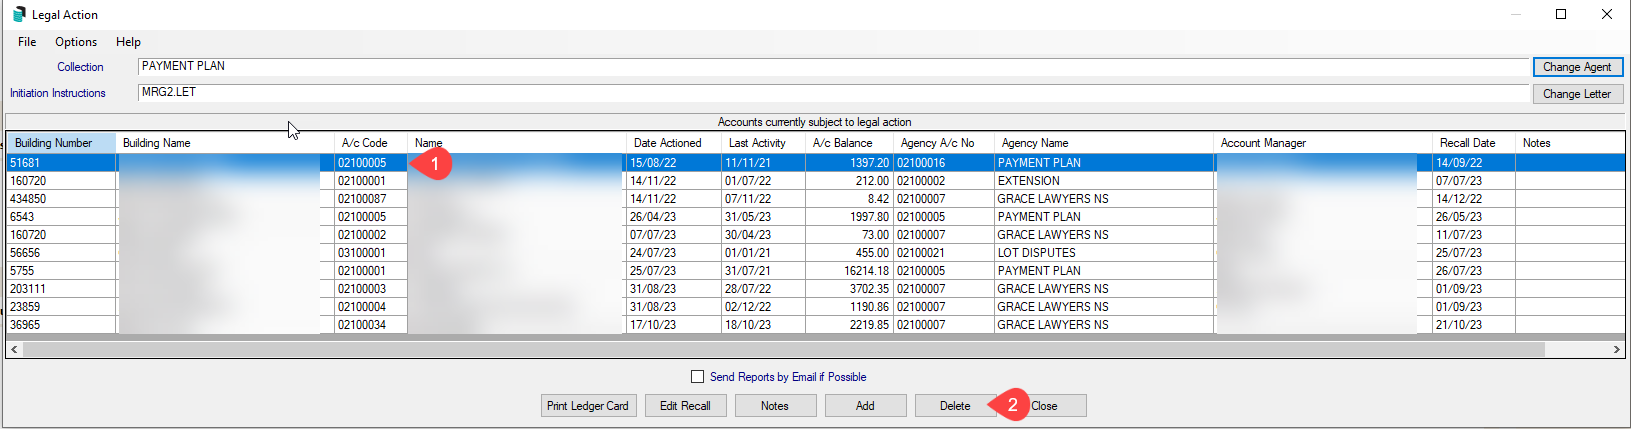
Add an Owner to Legal Action
When a lot is in arrears, and the final arrears notice has been issued from the Arrears Notice, it can be added to Legal Action if required. Interest will continue to be charged even if the lot has been added to Legal Action, so if you want to stop charging interest on the lot, see Not Charge Interest for One Owner. This can be for an internal payment plan agent or a collection agent (third party collection agent)
- Search for or select Legal Action.
- Click the Change Agent button to select or change the Collection Agent.
- Click the Change Letter button to select or change the Initiation Instructions letter (a merge letter, set up in Merge Letters).
This does not need to included if not required. - Click the Add button.
- Select the building and click OK.
- Select the owner and click OK.
- Select Option: Email / Email and Print / Print / No Print or Email / Close.
Repeat this process for each owner, remembering to change the collection agent and instructional letter when adding owners to different agencies/payment plans before selecting an owner.

Check that the correct agent and the correct instruction letter is also selected before you click Add. Click Change Agent or Change Letter if you need to change these. These would have been set up as part of the Legal Action Setup process.
Add Notes to an Owner in Legal Action
- Search for or select Legal Action.
- Select the owner account to add a note to.
- Click on Notes and enter the note into Notepad.
- Click OK.
Remove an Owner from Legal Action / Adding to a different Legal Action Agent.
When the debt has been paid or the action has ceased, delete the record from Legal Action. This should be actively reviewed for each agent, including internal payment plan agents, as these lot accounts will not be included in the arrears process if they are still set in this area.
The legal action record and notes can still be viewed by selecting File > View Archive.
- Search for or select Legal Action.
- Expand the window to full screen. Refer to the owner account with the relevant collection agent and click Delete.
- Select the owner account to delete, and click Delete.
- Click Yes to confirm the deletion of the account in legal action.
- Make your selection from the Arrears Log Action to either:
- 'Change Arrears Log to 'Notice 1''. This action will reset the arrears flag to type 1 and start the process again.
or - 'Leave Arrears Log in its present state'. This action will leave the arrears flag in its current state (keeping in mind that this may be the end of the arrears schedule, so action with caution).
- 'Change Arrears Log to 'Notice 1''. This action will reset the arrears flag to type 1 and start the process again.
- If no further action is required, click Close and Close.
- If this lot account is to be added to a different collection agent, click Change Agent, select the Debt Collection from the list, and click OK.
- Click Add, select the building, and click OK.
- From the list of owners, select the lot account and click OK. Select a delivery preference for initiation instructions (if set). If no delivery preference is required, click No Print or Email (suggested for internal payment plan type).

Add Multiple Owners into Legal Action
Add multiple owners based on the days overdue and amount overdue for Debt Collection. This process would only be done for those owners who will be submitted to a debt collector and not to an internal collection agent.
- Search for or select Legal Action.
- Select Collection Agent for the Debt Collector.
- Select Options > Overdue Report.
- Tag the required building/s and click OK.
- Enter the required options for the report:
- Days Overdue: enter the days overdue e.g. 90 (this will only report owners to add to legal action that are 90 days in arrears).
- Include Already in Legal Action: 'N' for No.
- Include Electricity: have set to 'N' for No.
- Set Clear Flag: have set to 'N' for No.
- Minimum Arrears Amount: set a minimum arrears amount (i.e. $2,000.00).
- Include Already Issued Arrears: have set to 'Y' for Yes.
- Click OK.
- You will be asked to set the overdue days and the minimum arrears amount as the global default, click either Yes or No.
- Select Sort Preference and click OK.
- StrataMax will now run through the buildings and once this has finished a list of owners will be displayed.
- Tag the owners that will now be added to the Debt Collector and click OK. No action will be taken for lots not tagged.
- A message will now display 'Tagged records will be sent to Debt Collector Name for legal action. OK?' Select Yes, if correct. If this not correct, select Not.
- Click on the appropriate option to Email / Email & Print / Print / No Print or Email.
- This function emails/prints the debt recovery letter and ledger card to the debt collector).
Arrears Manager
Arrears Manager is the same as the arrears manager in all areas. You may add notes from this menu, which are linked to the owner’s notes. Refer to the Arrears Manager article for further information on how to use this feature.
Update and Print Ledger Cards
This function updates account balances and if there has been any activity on the owners account, it will automatically print the ledger cards.
- Search for or select Legal Action.
- Select Options and select Print Ledger Cards.
- Select the required debt collector/s and click OK.
- If Building List appears; tag required buildings and click OK.
- If there are no changes to the owner’s balances then a message will appear No records found for printing.
- If there are changes to the owner’s balances then it will automatically print those ledger cards.
Update and Email Ledger Cards to Debt Collectors
This function updates account balances and if there has been any activity for any of these owners it will automatically email the ledger cards to the Debt Collector.
- Search for or select Legal Action.
- Select Options and also Email/Print Ledger Cards.
- Select the required Debt Collector/s and press OK.
- If Building List appears; tag required buildings and click OK.
- Tag the buildings and click OK.
- If there are no changes to the owners balances then a message will appear 'No records found for printing!' If there are changes to the owner’s balances then it will automatically email those ledger cards to the debt collector/s
Update Only
This function updates account balances only, it is recommended to print the Legal Action Report prior.
- Search for or select Legal Action.
- Select Options and also click Update Only.
- When prompted '....Are you sure you want to Update Only?' Select Yes.
- Tag the Debt Collector/s required and click OK.
- Tag the buildings and click OK.
- A message may show if there are no records to update.
Recall Days
The system allows you to set a default for recall days and to also set recall days for specific owners. The Recall Date is the date that you want to use as a date to review the case or take further action. It is intended to be used by the person who looks after Legal Action and would likely view the list of legal action cases on a regular basis. The list can be sorted into Recall Date order for user selection. The date can be edited manually after a review. The initial recall date is set using the date of entry into Legal Action plus the number of days set in Set Auto Recall Days.
Set Auto Recall Days as default (Will be applied to all buildings and all owners)
- Search for or select Legal Action.
- Select File and then also Set Auto Recall Days.
- Enter no. of days as a default and click OK.
Set recall date for individual owners or manually
- Select the owner and scroll across until you see Recall Date column and then click Edit Recall button and enter the date and click OK.
- Sort into Recall Date to review or send the report to Excel which will show you the Recall Dates (see reporting below).
Reporting
Print a Legal Action Report
The legal action report provides a list of all owners currently in debt collection with the original arrears value.
- Search for or select Legal Action.
- Select Options > Legal Action Report.
- Click on Sort Preference.
- Select the appropriate sort preferences and click OK.
- To select an item, click on the Select button or double click in the Order column.
- Select Account Managers – This selection allows you to print this report by account manager with the option to print a New Page for Change to Account Manager by ticking the box.
- Select Collection Agents – This selection allows you to print this report by collection agent with the option to print a New Page for Change to Collection Agent by ticking the box.
- Once your selections have been made, simply click Print Report.
- Click OK to print report.
Agent Summary Report Only
This will print a separate summary report for each collection agent selected.
- Search for or select Legal Action.
- Select Options > Agent Summary Report Only.
- Tag the Collection Agent to report and click OK.
- Tag all buildings and click OK.
Agent Summary Report Only to Excel
This will not print the summary report but open in Excel, the summary of which will have all collection agents listed on the one summary.
- Search for or select Legal Action.
- Select Options > Agent Summary Report Only to Excel.
- Tag the Collection Agent to report and click OK.
- Tag all buildings and click OK.
Agent Summary Report with Statements
This will print the Summary Report with Ledger Card/Statements for the selected collection agents.
- Search for or select Legal Action.
- Select Options > Agent Summary Report with Statements.
- Tag the Collection Agent to report and click OK.
- Tag all buildings and click OK.
View Archive
Archive is a record of all owners that have been added to Legal Action & subsequently deleted & includes notes.
- Search for or select Legal Action.
- Select File >View Archive.
- To view the note that was added, highlight an owner and click Notes. These notes can be viewed from the roll as well.
View Saved Log
- Search for or select Legal Action.
- Click File > View Saved Log.
