| The instructions in this article relate to EFT Manager. The icon may be located on your StrataMax Desktop or found using the StrataMax Search. |
When an EFT payment has been created through Payments, a "batch" is ready to be created for the applicable bank. EFT Manager is designed to create the batch, whilst checking for any issues, and at the same time removing or reversing any payments if required. Once the batch has been Authorised and Finalised the Remittance Advices can be sent to your contractors.
EFT Manager Security Setup
The following security permissions in Security Setup may restrict access to specific functions noted below:
- EFT Manager: Restricts the ability to access EFT Manager.
- Edit EFT Reference to Account Number: Restricts the ability to add new, edit or delete EFT References setup in Configure References.
- Edit the configuration of EFTs: Restricts the ability to enter the Configure menu of EFT Manager.
- Submit or Export EFTs in EFT Manager: Restricts the ability to authorise & export EFT payments.

EFT Manager Configure
Generally this would already have been configured by the StrataMax Support team during the installation of StrataMax, but may be required if you have changed banking institutions. This is the location where payment file will be saved so that you can then upload it to the bank's web site.
Setting up Bank Account Configuration will automatically create the required ABA file path; this is where the ABA will be saved to. This step is not required for StrataCash Management.
- Search or select EFT Manager.
- Click the Configure button in the top right.
- Tick the box for the required bank that will be used for EFT payments.
- Make a note of the file path, which will populate automatically; this is where the ABA file will be saved for later when you want to upload the file to the bank's website for authorisation.
- We recommend adding this folder to your Windows Quick Access folder list so that ABA files can be located quickly when uploading them for authorisation.

- We recommend adding this folder to your Windows Quick Access folder list so that ABA files can be located quickly when uploading them for authorisation.
- Click Save.

Additional Configuration Settings
If the Except Managers Account check box is not selected, the GLMax banking will not automatically match.
When ticked the Company / Building Name will be used as the remitter, if unticked enter the required name in Remitter Name field. This is used for all Companies / Buildings.
EFT Details to Display Building Short Name
When ticked the building's short name (from Building Information) will be used as the reference so that it appears on creditor's bank statements when payments are made.
EFT Manager | Preparing Payments
This section covers the process that most managers need to follow when sending a payment file to the bank in order to authorise payments. This is done after the Payments stage as part of the Payment Process; when this is complete, a batch will display in EFT Manager and once the batch has been Authorised and Finalised the emailing of Remittance Advices can be completed.
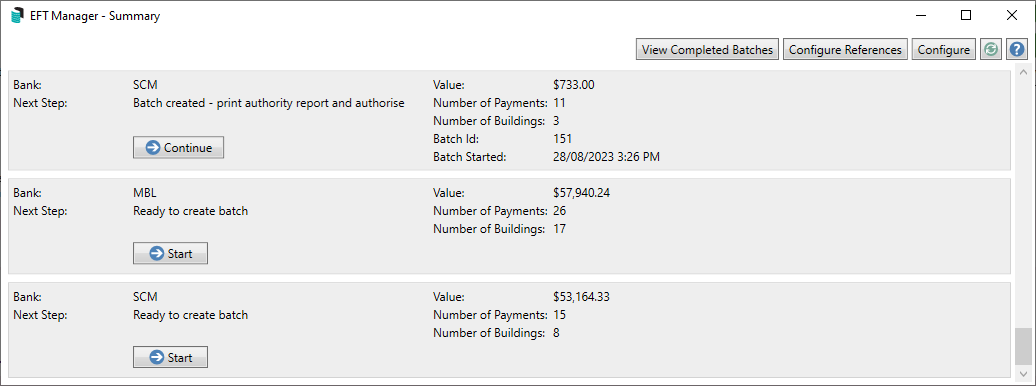
- Search or select EFT Manager to view the summary page; which displays any new batches ready to create and any batches previously created, but not finalised.
- Click the Start button on the required batch. Select Continue if you are continuing to process a Batch. Refer to the Batch Started data and time.
- If paying all buildings and all creditors, click the Continue button; if paying only for selected buildings and/or creditors, select from the options and tag the required buildings and/or creditors. The tag lists for buildings is only available if All Buildings is not selected and the tag list for creditors is only available if All Creditors is not selected.
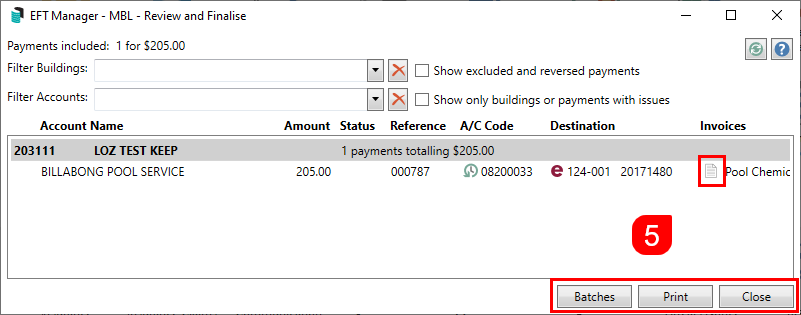
- Review the payments included within the batch. The payments are broken up by building; the below radio buttons and tick boxes are available:
- Show creditor and other payments: all payments will be displayed.
- Show creditor payments only: only payments to Creditors will be displayed.
- Show other payments only: only payments to Non Creditors such as owner refunds will be displayed.
- Show excluded and reversed payments: excluded and reversed payments will also display if ticked however the text will be in grey.
- Show only buildings or payments with issues: only buildings & payments with issues will be displayed; refer to Issues below for explanations.
- If a payment needs to be excluded from the batch, click on the red 'minus' - icon. The payment will be removed from the batch and included in the next batch for the specific bank.
- If a payments need to be reversed, click on the orange 'arrow' icon to reverse the payment using Payments Management.
- Click on the History (green clock with arrow going backwards) icon to view previous payments to the creditor.
- Click the Show Invoice icon to display the invoice details, then click the View the DocMax Invoice icon to display the invoice, which was added to DocMax.
- Click the Print button to print the EFT Authority Report after any payments that need to be excluded or reversed are actioned. It's recommended to save a copy in DocMax in case it needs to be referred back to in the future.
- When printing the EFT Authority Report, an option is available to include excluded and reversed payments if required. The report will identify these are excluded and/or reversed.
- The 'Page break on...' tick box is dynamic and creates page breaks according to whichever Report Order radio button you selected above.


- Click the Authorise button.
- Clients who do not use StrataCash will be required to enter the username and ID, which must be obtained from the bank. It is imperative that this verification information is entered absolutely correct for the bank to accept it. It must also remain totally confidential. Authorisation will now be complete and the ABA file will be created; and the Remittance Advice can be sent once the the ABA file has been uploaded.
- StrataCash clients will be asked whether to authorise the payments now or later. For details on authorising payments on the StrataCash website, see the StrataCash Website article.
- Upload ABA file to your bank's website.
- Click the Finalise button.
- Select to Email Remittance Advices when ready to send all Remittance Advice emails to contractors / creditors.
Note: Any contractors / creditors without an email address recorded in their Contact, who require a Remittance Advice to be printed, can be printed individually per payment from Payments Management.
Note: If Disbursements are enabled for 'Payments' the TRMax recovery charges will be created at the finalisation and email stage. - Click Yes to 'Are you sure you want to send remittance advices for this batch?'.

Please Note: A confirmation message will display if EFT Manager is closed without sending Remittance Advice emails, and Remittances can be emailed after closing EFT Manager by reopening EFT Manager and selecting the batch.
Email Remittance Advices
The finale stage of the Payment Process is to submit the ABA file to the bank and then email the Remittance Advice to your contractors. Once the Batch of payments have been Authorised in EFT Manager and then Finalised, the option to Email Remittance Advices will be available. When this button is selected you will be prompted to send the Remittance Advice.
Note: Any contractors / creditors without an email address recorded in their Contact, who require a Remittance Advice to be printed, can be printed individually per payment from Payments Management.
Tip:- A tailored message can be included in the body of the email for your Remittance Advice from Email Template Manager by selecting Eft Remittance Advice.
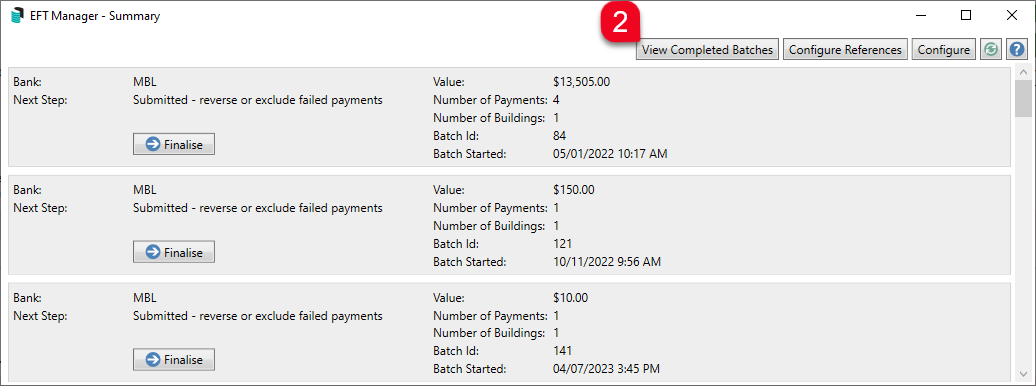
- Search or select EFT Manager to view the summary page; which displays any batches ready to create and any batches previously created, but not finalised.
- Select the batch and ensure your batch has been Authorised and the ABA file uploaded to your bank's website.
- Click the Finalise button.
- Select to Email Remittance Advices when ready to send all Remittance Advice emails to contractors.
- Click Yes to 'Are you sure you want to send remittance advices for this batch?'.


Re-Open Finalised Non-SCM Batches
Non-SCM batches can be opened if:
- There are no presented payments for the entire batch.
- If the batch was finalised within the last 7 days (including the current day).
- Batch has included payments.
- Search or select EFT Manager, and the Summary screen will open.
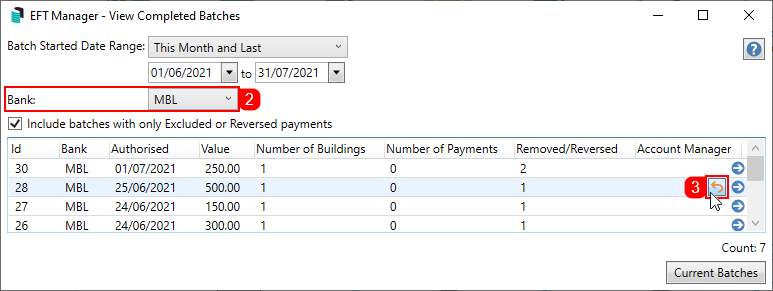
- Click the View Completed Batches button in the top right, and use the Bank drop-down menu to select the non-SCM bank if required.
- Once you have located the required Batch, and provided it is eligible to be re-opened, click the Re-Open Batch button, which is an orange "return" arrow.
- The ‘Authorise and Print’ screen will appear and the authorisation process can be carried out.

If you have any questions on re-opening a Batch or re-sending Remittance Advice please contact our Support Team.
SCM Rejected Payments
SCM payments within a batch may at times be rejected by the SCM website after authorization; these payments will appear in EFT Manager on the summary screen. Payments may be rejected due to invalid BSB's, SCM accounts not being open or on hold, for example.
The rejected payments can be managed using steps 5 and 6 above, or if the BSB was invalid this would need to be corrected in Creditor Maintenance and re-authorised. Payments that were not rejected would process as normal.
Once the rejected payments have been reversed or excluded from the batch; the batch should be finalised by selecting Finalise.
EFT Manager | Payment Warnings
The EFT Manager at times will display a warning icon (yellow triangle) and a refresh button (green circle) for a payment. Some of the warnings only display a warning icon, and are displayed for info purposes so that you can check that the details of the payment are correct before authorising the batch. Other payments have a warning icon as well as a refresh button, and in some cases you may see two refresh buttons, but only one warning icon. Hover your mouse cursor over each refresh button to display a tool tip that says what the refresh button does.
The batch cannot be authorised until you have checked that all payments are correct and their refresh buttons have been clicked, or until the payments have been excluded from the batch.
Bank A/C changed since last payment
This means that the current payment for the creditor has been made to a different bank account than the previous payment for the specific building. Note that this will only observe payments included in the batch, and not excluded or reversed payments. It is recommended to check when bank account details are changed; check the invoice and contact the creditor by phone. This phone number should be sourced separately from the invoice and be from a trusted source. There is additional security available to implement using the Bank Account Change Approval Process.
Bank A/C changed
This means that the bank account has changed after the payment was completed through Payments. The bank account should be checked to confirm if the change is correct, and if so, click on the refresh button (green circle) to update the bank account details in the batch. There is additional security available to implement using the Bank Account Change Approval Process.
BSB Invalid
This means the BSB is not a valid BSB number and should be checked in Creditor Maintenance and corrected. Re-check the details on the batch are then correct so that the payment can be completed. An invalid payment must be corrected or the batch will not be able to be authorised.
Available Balance v total of payments
This displays with an explanation mark if the available balance is less than the total payments for the building. The available balance is made up of the bank balance less unpresented payments.
Debit Title Must Only Contain
The creditor name must only contain A-Z, a-z, 0-9 or any of the following characters; &',-./+$!%()*#=:?[]_^@.
Account Name changed
This means that the creditor name has been changed in Creditor Maintenance after the payment was completed through Payments. It is recommended to open Creditor Maintenance to check the name is correct, and if so, click the refresh button for that payment in EFT Manager to update the name.
Bank Account entered manually
This is a warning that the bank account has been entered manually which may need to be investigated.
View Completed Batches
To view completed batches follow the below steps:
- Search or select EFT Manager.
- Click the View Completed Batches button in the top right.
- Use the date range and bank filters if required.
- Click the arrow icon on the right to view the batch details.

- From within the batch, all previous functions like printing, and viewing the invoice details can be done.