Report Distribution is used to produce a configured report or formatted output for the selected area. This can include a report, template, notice, letter, label, certificate, ledger card, report pack, or other stored report output.
The screen opens with the appropriate recipient list for the selected report type. For example, Merge Letters offers the Owners List from the Main area or Other Debtors from the Sub-Group area, while Roll List defaults to the Internal Recipient list based on users set in Security Setup.
The Distribution Method settings are specific to each area and, when changed, remain set in that area for the next distribution. These settings are also available when a report is produced from Report Set.
When to use Report Distribution
Report Distribution is used when you need to generate a configured report or formatted output for printing, emailing, saving, or storing to DocMax.
Search screens, Report Distribution, Report Set, and Stored Reports are used for different purposes:
- Report Distribution: Use this when you need a configured report, template, notice, certificate, ledger card, label, letter, or stored report output.
- Search screen: Use this when you need to locate records, add columns, filter results, or export a list of data to Excel.
- Report Set: Use this when multiple reports need to be grouped and produced together for a building or purpose.
- Stored Reports: Use this when you need to retrieve, resend, reprint, or review reports that have already been generated and saved.
Note: Some older Global Reports and Preview Feature outputs are now accessed through Search screens or Report Distribution. If a legacy menu no longer gives the expected output, search for the report name and review the relevant Search or Report Distribution article.
Distribution options
The available distribution options determine how the selected output is produced or delivered.
- Post sends the report to the selected printer. Including any BING printers, and where you can access the Bing Mail settings. The currently configured printer is displayed. To print to Bing, ensure the printer is set to Bing Easy Post API and that Use Bing for Print is ticked.
- Email sends the report by email where recipients and templates are configured. Email Subject, Email Body, From Address and Email Delivery Preference can be adjusted here, including setting temporary email details. Using BING for email is also controlled here and is available using the BING API (charges may apply - contact Bing for further information). Tick Use Bing for Email to send email to BING for processing. Emails sent via Bing will not appear in the Communication log.
- SMS is available only where the third-party SMS service is enabled.
- Save Report saves the report to DocMax when the required profile is selected.
- Use Preferences applies the contact preference settings for the selected distribution method.
Note: If a report needs to be saved without emailing or printing, select Save Report and choose the required DocMax profile.

Report Distribution Overview
This section describes the main buttons, fields, and tick boxes in the top left of the Report Distribution window. The Distribution Method tick boxes are explained in the next section.
- Building: Use this building selector tool to tag multiple buildings and apply standard building filters such as Account Manager or Financial End Month. Clear any building filters after use to ensure the next process runs with the correct buildings.
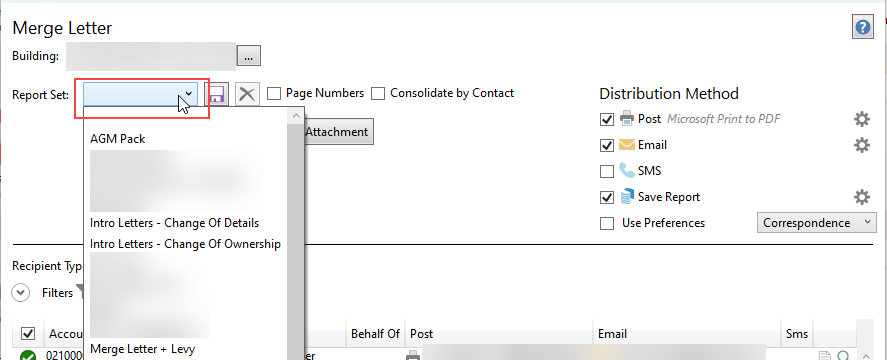
- Report Set: Select from a pre-configured report set that includes merge letters, attachments, and reports. The save and delete icons next to the drop-down selection control the action taken for the selected report set.
- Page Numbers: Includes page numbers in a centred paragraph position on the merge letter and all attachments.
- Consolidate by Contact: Consolidates the merge letter and any attachments into one pack for distribution. With this option enabled, any contact who owns multiple lots will receive one combined delivery in report order. For multiple buildings, that contact will receive one pack for each building.
- + Report: Provides access to various building, owner, and global reports that can be added to a report set.
- Attachment: Opens the Add Document window from DocMax, allowing the user to navigate to the attachment, either in DocMax or from a folder location.
- Up / Down arrows: Use these to change the order of documents and reports.
- Report / Document Cogwheel: Opens the configuration window for that specific document or report.
- Red Cross / X: Removes the report or document from the window so it will not be produced or sent.
When the cogwheel is selected to configure each report, the display next to that report updates when defaults are changed.

Email Template Setup
Refer to the Email Template Manager article for instructions on managing email templates, including temporary templates for one-off use.
Consolidate by Email Address
This option allows notices for multiple accounts that share the same email address to be sent in one email with separate attachments. This can reduce duplicate emails when the same email address is used for more than one account.
For example, if an agent manages several lots in a building and notices are set to be emailed, Report Distribution can be configured to send all notices in one email as separate attachments. A record will be added to DocMax and the Roll for each account.
For the email subject line, unique subject lines will be combined. It is recommended not to use merge fields in the subject, as this can make the subject too long and exceed email character limits. Review email templates before using this setting.
Please note that the Report Distribution screen must be closed and reopened for this setting to take effect. When enabled, this configuration applies across all Report Distribution screens and will display, from the preview window, a record for each recipient and only one delivered item in the Communication log with all attachments included in the one email.
This feature can be applied as a default configuration or as a one-off configuration.
Default configuration
- Search for or select any window that uses Report Distribution.
- Select the Configuration cog icon.
- Enable Default to Consolidate by Email Address.
When enabled, emails for multiple accounts sharing the same email address will be sent as one consolidated email with separate attachments by default.
One-off configuration
If the default setting is not enabled, this option can still be applied for a single distribution.
- Select the Email Template Configuration cog icon.
- Locate the Consolidate by Email Address setting at the bottom of the configuration screen.

This setting sends all notices to the same email address as a single email with separate attachments.
Please note that this setting is not persistent and must be configured each time the feature is required. If the default setting is not enabled, the one-off setting resets after each distribution.
If Consolidate by Contact is enabled, notices will be consolidated into a single document rather than multiple attachments. Consolidation by email address applies only to email distributions.
For the email body, only the content from the first notice email body appears in the email. For example, if levy notices for two lots are sent together, the details shown, such as merge fields, will come from the first lot in the report.
SMS
If using a third-party SMS service, this can be configured to deliver to recipients who have a valid mobile number. This is also where the SMS template is set. If this service is not enabled, the SMS distribution method will not be displayed.

Save Report (DocMax)
The Save Report tick box saves the document and all attachments to DocMax. The currently selected profile, if one has been chosen, is displayed on screen. Select the appropriate profile before generating the reports or documents so the BCMax System Document can be added to DocMax.
Use Preferences
Each contact has their own delivery preference. This tick box controls whether or not to use the contact's preferences when sending a document, and the drop-down controls which delivery preference to apply. Without using preferences, the default will be post.
The Title field in DocMax reflects the document or report name, and BCMax System Document is used as the Added From condition when searching for these documents in DocMax.
Recipients & Filters
The Recipient Type drop-down menu determines who receives the report or document. Select the drop-down menu to choose a different recipient type.
- Lot/Owner is selected by default when merge letters and other owner-type reports are being sent. This recipient type observes the different contacts in the Roll and, depending on whether Use Preferences is ticked under the Distribution Method section, it will change the recipient list and the way the item is sent. More filters are available for this recipient type.
- Other Debtor recipients are in a Sub-Group and are maintained in Debtor Maintenance. More filters are available for this recipient type.
- Letting Agent observes any letting agents recorded in the Roll. No filters are available for this recipient type.
- Owner observes owners only in the Roll and does not include letting agents or other contact types. No filters are available for this recipient type.
- Tenant observes any tenants recorded in the Roll. No filters are available for this recipient type.
- Creditor observes any creditors recorded in Creditor Maintenance, including hidden creditors. No filters are available for this recipient type.
- Office Bearer refers to committee members in Office Bearers. More filters are available for this recipient type.
- Applicant observes contacts in Applicant Maintenance.
- Resident observes any contacts in the Roll who reside in a lot. This includes tenants and any owners who have Is Owner Occupied selected in the Change of Details screen. More filters are available for this recipient type.
- Internal Users displays the users set up in Security Setup.
Committee Member radio buttons are available only when Lot/Owner is selected in the Recipient Type drop-down menu, and determine how committee members are treated.
- All: Includes all owners or lot contacts, regardless of whether they are committee members.
- Exclude: Excludes committee members from the recipient list.
- Only: Includes only committee members in the recipient list.
Lot Type radio buttons are available only when Lot/Owner is selected in the Recipient Type drop-down menu and determine whether other lot types, such as car spaces and storage spaces, are included in the recipient list.
Include only tick boxes observe various settings in the Roll screen.
- Committee Meeting Minutes, Committee Meeting Notices, and Advertising OK: Refer to the corresponding tick boxes in the Edit Correspondence Preference window. See Roll Correspondence Preferences for more details.
- Owner Occupied: Observes the Is Owner Occupied box configured for each contact. This is accessed by editing the contact details in the Roll screen. See Contact Change of Details for more information.
- Intro Letters Not Sent: Filters the list to owners who have not received the StrataMax introduction letter. This is useful if the letter needs to be sent manually instead of during a Change of Ownership.

Select all is a tick box on the far left of the recipient list header and is used to select or clear all recipients in the list. It performs the same function as the keyboard shortcuts Ctrl+A and Ctrl+X.

Search is available for larger recipient lists and can be used to enter recipient details, excluding the 0210000X record, which will highlight the record for tagging.

Recipient List Export
To export the recipient list for use in a third-party application, such as Microsoft Word, follow the instructions below. Only tagged accounts are exported.
- Search for Merge Letters.
- Select Cancel on the merge letter list.
- Review the Distribution Method and select the appropriate options.
- The default recipient list is Lot/Owner. Adjust this if required.
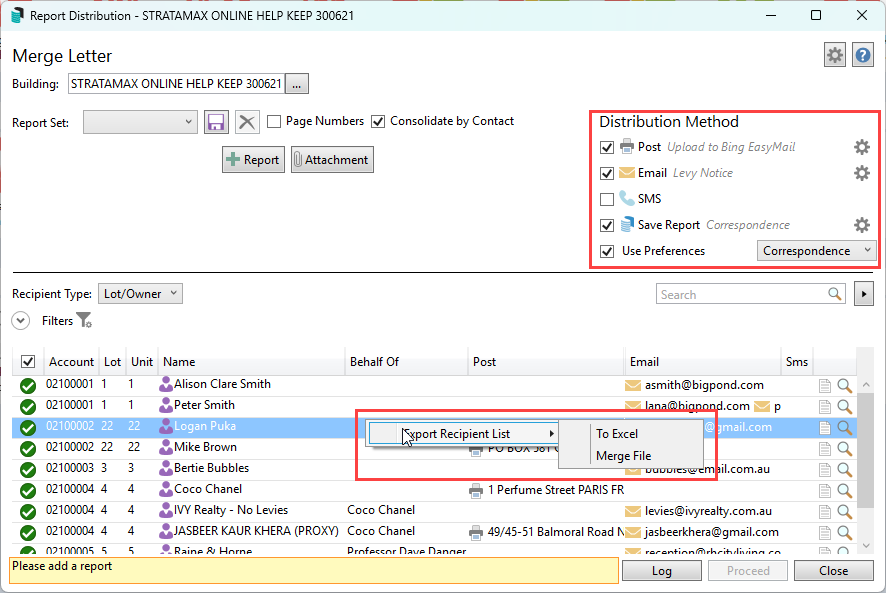
- Right-click and select Export Recipient List > To Excel or Merge File for a text document version. If using Merge File, additional fields and options can be controlled for the file output.
- Save the file in a known location.


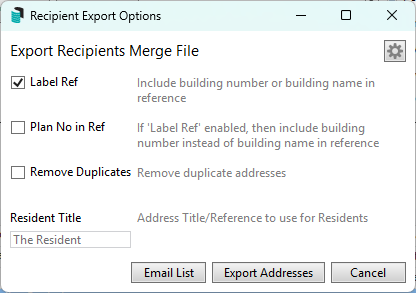
Print labels from Report Distribution
Report Distribution includes additional label printing options to give you more control over how labels are produced. You can set the title to display as The Resident, remove duplicates, choose the starting label position, and export the address and email lists.
- Search for Merge Letters.
- Set the Distribution Method, typically Post, Email, or Use Preferences, then select the required preference type.
- Select the required Recipient Type.
- Right-click and select Label Printing/Merge File.
- In the Skip field, enter the number of labels to skip if you want to begin printing from a specific label position.
- Select Configuration to set the title to The Resident, if required.
- Select the Printer menu to set up the printer before printing.
- Select Email List to generate a text file of email addresses that can be copied and pasted into Outlook or a similar application.
- Select Print Labels to print the labels to the selected printer.

Simple and Advanced Mode
Internal reports can be produced in Simple or Advanced mode. Advanced mode displays all available options in Report Distribution, while Simple mode shows a smaller screen with fewer options for quicker report production. Use the Simple or Advanced button to switch modes as required.
- Search for or select the appropriate report.
- The report name is confirmed in the top right corner. Select the cogwheel to set the template and configuration options. When the cogwheel is selected for each report, the display next to that report updates when defaults are changed.
- If required, review the Distribution Method. In Advanced mode, settings for Post, Email, and Save Report can be updated from each cogwheel.
- If multiple buildings are required, tag them using the Building Selector.
- If selected accounts only are required for the report, select Accounts and tag the associated accounts.
- If the report needs to be exported to Excel for a single building, select Excel Report to create a workbook ready for further review.
- Select Proceed to preview the report. In Advanced mode, you can also use the Magnifying Glass icon for a single-contact preview.
- From the preview window, select Proceed to distribute the report using the selected Distribution Method.
- In Advanced mode, the Report Publish window also displays the Distribution Method options, including the email body and document preview. You can use the DocMax icon to save to DocMax, or the Save icon to save to a network location.
The Email, Save to DocMax, and Save icons are also available if preferred.

Icon Guide
 |
Shows Report Data for the individual contact. This document or report contains Roll contact card merge fields and is specific to the lot. |
 |
Shows Report Data for the selected account. This type of document or report is specific at the lot level and does not rely on Roll contact cards. |
 |
Shows Report Data across all buildings. This type of document or report does not contain roll-specific merge fields. |
 |
Shows Report Data for selected buildings. This type of document or report does not contain roll-specific merge fields. |
Email Template Setup
Please refer to the Email Template Manager article to learn how to manage email templates, including setting temporary ones for one-off use.
Creating a Lot-Specific Report Set
Creating lot-specific report sets can help produce a subset of reports, documents and attachments for regular use. The Distribution method set here will be the default preset and should be considered when creating a set. Examples may include Welcome Packs or Nomination Forms.
- Search or select the appropriate report or Merge Letters.
- The report name will be confirmed in the top right corner. Select the cogwheel to set and check the template and configuration options. When the cogwheel is selected to set each reports configuration, the display next to each report is updated when defaults are changed.
- Check the Distribution Method (which will hold settings based on the previous process) for Post (print) Email and Save Report (DocMax). Set as required from each cogwheel.
- Click + Report and add merge letters or reports.
- Click Attachment to add an attachment from DocMax or +Add New Folder Location to add from the network folder.
- Once all merge letters and reports have been individually selected, use the navigation buttons to apply a sort order to each report/document, if required.
- Click the Save icon and enter the Report Set title (30-character limit). Click OK to save this to use again.

Example of Lot-Specific Report
Lot-specific reports will include the recipient lists to default to the Owners and are designed to report Owner information. Examples may consist of Roll Details Confirmation, Roll Form and Update Advice.
Creating an Internal Report Set
Creating an internal report set can assist with reporting various areas and is a transition of what is available in the Global Report Sets. This information can quickly report Bank Reconciliation Reports, Financial Statements, Creditor Balances, Aged Balance Lists and Building Information. Not all reports are available. However, an extensive range of reports can be added to this area.
- Search or select any of the internal reports using the Report Distribution screen.
- Click + Report and select these reports OR Merge Letter to add to the current distribution.
- If any attachments are required, click Attachment and navigate to where the document has been saved in DocMax OR Add New Folder Location. Click Select Document to add this document. Repeat for any further documents.
- Use the up and down arrows to change the order of documents and reports if there are multiple.
- Click Save and give the Report Set a description (30-character limit). Click OK.

Distributing a Report Set
Any configured Report Set can be distributed to a Lot-Specific contact where required. Each of these areas may include its own Report Set and should be accessed from the menu where it is set.
- Search or select the appropriate report or Merge Letters from Main or Sub-Group.
- Click Cancel if there is a Report Selection window.
- From the Report Set drop-down box, select the required type.
- If multiple buildings are to be included, tag the required buildings using the Building field.
- If running for a single building and there are multiple contacts with the same contact, tick Consolidate by Contact to enable a single delivery based on preferences.
- Review the Distribution Method options and adjust them as needed.
- Any settings adjusted here will persist through the subsequent distribution process.
- If there is a single one-off report, click +Report to add more reports and merge letters; similarly for Attachment. Add as needed.
- Click the Proceed button to preview the results.
- In the Report Publish window all the documents will start loading. When distributing to a large number of recipients, it can be useful to tick the Auto Proceed on Load Complete box, which automatically proceeds with the distribution once all documents have been processed and loaded in the Report Publish window. This tick box will remain on screen at the bottom in the green progress bar whilst documents are loading. Once they have all finished loading, the tick box will disappear automatically.

- Once all documents have completed loading In the Report Publish window, click the Print X Pages, Send X Emails, Send to DocMax button or the Magnifying Glass (single-contact selection) icon to finalise the distribution.


Attachments
Attachments can be created using any report distribution screens, which are particularly effective with Merge Letters. The instructions below refer to how to add a document attachment.
- Search or select Merge Letters from Main or Sub-Group.
- Click Cancel on the Report Selection screen.
- Use the Building Selector tool for multiple buildings and tag buildings as needed.
- Check the Distribution Method (which will hold settings based on the previous process) for Post (print) Email and Save Report (DocMax). Set as required from each cogwheel.
- Click Attachment.
- From the Select Document window, navigate to where the attachment is located, either in DocMax.
- Or from the folder location if the document has been saved in a network location.
- Click Select Document to attach this document.
- Repeat for any other document.
- Click Proceed.
- From this Report Publish window, click Print X Page, Send X Email, Send to DocMax to finalise.
Log
The log is a powerful tool that reports all sent items across all menus that use the Report Distribution screen. This will include a date and time stamp, as well as the user information. It can be used to distribute any previously distributed documents or reports, or any documents that failed to load for example.
- Search or select the appropriate report or Merge Letters from Main building or Sub-Group.
- Once the Report Distribution window opens, click the Log button in the bottom right and the Search Report Distribution Logs window will open.
- Amend any of the fields as necessary and apply as needed. This can be saved as a search for later use by clicking Save Search As and following the screen prompt.
- Once the distribution has been located, click View to see the original reports and documents.

- Make a selection for Resume / Repeat All / Repeat Only Print from the preview window.
- Resume: Resume the Distribution from where it failed.
- Repeat All: Start the original Distribution again.
- Repeat Only Print: Start the Distribution for records set to print only.

Once completed, the distribution will be marked with a Finished date in the log.
Emails can be resent from the Communication log if needed.

