 |
|
Invoice Printing will print invoices generated from Invoice Entry available to both Debtors (Owners) and Second Debtors (non-Owners). The instructions below are for printing all invoices that have not been printed and for reprinting individual invoices where required.
Each invoice entry item has its own invoice reference, displayed as the M number and this reference is used to specifically print on the invoice. If this number is not set, all invoices that have been charged to the account will be included. If a previously issued invoice charge needs to be reprinted, identify the relevant invoice number and ensure it falls within the Invoice Number Range Start and Finish fields.
Printing Unprinted Invoices
- Search or select Invoice Printing.
- In the Select Lots tab (for StrataMax Buildings) or Select Debtors tab (for GLMax Companies), tag required accounts.
- Select the Message tab.
- Type in a temporary message to use for this print only, or select a different message by clicking Message Maker and selecting a new message. For more information on the message maker, see Message Maker.
- Select the Conditions tab.
- Report Order: Select one of the following to print the arrears notices in that order:
- Account Number - Print the invoices in account number order.
- Alphabetical - Print the invoices in alphabetical order.
- Report Period: These options are only valid for unprinted invoices:
- Month to Date - Print the invoices for the current month only.
- Year to Date - Print the invoices for the entire financial year so far.
- Invoice Number Range: This will display the invoice number from the last unprinted invoice.
- Look in Local Transactions to identify the transactions that need to be printed. These transaction reference numbers start with an 'M'.
- Due Date and Pay Amount: Enter the number of days from the invoice date to set the due date.
- Show Nil if Paid - Displays an Invoice with a Nil amount.
- Show Brought Forward - Displays brought forward amounts if any.
- GST: Select whether to 'Print Non-Taxed' Invoice’s by clicking this option to select it.
- Update Due Date: Will update the due date based on today's date plus the number of days from invoice date.
- Email/Mail as per Contact Preferences: This will observe tick boxes under the 'Delivery Preferences' section in the contact card for the lot in the Roll screen to determine how the invoice will be distributed.
- Report Order: Select one of the following to print the arrears notices in that order:
- Click Proceed.
Print All Unprinted Invoices
The following instructions can be used to print ALL unprinted invoices in GLMax after the Management Fees and/or Recoveries has been posted. Set the settings in the 'Conditions' tab as required.
- In the GLMax company, search or select Invoice Printing.
- Select the Conditions tab. Make adjustments as required.
- Click Proceed. This will tag all accounts.
- The Invoices can be printed, emailed, saved as a pdf or saved to DocMax.
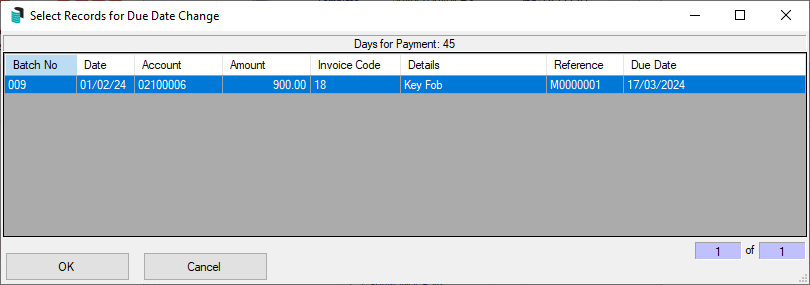
Change Due Date for Existing Invoices
When an Invoice is created, a number of days to pay the invoice can be set in Invoice Entry (Due Date). This will automatically calculate the due date based on the date that the Invoice was issued. The 'Set Pay Days' is located in Invoice Entry / File and the Set Pay Days can be local or global. If required this date can be changed before printing an Invoice;
- Search or select Invoice Printing.
- Options / Change Due Date for Existing Invoices.
- Select the invoice to be adjusted and click OK.


Reprinting a Printed Invoice
Invoices that have been printed can be reprinted. The invoice number will need to be identified and entered into the Invoice Number Range fields. Use Local Transactions to identify the transactions that need to be printed. These transaction reference numbers start with an 'M'. If the original invoice was raised in a prior year, use Local Transactions to identify the M reference. Once that is known, use the year selector tool to pick the year the invoice relates to and reprint.
- Go to Ledger Card, then tag the account and click Proceed.
- Look at the transaction to identify the M Reference number and note this.
- Look in Local Transactions to identify the transactions that need to be printed. These transaction reference numbers start with an 'M'.
- Go to Invoice Printing and in the Select Debtors or Select Lots tab, tag the account.
- Then in the Conditions tab, enter the M Reference Number in the 'Start' field. The 'Finish' field can be left blank.
- Click Proceed.
Tax Invoice Stamp Setup
If you are adding a Tax Invoice Stamp to the Invoice and need to adjust the location of the stamp, you can follow the steps below. This is only applicable if the building is registered for GST and the GST Registered field in the Building Information menu has a 'Y' in it.
If the building is not GST registered but an ABN is entered the Australian Business No. field in the Building Information menu, the ABN will display however the wording Tax Invoice will not.
- Search or select Invoice Printing.
- Select Tools >Tax Invoice Stamp Setup.
- Type in the new Horizontal and/or Vertical location as a distance measured from the left edge of the page. The measurement is in 300th of an inch, meaning 300 = 1 inch.
- Tip: Try halving or doubling the number in the first instance to gauge how much difference it makes.
- Click OK.
- Print a test invoice and check the location is correct.
Invoice Templates
The ledger cards can be configured to use certain templates. Instead of having to test each levy template, here is a PDF with the ledger card templates available, for your convenience: invoice templates
- Click the ellipsis button next to the Template field in the top right of the menu.
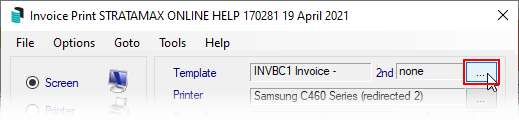
- In the Template Selection screen, select the template required, and either click the Select as Global button to use the template for all buildings, or click Select as Local to use this template for the current building only.
- If you would like to preview the template first, select the template, then click the Preview button at the bottom.
- To change the preview style, click Options > Preview Style > Field Names or Field Numbers.
- Make sure you select the Deposit in the bottom section of the screen, and click the Select as Global button.
- Click Close to close the Template Selection screen.

Tip: A StrataMax Upload must be completed before the StrataPay Reference Number becomes active for payment processing. Uploads are processed automatically overnight. If you need a debtor to make a payment immediately, you can manually initiate a StrataMax Upload from the StrataMax icon.
