There are various banking reports available in StrataMax. This article explains what these reports are for and how to produce them.
Account Balances at End of Each Month
The Bank Reconciliation Summary Report is a global report providing bank account numbers, bank balances, outstanding deposits, and other details. It also can be configured to include investment accounts. This report will not include bank accounts managed using Other Investment Accounts.
Search Bank Accounts
The Search Bank Accounts menu can be used to configure particular data to report to Excel. Available columns include bank account numbers, bank balances, account code balances and term deposit information. Bank accounts managed using Other Investment Accounts can be included.
Bank Account Balance Report
If a report is required at the end of each month, the Bank Account Balance Report can be produced each month before rolling the building into the new month and will include Investment Accounts set in Bank Account Setup. Follow the steps below to create the Bank Account Balance Report.
- Search or select Bank Balances.
- From the preview window that will display the current balances for all accounts in the selected building, click Print.
If required globally, this report can be run as a consecutive report via Report Sets.
Bank Account Statements
Bank account statements can be requested from the building's bank, even for closed accounts that were previously set up in StrataMax. For example, if the building has StrataCash accounts, you can request a statement through the StrataCash Hub. For all other banks, you must contact the bank directly.
You can also produce a Bank Transaction Report, including accounts that have already been closed and removed from Bank Account Setup. This is not a bank statement issued by the bank, but a report resembling a statement with bank reconciliation data, stored with transactions downloaded on the day's banking, if any. Due to the possibility that no bank reconciliation is stored on the last day of the month, it is recommended to print the Bank Reconciliation before performing a Month End Rollover, as the last day's banking must be completed before printing Bank Reconciliations.
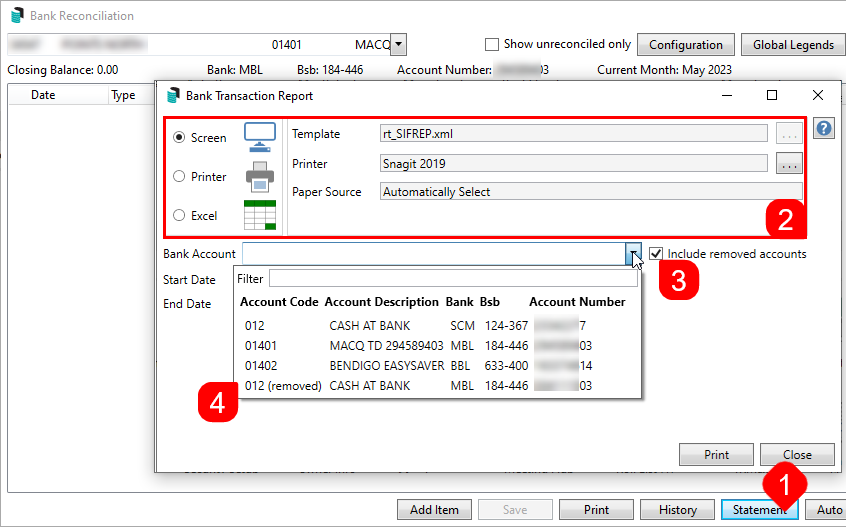
- Search or select Bank Reconciliation and click the Statement button in the bottom right. Or search or select Bank Transaction Report.
- When the Bank Transaction Report screen appears, select your output method, Screen, Printer, or Excel, and change the printer if necessary.
- Tick the 'Include removed accounts' box to include any closed bank accounts.
- Select the required account from the 'Bank Account' drop-down menu.
- Note that any that have been closed will have '(removed)' under the 'Account Code' column.
- Note that any that have been closed will have '(removed)' under the 'Account Code' column.
- Enter the Start Date and Finish Date for the required period, then click the Print button.


Unpresented Cheques (Payments)
The bank reconciliation printed on the last day of the audit period will list any unpresented cheques. There is also an Unpresented Payments and Receipts Report available.
Cash Flow Management
The Cash Flow Management report includes the Admin, Sinking Fund and Other Fund Balances. It will also include the totals for levies in arrears and advance, Cash at Bank and Investment Accounts. Lastly, it will include the next levies due date with the amount to be raised with the creditors balance and insurance next due date. This report is useful to manage budgeting and forecasting the financial status of a building.
- Search or select Report Set.
- Search or select the Cash Flow Management.
- This can be saved as a report set with further reports by clicking +Report button and adding further reports. Once all reports are available, click the Save icon. Enter a Report Set name and click OK.
- To run this across multiple buildings, use the Building selector area and tag the buildings.
- The default recipient will be the internal user. Drop the recipient type if required, and select the appropriate type.
- If for sending to a recipient, tag this contact and click Proceed to preview.
- In the preview window, click Proceed to finalise the distribution, click the save icon to save the report to a file location, click the email icon to use Communications, or click the DocMax icon to save to DocMax.
- Investment Accounts must be set up in Bank Account Setup to report.
- The Next Levies due date column reports levies which billed not yet due only.
Cashbook for the Audit Period
A Transaction List for the account code 012 Cash at Bank can be produced from the current year, with options for the old year, the current year, or both.
- Search or select Transaction List.
- Using the Account selector, tag 012 Cash at Bank account code.
- The default recipient will be the internal user.
- Drop the recipient type if required, and select the appropriate type. If for sending to a recipient, tag this contact and click Proceed to preview.
- In the preview window, click Proceed to finalise the distribution, click the save icon to save the report to a file location, click the email icon to use Communications, or click the DocMax icon to save to DocMax.
Trust Account Receipts
Trust account receipts are required for receipted money in NSW trust accounts. To enable receipts to be created, this is set up in Receipt Printing Setup.
To print receipts for all buildings, follow the steps below:
- Search or select Receipts Report (Group/Trust).
- Select the Receipt Group.
- Enter the receipt range required and click Run Report.
- Click OK.
Lot Balance Report
The Lot Balance report is helpful to report owners who are in advance or arrears. This reporting style can be configured to separate each type, combine or only that type. It can be produced from the current year, with options to include the old year, the current year, or both. The Aged Balance List is another lot balance type report, but cannot be backdated.
- Search or select Report Set.
- Search or select the Lot Balance report.
- Click the cogwheel, review the Arrears, Include Zero Balance and Financial Year settings.
- Click Close once set.
- To run this across multiple buildings, use the Building selector area and tag the buildings.
- The default recipient will be the internal user.
- Drop the recipient type if required, and select the appropriate type. If for sending to a recipient, tag this contact and click Proceed to preview.
- In the preview window, click Proceed to finalise the distribution, click the save icon to save the report to a file location, click the email icon to use Communications, or click the DocMax icon to save to DocMax.
Example:

