This article covers the setup, export, and import of data to and from Softlog recording software in TRMax.
We highly recommend contacting our StrataMax Support Team if you would like to import any records in bulk as a one-off.
Softlog Data Folder Setup
Please follow the below steps to set up the Softlog data folders, which is required before exporting and importing Softlog files.
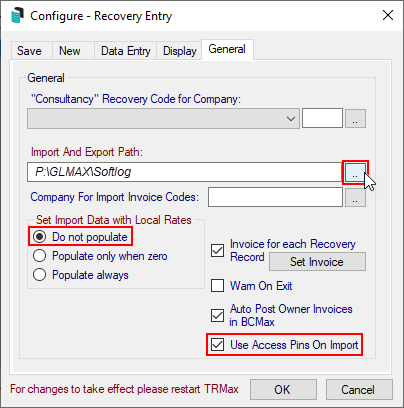
- Search or select TRMax and click File > Configure, then select the General tab.
- Click the ellipsis [...] button next to the Import and Export Path field.

- Browse to and select the required folder to import data from or export data to.
- In the above example, the path is P:\GLMAX\Softlog.
- We recommend using the GLMax\SoftLog folder located inside the StrataMax installation folder on your server.
- Set the rest of the settings/boxes as per the above screenshot or as required, then click OK.
Set Import Data with Local Rates:
Do not populate - recoveries will import based on the unit price set in in the import file
Populate always - recoveries will import based on the default unit price set in TRMax regardless of what the unit price is in the import file (if a building has a custom rate, this will be used rather than the default unit price)
Populate only when zero - recoveries with a $0 unit price in the import file will import using the Unit Price set in TRMax (if a building has a custom rate, this will be used rather than the default unit price)
Recoveries cannot be imported for a $0 value and will be excluded automatically.
Softlog Operator PIN
The Softlog Operator Pins are set up in Security Setup. The Access Code or Extension field is where data must be entered if using the exported TRMax Operator.txt file to pick up the User details.
- Search or select Security Setup.
- Locate the Username of the staff member, right click and select Edit User Profile & Manager Account .
- The Softlog Pin for each operator must be entered in the Access Code field and/or the Extension field and saved.

Export Recovery Data
Exporting recovery data is required to maintain up to date files relating to TRMax operators, invoice codes and buildings.
- Search or select TRMax.
- Select File > Export Recovery Data.
Importing Recoveries
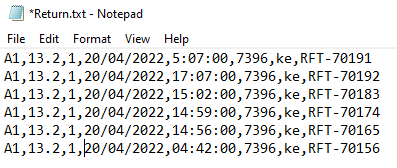
The below noted information is a guide to how much information can be captured for importing for recoveries and not all fields are mandatory. The highlighted fields below are required within the text file. It should be noted that the time should be included in a 24 hour format.
To import data follow the below steps:
- Create an Excel sheet and enter the required data, where each row is a recovery item and the columns are as follows:
Recovery Code Unit Price Number of Units Date Time Building Number Operator Notes that will display in TRMax recovery
Example file including additional column references for time (24 hr format), operator and notes.
- Save the Excel file as a comma delimited .csv file, then change the file to a .txt, naming it 'Return.txt', and place it in the folder which has been configured in TRMax > File > Configure > General (tab) > Import and Export Path.
- Open the 'Return.txt' file and remove any blank paragraphs from the bottom of the list, which can sometimes appear from converting the file from .csv to .txt. Then close the file.
- Search or select TRMax and click File > Import Recovery Data.
- Select the "Softlog" option and click OK.
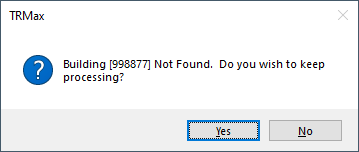
- If the below message appears, click 'No' to cancel the import and check the 'Return.txt' file and make sure all building numbers are correct, and make sure there are no blank paragraphs at the bottom of the list. Then try to import again.

- If the below message appears, click 'No' to cancel the import and check the 'Return.txt' file and make sure all building numbers are correct, and make sure there are no blank paragraphs at the bottom of the list. Then try to import again.
- Once successful, a confirmation will appear with the dollar value that has imported.
- Close TRMax and open it again to display the imported records.
Importing Softlog
Softlog will provide a file and this will be saved into the export path configured in TRMax > File > Configure > General (tab) > Import and Export Path.
- Search or select TRMax and click File > Import Recovery Data.
- Select the "Softlog" option and click OK.
- If the below message appears, click 'No' to cancel the import and check the 'Return.txt' file and make sure all building numbers are correct, and make sure there are no blank paragraphs at the bottom of the list. Then try to import again.

- If the below message appears, click 'No' to cancel the import and check the 'Return.txt' file and make sure all building numbers are correct, and make sure there are no blank paragraphs at the bottom of the list. Then try to import again.
- Once successful, a confirmation will appear with the dollar value that has imported.
- Close TRMax and open it again to display the imported records.
Softlog Printers
The following printers must be excluded from Softlog:
- HP Max Software
- HP Maxsoft Color PS


