 |
The instructions in this article relate to Local Transaction. The icon may be located on your StrataMax Desktop or found using the StrataMax Search. |
Local Transactions has been designed for users to search transactions with the option of applying filters, which can assist with reviewing account codes or financial queries. To quickly view more details relating to a transaction, either double-click on the transaction or click the Details button. It also replaced Transaction Entry and Transaction History, and can be used to find specific transactions and to extract data that can be used for analysis.
The user can also edit the description of a transaction, including sundry non-creditor EFT Payments (Reference starting with 'F'), adjust the GST Tax Code, edit the EFT Reference, and adjust the account code by using the Change Transaction Code function.
The historical transactions can also be searched across different financial years, and searches can be saved to be produced quickly in the future, with an option to export to Excel. Each column can be clicked on to sort, and descriptions can also be edited for Directs (reference starting with 'B'), receipts, debtor transactions (reference starting with 'M0', but not those starting with 'MA'), and journals. There is also a tool to assist with quickly finding fields of text information. Use the top right corner and enter text into this field to search. Click Find First or Find Next to locate results.
In the Reference column, a reversed transaction will be marked as a Y, and the original transaction will be marked with an X.
- Any transactions with X at the end of the reference are user-initiated transactions that have been reversed.
- Any transaction with Y at the end of the reference are system generated transactions to reverse a transaction (with the X reference).
Local Transactions | Security
To access Local Transactions the user must have the permission set to Allow for Local Transactions under the Menu category.
To allow the edit of the transaction description in Local Transactions, the user must also have the ‘Transaction entry edit reverse’ permission set to 'Allow'.
Local Transactions | Column Details
This section gives explanations as to what each of the default columns represents.
- Batch No: Each journal set / transaction batch is allocated a Batch number, meaning the transactions were created together.
- Date: The date the transaction was either entered or the date entered when creating the transaction.
- Account Code: The Account Code specifies the account to which a transaction is posted. Use is any of to include one or more account codes, or is not any of to exclude one or more account codes. Both conditions are available within the same search.
- Account Description: The account code's description, which is managed in Account Maintenance.
- Type: The type of transaction. Hover your mouse cursor over the icon to display a tooltip. Refer to the article on Transactions in StrataMax.
- Hidden: Indicates whether the transaction has been hidden using the Transaction Report Manager (Hide Transaction).
- Amount: The amount of the transaction. A minus figure is a credit.
- Running Balance: Displays the running balance of the transactions.
- Invoice Code Description: Only displayed for lot/debtor account transactions. Admin Fund, Sinking Fund, Maintenance Fund, Overdue Interest, Other - all set up in Levy Invoice Code Setup.
- Description: The description of the transaction. If this is "Balancing entry" this is the contra side of a batch.
- Reference: Each transaction has a unique reference number. Refer to the Transactions in StrataMax article for further details.
- Extra Details: Reports the corresponding transaction reference or invoice number.
- Extra Text: The text displayed here will depend on where the transaction was entered. For example, if it was entered via Payment Entry as an owner refund or reimbursement, it will display the owner's name.
- Fund Name: Admin Fund, Sinking Fund, Capital Works Fund, Maintenance Fund, etc.
- Account Group: Used in Multi-OC buildings in Victoria to display which OC the transaction is in.
- Cheque Book Reference: Only displayed when the transaction Type is 'Cheque' and/or the Reference starts with a 'C'.
- Posting Period: The Posting Period relates to the month the transaction relates to. July = 17, August = 18, Sept = 19 etc.
Local Transactions | Search Transactions
This section provides a quick reference guide for creating a search using the fields of restriction and column display fields.
- Search or select Local Transactions.
- Use the ‘Year’ field to select a year value, including Current Year, Old Year, Year Selection or Historic Year. Or by removing or changing the 'Year' field to a different field, it will display the full history of transactions.

- Use the 'Date' field to select a specific date or date range.
- To add another field, click the green plus button, then select the Field by clicking the drop-down menu. Based on the selected Field, the Condition can be changed if required, and then you can change/select the required Value.

- The 'Account Code' field, when set with the Condition 'is any of', allows for multiple account codes to be selected. To remove the code selection, click the red cross on the set of codes.
- The following tabs are available to refine the search:
- The Columns is where columns can be added, removed, or moved left or right in the table.
- Sort Order to change how the data in the table is sorted (by column, A-Z, etc.).
- Advanced to change the maximum number of records to display in the table (10000, 1000, etc.).
- Click the Refresh button to search for the records.
- Note that depending on how many columns have been included in the search, there may be a horizontal scroll bar at the bottom of the screen, so use that to scroll left and right to see the additional columns.

- Note that depending on how many columns have been included in the search, there may be a horizontal scroll bar at the bottom of the screen, so use that to scroll left and right to see the additional columns.
- The user can save this search, including filters, columns, etc., as a 'Saved Search'. See the Local Transactions | Saved Searches section below.
- In addition, if you would like to, you can export the data to an Excel sheet by clicking the Export button.


Local Transactions | Edit Transaction Description
- You can either double-click the record/transaction you would like to edit or select the transaction and click the Details button.
- If the Description can be edited, there will be a grey line around the text.
- Edit the text (limited to 20 characters) and click Save.
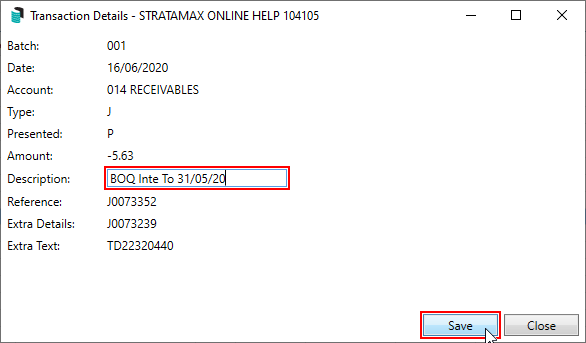
- The description will not update automatically on the Local Transactions screen, so the Refresh button will need to be clicked again to see the updated Description text.

Each column can be clicked on to sort the order of transactions.
Local Transactions | View Document/Invoice
- Search or select Global Transactions or Local Transactions.
- Locate and select the transaction by adjusting the Fields as required, then clicking Refresh.
- Click the Details button to display the 'Transaction Details' window.
- In the 'Transaction Details' window where the details of the transaction are displayed, click the Document icon on the far right.
- The DocMax 'Document View' window will open with the document displayed.

Local Transactions | Change Transaction Code
If you have taken over a property from another manager, local account codes may exist for the new building that do not align with your master chart of accounts. If you need to merge or move all of the local transactions from one expense code to another expense code, then you should use Change Code Number.
The Change Code function is used to move individual transactions from one income or expense account code to another. If the two account codes (transfer from and to) are within the same fund or account group, most transaction types may use this process. This function cannot be used on account codes that are setup to report as either Main or Sub-Accounts, so Journal Preparation will need to be used.
If the building is configured for the Invoice Hub and the Creditor Invoice is pending approval, Change Transaction Code cannot be used until the Creditor Invoice has been Approved and is no longer on the Invoice Hub. If a Creditor Invoice has been part paid, the Creditor Invoice will need to be fully paid before the Change Transaction Code tool can be used.
If a Change Transaction Code is completed to a transaction, the Tax Code should be reviewed at the same time due to the creation of new transactions. The tax code may need to be amended on the original or amended account code to ensure the GST is applied correctly. Refer to the Edit Tax Code information for steps to complete this.
If the two account codes (transfer from and to) are for different funds or account groups within a property, only expense transactions that have been created via the Creditor Invoices menu will be able to use this process. Creditor invoice transactions are identifiable by a ‘D’ reference. This may exclude some transactions such as TaskMax services fees from using this Change Code to move transactions between funds.
If account codes within the Balance Sheet code ranges need to be changed or moved, this can be done using Journal Preparation. However take extreme care as Balance Sheet account codes are often totalling accounts and adjustments should be done within the income and expense code ranges instead.
Other types of transactions that may have previously been able to use the Change Code function and are required to be changed between funds or account groups should now be rectified using Journal Preparation.
Any code changes will also be logged in the Log Viewer and can be searched for with the Category called 'Transaction'. It's also important to remember that the Change Code function is not available for the following transaction types and scenarios:
- Balance Sheet codes.
- Non-posting accounts.
- Sub and main (including debtor and creditor).
- Hidden transactions.
- GST transactions (description ‘GST’).
- Building locked by another user.
- 'Change Transaction Code 'permission is not set to 'Allow' in Security Setup.
- Historical Years
- Old Year if the building is marked as 'Audited' in Building Information.
- Appropriation transactions (description ‘Trf Surplus/Deficit’)
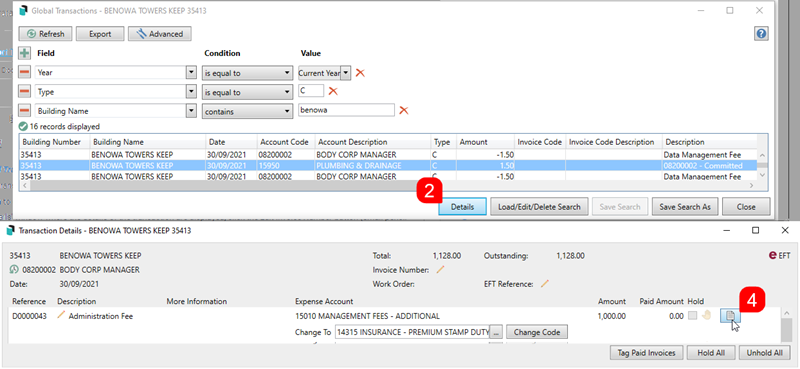
- Search or select Local Transactions or Global Transactions, depending on your requirements.
- Once you have located the required transaction, select it, and click the Details button.
- In the 'Transaction Details' window that appears, and if the transaction code can be changed, the 'Change To' field will be displayed.
- Please be aware that the system automatically enters the last code that was used in the 'Change To' field for ease of use so that changing multiple codes can be done more quickly. Simply remove the existing code if you need to select a different code.
- Click the ellipsis button [...] and the 'Account Code List' window will appear where you can locate and select the required code.
- Back in the 'Transaction Details' window, the selected code will be in the 'Change To' field, so click the Save button.
- Note the blue information box about how the change will occur.

- Note the blue information box about how the change will occur.
- You will need to click the Refresh button in order to see the code change appear in the table of records displayed.

Local Transactions | Edit Invoice Number
This section covers how to edit the invoice number of Creditor Invoices. This can also be done in the Search Creditor Invoice Items and Local Transactions screens.
- Search or select Search Creditor Invoice Items, Global Transactions, or Local Transactions.
- Locate and select the creditor invoice by adjusting the fields as required, then clicking Refresh.
- If you are using the Global Transactions or Local Transactions screens, you will need to click the Details button to display the 'Transaction Details' window.
- When the transaction details of the transaction are displayed, click the Edit Invoice Number button (small pencil button next to the 'Invoice Number').
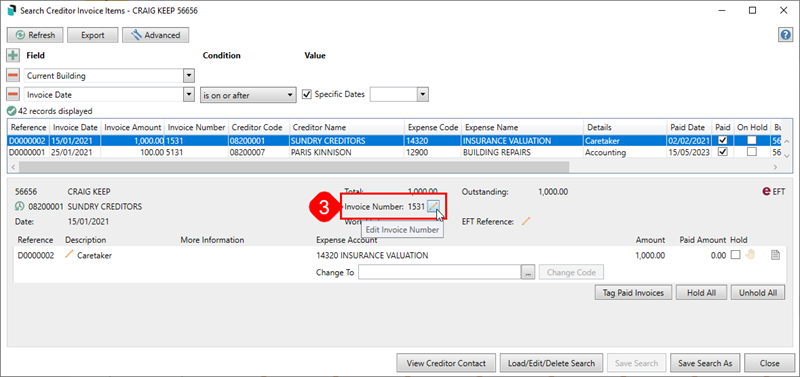
- The 'Change Invoice Number' window will appear, and the Invoice Number field can be edited. Click Save when done.
- The 'Change Invoice Number' window will close, and the change can be observed immediately.


Local Transactions | Edit Tax Code
This section covers how to edit the tax code on individual transactions that may be in the current or prior period, or the Old Year. This can also be done in the Search Creditor Invoice Items or Local Transactions screen.
The GST and GST Clearing Tax Codes are system-only and used for GST transactions created by StrataMax on the Income/Expenses and the GST Clearing Account. These options will be selectable in areas such as Local Transactions and are designed to facilitate reporting. When adjusting a tax code, use only the standard tax codes.
Tax code changes, for the current period, can also be edited in the Business Activity Statement.
- Search or select Local Transactions or Search Creditor Invoice Items.
- Locate and select the Income / Expense code for the tax code adjustment by adjusting the fields as required, then clicking Refresh.
- If you are using the Local Transactions screen, click the Details button to display the 'Transaction Details' window.
- When the transaction details are displayed, click the Edit Tax Code button (the small pencil icon next to the 'Invoice Number').

- The 'Change Tax Code' window will appear, and the Tax Code field can be edited. Click Save when done to process the adjustment transactions..
- The 'Change Tax Code' window will close, and the updated tax code can be observed immediately.
- Close the Transaction Details window and select Refresh to show the adjusted transactions.

The adjusting GST transactions will be dated the original Posting Date; this can be amended if required before saving.
The Change Tax Code process can be changed on the following:
- Receipts not posted to a debtor.
- Journals with tax code Not Included on BAS (excludes GST, Brought Forward, Opening Balance and where the chart of accounts tax code is not 'Not Included on BAS', including Generated Levies Billed Not Due, Generated Levies Paid In Advance, Account Type is not Equity, Other or Surplus/Deficit or Account Default Tax Code is not any of Not Included on BAS.
- The building is registered for GST.
- Transaction reference starts with MA, F, C, B, R or J.
- BAS, PAYG Withholding (Wages), PAYG Instalment or PAYG Withholding (No ABN).
This is to assist where GST is activated after transactions have been recorded.
For example, the tax code for receipts posted to non-debtor accounts can now be changed.

Local Transactions | Transaction List Report
A General Ledger Transaction List can be produced for the selected transaction. The Report Distribution screen allows for additional reports to be configured as well as additional documents from DocMax added. The option to Post, Email and save in DocMax is also available along with selecting the Account Code Range, Sort Order and Template selection for Transaction List with GST from the Configuration Cog Wheel.
- Search or select Local Transactions or Global Transactions depending on your requirements.
- Once you have located the required transaction, select it, and click the Report button. This will open the Report Distribution screen where you can adjust the Configuration of the General Ledger Transaction List if required. Additional Reports can be included by clicking the Report button.
- Select the Cog Wheel to open the Configuration and edit the Sort Order, Template or Account Code Range. To produce the "Transaction List with GST" select the gentran1 template.
- Review the Distribution Method and Recipient Type and click Proceed to produce the Transaction List Report.


