 |
The instructions in this article relate to Label Printing (Debtors), (Creditors), (Mortgagee). The icon may be located on your StrataMax Desktop or found using the StrataMax Search. |
From version 5.6.154, label printing is also available in Report Distribution. This provides a simpler way to produce labels while still supporting the same core functionality as the legacy label printing option, including starting from a selected label position, generating email-only lists, exporting recipient details, and supporting contact-based output.

Create Word Document Label List
Create a New Label Template in Microsoft Word.
- Open Microsoft Word.
- Click File > New.
- In the Word ribbon at the top, select the Mailings tab > Mail Merge > Labels.
- Choose the label type used in the office, under 'Label Vendors', select Avery A4/A5 or the manufacturer that matches your physical label sheets.
- Select the Product number in the list that matches your label pack (for example: Avery L7163).
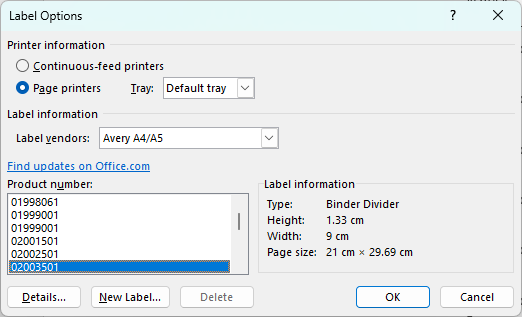
- Click OK.
- Click OK to the message: In Order to apply the selected label options, Word must delete the current contents of Document. Any unsaved changes to this document will be lost.

Optional: Save Your Template
- Click File > Save As.
- Save the template in a network shared folder in order for it to be accessible for multiple users.
Insert the Recipient List
- Go to the Mailings tab.
- Click Select Recipients.
- Choose Use an Existing List.
- Browse to the folder where your exported file was saved.
- Select your Excel (.xlsx) or Merge File (.txt or .csv) and click Open.
- If using Excel choose the correct worksheet and click OK.
- If using a text file ensure the delimiter is correct (usually comma or tab), then click OK.
Insert Merge Fields Into the Label Template
- Click inside the first label on the page.
- Select the Mailings tab > Insert Merge Field.
- Choose the fields required to appear on each label, such as:
- Address Title 1 and Address Title 2.
- On Behalf of 1 and On Behalf of 2.
- Address Line 1, Address Line 2 and Address Line 3.
- Press the Enter key between merge fields as needed to format the label layout.
- Once the first label is formatted, click Update Labels in the Mailings tab to copy the layout to all labels.
- Click Preview Results to check the formatting.
- If adjustments are needed, click Preview Results again to switch back and edit the layout.
- When ready, click Finish & Merge.
- Choose Print Documents or Edit Individual Documents to review before printing.
If the data is a text file format, the header information can be matched using the Match Fields button.
Label Address Priority
The information below explains the address priority used in Report Distribution, which is determined by the Roll, using the available address fields.
Merge Letters / Correspondence
Service of Notice > Residential Address
Levy Management/ Arrears
Levy Notice > Service of Notice > Residential Address
Resident Only List
The lot address editor must be set in the Roll for each lot to generate a resident-only list; the following instructions provide the steps to complete this. This type of list is generally used when correspondence is required for all lots in a building, which may affect the residents.
- Search or select Merge Letters.
- Click Cancel on the report selection screen.
- Review the Distribution Method selections and set for Post and Email. Do not tick Use Preferences.
- In the Recipient Type drop-down select Resident.
- Expand the Filters and tick Owner if no Tenant and Use lot address (if available).
- Right-click anywhere in the table of contacts and click the Export Recipient List to select one option. Only tagged accounts will be exported.
- To Excel: When opening the file, change the Address Title 1 and 2 to a generic title if required. Save this as needed.
- Merge File: This will provide a field option before exporting to set a Resident Title. Check the settings, then click Export Addresses to save to a text file.

Legacy Instructions
The instruction provided in this section of the article apply only to the Label Printing screen, which is planned to be phased out, as of early/mid 2026.
Label Printing Configuration
This section covers the configuration for the Label Printing menu, including Owners, Office Bearers, Creditors, Mortgagees, Mortgagee Reference Labels, and Real Estate Agents.

Label Title for Residents
Global
If the Resident checkbox is ticked, it will use the details in this field when creating labels addressed to the residents as long as the details in This Building Only is the same.
This Building Only
If the Resident checkbox is ticked, it will use the details in this field when creating labels addressed to the residents. This setting will override the above Global setting.
Settings
Delimit Email List with (enter)
When the Separate Email List box is ticked, this will show the email address for the next lot on the next line of the text document instead of being in one continuous line.
Exclude Unresolved Returned Mail Addresses (Labels / Levies / Arrears)
Ticking this excludes any lots that have been added to the Returned Mail Register menu from producing a label, a levy notice, or an arrears notice.
Change the Type for Labels
This process allows you to switch the type and print labels from any other label file in StrataMax regardless of the Label Printing area you are in i.e. Roll Reports, Creditors, Office Bearers, etc.
- Search or select Label Printing (Debtors).
- Select the Options menu.
- Click the source/type you wish to produce labels for:

Label Printing (Owners/Debtors)
- Open the Label Printing (Debtors) menu from within the required building.

a) Report Order
- Code Number Order - will order the labels based on the Account Code number.
- Alphabetical Order - will order the labels based on Surname if labels for Office Bearers or Owners and Company name for Creditors.
b) Remove Duplications - will prevent any duplicate labels from generating, for example, if there is a Lot Owner who owns two or more lots in a building and the addresses are identical, BCMax will only print one label.
c) Label Ref - if enabled, labels will print with the account number - lot number - unit number - building name on the label.
d) Priority Address Selection
- Levy Notice Address Priority Process - will generate labels using the Levy Notice Address if present, if there is no Levy Notice Address labels will use the Service of Notice Address. If there is no Service of Notice Address labels will use the Residential Address.
- Notice Address Priority Process - will generate labels using the Service of Notice Address, if there is no Service of Notice Address labels will use the Residential Address.
- Residential Address Priority Process - will generate labels using the Residential Address.
- Notice Not Levy Address Priority - will ignore the Levy Notice Address and generate labels using the Service of Notice Address, if there is no Service of Notice Address labels will use Residential Address.
e) Options
- All Owners - will display All the Owners in the Label Printing screen if they are tagged.
- Plan Num in Ref - is used in conjunction with 'Label Ref' this will put the Plan Number instead of the building name in the Label Reference.
The next two settings are based on the settings in the Roll for 'Send Notice of Committee Meeting' and 'Send Minutes of Committee Meeting'.
- Committee Meeting Notices - if this is selected in the Label Printing screen, only Owners that are flagged 'Y' in the Roll for 'Send Notice of Committee Meeting' will have their labels appear. If an Owner is flagged 'N' in the Roll, their address will not appear in the Label Printing Screen.
- Committee Meeting Minutes - if this is selected in the Label Printing screen, only Owners that are flagged 'Y' in the Roll for 'Send Minutes of Committee Meeting' will have their labels appear. If an Owner is flagged 'N' in the Roll, their address will not appear in the Label Printing Screen.
- Residents Only - will address the label as 'The Resident' and will address the label to the Lot address.
- Owner if No Tenant - is used in conjunction with the 'Residents Only' setting, this will address to the Lessee's address that is in the Roll, if a Lessee does not exists it will address the label to the Owner.
- Building Name on Resident Labels - is used in conjunction with the 'Residents Only' setting, the name of the building will be included on the label.
- Adv. Only - if selected, will exclude any Owners that have an 'N' flagged in 'Adv. OK' in the Roll.
- Not Committee - will exclude any lots that are Committee Members for this building in the Label Printing screen
- Include Non-Owner Officers - will list any Office Bearers that are not Owners of any lots in the building.
- Label Title - is the name that you will be addressing Labels sent using the 'Residents Only' setting. This can be edited in the Configuration option of the File menu.
f) Producing lists with emails and labels for post
- Separate Email List - will produce a txt document with the email addresses of Owners that have an email address in the Roll based on the contact preferences setup.
- Use Correspondence Mail Out Register - is used in conjunction with the above setting. If selected, it will produce a separate email list based on the Email/Mail Manager settings in the Roll. Note that labels will not be produced for Owners with an email address on this list.
If a lot is set up to send correspondence to an Agent, Mortgagee and others; the owner will not receive correspondence regardless of their email/mail preferences. If you need to send correspondence and include both the Agent and the Owner, it is recommended to use Merge Letters.
Printing Labels Owners
Label printing can include the contact preferences for the owner and agent when configured correctly and produce lists for email and address based on each. Label printing window can also generate email lists based on multiple contacts on the Roll, and offer lists to cater for preferences for each type. The below instructions refer to generating these lists with contact preferences applied.
- Search or select Label Printing (Debtors).
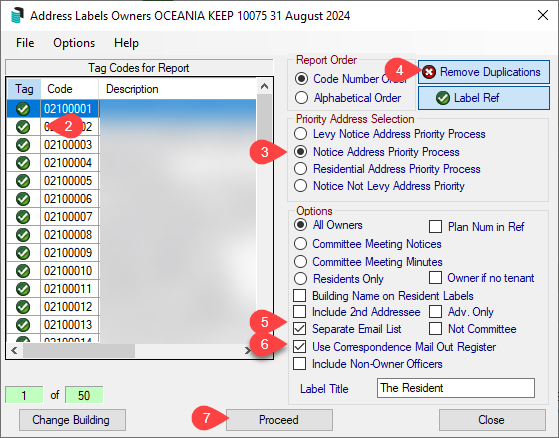
- Tag any individual or all (Ctrl + A) to tag all owners etc.
- Set the Priority Address Selection (Notice Address Priority Process is used for Service of Notice).
- Select Remove Duplications to exclude any duplicate owners.
- Tick Use Correspondence Mail Out Register to include the contact preferences.
- Tick a Separate Email List to generate a separate email list.
- Click Proceed.
- If a separate email list was selected, the notepad window here contains the contacts that have Email set as their Correspondence preference.
- This will take you to the Label Printing screen for contacts with Post set as their preference.
- Click the label you wish the printing to start from, and click Print.

NOTE: If 'Separate Email Email List' and 'Use Correspondence Mail Out Register' is selected when clicking Proceed (step 3), the txt file that is produced are the Owners requiring email correspondence and can be copied and pasted into Outlook if needed. Once closed the next screen of labels are the Owners requiring mail.
Change the Label Size
The label size and layout options presented are 1, 2 or 3 columns. When you change the label size, the label grid will change to show you the selected size and layout.
- Search or select Label Printing (Debtors).
- Tag any individual or all owners (Ctrl+A).
- Click Proceed.
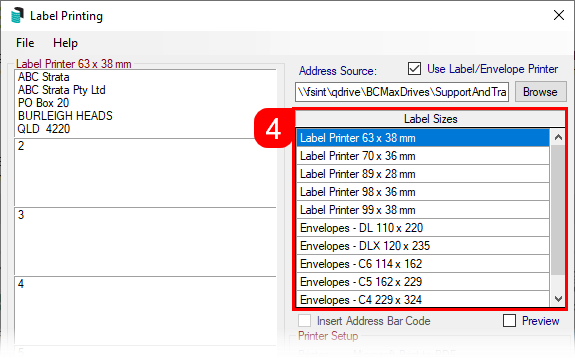
- This will take you to the Label Printing screen. In Label Sizes, select the label size. BCMax will change the size of the grid based on the selection. Use the scroll up and down arrows to view all available sizes.
Change the Printer Settings
The printer where the labels are printed to can be changed, or a specific paper tray used for labels.
- Search or select the Label Printing (Debtors).
- Tag any individual or all (CTRL + 'A') to tag all Owners etc.
- Click Proceed.
- Click the Change button in the Printer Setup section.
- Select the printer to use from the selection in your office set up for StrataMax.

Customise Labels
Labels can be customised to suit various label types in your printer. This can be done for any type of label printing; Debtors(owners), Creditors, etc.
- Search or select the Label Printing (Debtors).
- Tag any individual or all (CTRL + 'A') to tag all Owners etc.
- Click Proceed.
- Under the Label Sizes list on the right, select a comparative size. This will affect which fields can be amended in customisation screen (step 7 below).
- In the top left of the Label Printing screen, click File > Customise Labels.
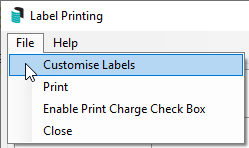
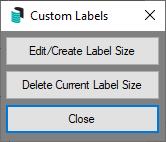
- Click the required buttons.
- Edit/Create Label Size: Opens the customisation screen.
- Delete Current Label Size: Removes any currently configured customisations.
- Close: Close this menu.
- After clicking the Edit/Create Label Size button above, the customisation screen will appear. All measurements in this screen are in millimetres, and which fields can be customised will depend on which Label Size was selected in the Label Printing screen (step4 above). You can adjust any of the measurements in the fields to suit your label, page, or envelope.
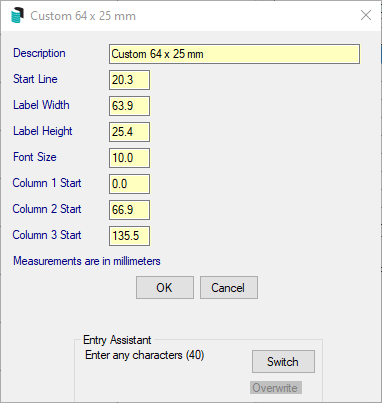
- Click OK to close the customisation screen.


Create a Merge Data file for Labels
From any of the label printing functions in StrataMax, you can create a mail merge data file for use with other programs, such as a word processor to create personalised letters and other documents.
- Search or select Label Printing (Debtors).
- The directory path for the building’s merge files is displayed. Make a note of this location.
- Under the directory path, type in a name for the merge file and add it to your note about the directory path.
- Click on Create Merge Data.
- The merge file has now been created and is ready to be used. The name of the merged data file is what is entered into the Merge Data File field.

Include Non-Owner Office Bearers in Label Printing
Address labels has been enhanced to allow the selection of non-owner officers (as well as Body Corporate Manager). The new 'Include Non-Owner Officers' option is available when the 'Owners' option is enabled (Options menu).
- Search or select Label Printing (Debtors).
- Click the Options menu and select Owners.
- Tick Include Non-Owner Officers.
- This list will now only display Active Non Owner Officers.
- Tag the required Non-Owner then click Proceed.
- Make your print selections, and click Print.
Edit the Label List before Printing
You may wish to edit the labels list before printing it, e.g. add some more labels, change any already in the list or to delete any labels. You can do this before printing - these changes are only temporary and will not affect the main BCMax data files.
- From inside any Label Printing (Debtors) window:
- Click on 'Edit'.
- The label file will open in notepad.
- Make the changes as you require. Each label must end with a '#' at the end of the last line. This is how BCMax separates each label.
- Click the 'X' once your changes have been made (to close the window).
- Click 'Yes' to save changes.
- You can now place your mouse inside the required label, and the change/s you made will now be reflected.
- Print labels as usual.
Label Printing (Creditors)
To print labels for all or a selected number of Creditors used by this building.
- Search or select Label Printing (Creditors).
- Tag the Creditors to include in this set of labels. If none are tagged, then all will be assumed to be printed.
- Tag the required Creditors to produce labels for.
- From the Report Order area select Code Number Order or Alphabetical Order.
- If there are likely to be any Creditors with label duplications and you wish to print only one label for each person, click on Remove Duplications.
- Click Proceed.
- Set any label printing options as you require, e.g. change the label size, select a printer etc. More about label printing options.
- Click the label to start printing at. This is handy as it saves wasting labels by only being able to print from the 1st label.
- Check that label pages are in the correct paper tray in the printer.
- Click Print.
- Click Close.
This will take you back to the Creditors Labels screen. From here you can change buildings to print Creditors labels from another building, or you can print labels from other areas of BCMax. - To change buildings from within Label Printing:
- Click Change Building.
- Select (Tag) a building from the list then click OK.
- From this screen, you can also print other types of labels. Click on the Options menu then click on the label type. You may choose from:
- Owners
- Office Bearers
- Creditors
- Mortgagees
- Mortgagee Reference Labels
- Real Estate Labels
- Click Close to close the label printing screen.
Label Printing (Mortgagee)
These instructions are to be used for producing Mortgagee Labels and Mortgagee Reference Labels.
Mortgagee Label Printing
Below are instructions to print labels for mortgagees only where there is a mortgagee noted in the owners file. These may be used for Notices of Meetings.
- Search or select Mortgagee Label Printing.
- Tag the lots to be included in this print. Note that this will only produce a label where the mortgagee details are present in the roll. If there are no details under the mortgagee tab, this will not produce a label for that lot.
- The label printing order defaults to lot account number (Code Number) order. To change it to Alphabetical, tag the 'Alphabetical Order'. If you are printing every lot, you may want to initiate the 'Remove Duplications' feature.
- Click 'Proceed'.
Set options and select the starting label to print as for normal label printing. Insert Label paper into your printer tray, and click 'Print'.
Mortgagee Reference Label
This action will produce a label to identify where a Mortgagee exists for a lot, the name of the Mortgagee and the name of the lot owner.
- Search or select Mortgagee Label Printing.
- Tag the lots to be included in this print. Note that this will only produce a label where the Mortgagee details are present in the Roll. If there are no details under the Mortgagee tab, this will not produce a label for that lot.
- The label printing order defaults to lot account number (Code Number) order. To change it to Alphabetical, tag the 'Alphabetical Order'. If you are printing every lot, you may want to initiate the 'Remove Duplications' feature.
- Click Proceed.

