 | The instructions in this article relate to Invoice Hub. The icon may be located on your StrataMax Desktop or found using the StrataMax Search. |
To set up the Invoice Hub, please review the following articles first:
Review Invoices
Invoices that have been submitted to the Invoice Hub can be reviewed in the 'Review Invoices' screen. Any invoices that have been queried will be placed on hold and must be reviewed before it can be approved.
If there are any invoices that have been retracted or placed on hold, this will be displayed next to Review Invoices.

- Search or select Invoice Hub.
- Click Review Invoices.
- This will bring up the ‘Invoice Review’ window.
Invoice Hub Queries
Queries can be raised between approvers and/or directly to the manager. For all queries, an email will be sent to the manager however these can be identified based on the subjects as per below.
Subject for queries directed to the manager (this includes queries to all):
"Invoice Hub Automated Notification: A Query has been raised on Invoice Number [InvoiceNumber] for Building: [BuildingName], Building Number: [BuildingNumber]"
Subject for queries raised between approvers (excluding the manager):
"Invoice Hub Automated Notification: A Note has been added to a queried invoice for [BuildingName]"
Invoice Hub Review Fields

- Buildings: This field shows the currently selected building, which will default to the selected building when Invoice Hub is launched. Click into this field to tag one or more buildings as required. If this is changed, click on Refresh List to update the list.
- Status: Provides an option to ‘Filter by status’ so that invoices can be filtered by a particular status. Click this field to open a list of invoice statuses to tag. If this is changed, click on Refresh List to update the list.
- Date Range: Allows invoices for a date range to be viewed. This will default to one calendar month prior to today’s date. If this is changed, click on Refresh List to update the list.
- Refresh List: Used to refresh the list if any of the building or status filters, or the date range has been changed. It will populate the screen with the invoices included in the configured criteria.
- Export: This will export the data currently displayed on the screen to Excel.
Invoice Hub Review

The Invoice Review window will display information pertaining to invoices that have been uploaded to the Invoice Hub and identify their status. A number of columns are self-explanatory; below are definitions of columns that may need some context.
- Entry Date: This is the date that the Creditor Invoice was created in StrataMax.
- Invoice Date: This is the date that was entered on the Creditor Invoice entry.
- Status: The current status of the invoice.
- On Hold - the invoice has been queried, and waiting for a response.
- Retracted - the invoice has been retracted.
- Awaiting Approval - this invoice is awaiting approval from one or more approvers.
- Approved - this invoice has been marked as Approved.
- Notes: Displays the last note added to the invoice and the person that added the note.
- Submission Date: This is the date that the invoice was first submitted to the Invoice Hub for approval.
- Approved Date: This is the date that the invoice status was updated to ‘Approved’, i.e. all required approvals are provided, and the invoice is ‘OK to pay.
- On Hub: This identifies whether the invoice is currently appearing on the Invoice Hub.
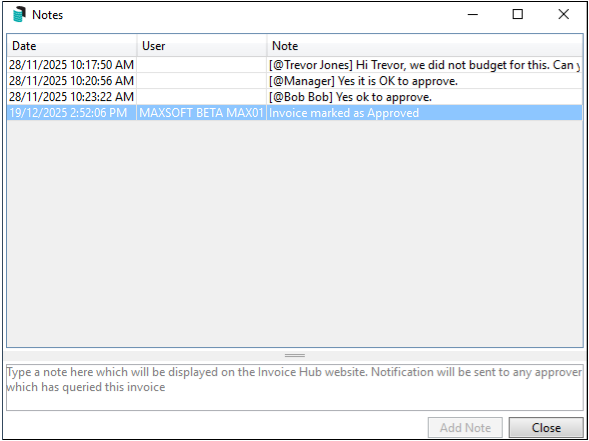
Add or View Notes (Responding to a Query)
If an approver queries an invoice that has been uploaded to the Invoice Hub, an email notification is sent to the Strata Manager, and a note is placed on the invoice. At that point, the invoice status will be updated to 'On Hold'. This query can be responded to via Review Invoices and then re-submitted to the Invoice Hub with an updated note.
- Search or select Invoice Hub.
- Click Review Invoices. This will bring up the ‘Invoice Review’ window.
- Highlight the invoice and right-click. Select Add or View Notes.

- Enter the response, then click Add Note. The invoice will automatically upload with the note for the approver to view on the Invoice Hub.

If the query requires an action, such as changing the invoice details, or updating the expense code, refer to the instructions Retracting an Invoice, or Change Transaction Code.
View Invoice Detail
The 'Review Invoice' window displays details of the invoice, including a display of the document. This is also where you can view who has approved the invoice, when it was approved, etc.
- Search or select Invoice Hub.
- Click Review Invoices. This will bring up the ‘Invoice Review’ window.
- Highlight the invoice and right-click. Select View Invoice Details.


Retracting an Invoice
Invoices can be retracted from the Invoice Hub to allow for changes to be made, and then resubmitted for approval. These changes can be to the amount, details, or Invoice Number in Creditor Invoices. Once the scenario is addressed, they can be resubmitted to the hub for approval. If an invoice needs to be removed to be paid immediately, it must be manually moved off hold in Search Creditor Invoice Items. Then, it can be paid via Payments, or the invoice can be reversed in Creditor Invoices as per the standard process.
If the only change required is to the expense code, this can be done via Local Transactions. Once the code has been changed, the invoice will be ready to load again from either the Invoice Submission Wizard or Auto Submission from Defaults.
- Search or select Invoice Hub.
- Click Review Invoices to display the ‘Invoice Review’ window.
- Right-click the invoice line item and select Retract from Invoice Hub.
Resubmitting an Invoice
If an invoice has been retracted, it must be resubmitted after any changes (except changing the expense account) have been made to be approved.
- Search or select Invoice Hub.
- Click Review Invoices. This will bring up the ‘Invoice Review’ window.
- Highlight the invoice and right-click. Select Re-Submit Invoice.
Deleting an Invoice
Invoices can be deleted from the Invoice Hub, which will also delete any historical record, including notes, from the Invoice Hub. If an invoice needs to be deleted to be paid immediately, it must be manually moved off hold in Search Creditor Invoice Items. Then, it can be paid via Payments, or the invoice can be reversed in Creditor Invoices as per the standard process.
- Search or select Invoice Hub.
- Click Review Invoices. This will bring up the ‘Invoice Review’ window.
- Highlight the invoice and right-click. Select Delete from Invoice Hub.
If the invoice is not available in the initial view, use the calendar to adjust the dates to ensure that all information is displayed as needed.
Change Transaction Code
If an invoice is queried and needs to be coded to a different expense code, use Local Transactions to amend it. The first step to achieve this action will be to retract the uploaded invoice. Once the expense account has been amended, it will be available to load again from the Invoice Submission Wizard or Auto Submission from Defaults. If 2-layer approval is required, both layers must re-approve the change. Review the approval overrides area if you would like to bypass one of these approvers.
Invoice Hub Reporting
Invoices approved via the Invoice Hub can be placed on hold using Search Creditor Invoice Items as normal. However, they cannot be uploaded again for approval, and will show as 'Approved' in the ‘On Hub’ column in the 'Review Invoices' screen. Below are a few examples that will assist in reporting different statuses using the Invoice Hub and the legacy report.
Approved Invoice on Hold Report
This report will identify any buildings with invoices approved via the Invoice Hub but then placed on hold using Search Creditor Invoice Items. This is an older-style report, and it is recommended to use the search function to provide the same results and be more flexible in what columns of data can be offered.
- Search or select Invoice Hub.
- Select the Options menu > Report.
- Select Approved Invoices On Hold.
Examples of Search Creditor Invoice Items fields of restriction:
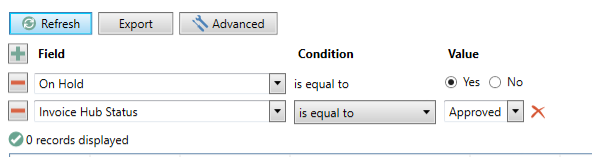 This search will report all invoices that have been approved and are on hold across all buildings.
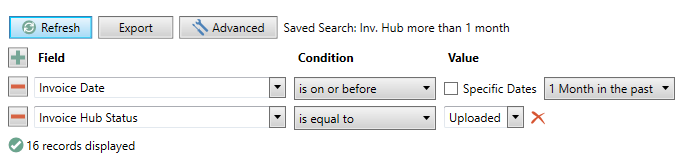 This search will report all invoices that are uploaded for 1 month in the past across all buildings.
 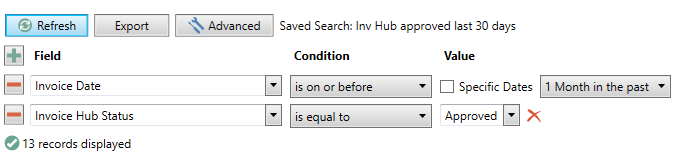 This search will report all invoices that have been approved in a one month period.
View Configuration Defaults for Approvers
Click the blue link 'View configured defaults' to produce a global report that displays the approver defaults for each building in your portfolio. Just be aware that you may be prompted for an Administrator password if the security has been enabled for this report.

The report contains columns for the Office Bearer, how many approval layers are set up, Which Limit, the Approval Limit, and the Minimum number of approvers required to approve the invoices.

