 | The instructions in this article relate to Utility Billing | Arrears. The icon may be located on your StrataMax Desktop or found using the StrataMax Search. |
This article is designed to guide users through the setup areas required to process arrears for debtors in the Utility Billing area. The process for running the arrears against debtors from the Utility Billing area. If you want to review the process for owners in arrears and producing notices for levy arrears, please check out this article.
When the arrears notice is issued, the fee will report only on the arrears notice but will not be charged until the following billing period. When the arrears notice is printed, StrataMax automatically enters a sundry charge against the account on a once-only basis, which then posts on the next bill.
The utility arrears cycle must be completed within 21 days and before the next bill is issued, as the system uses the current Utility Bill to determine the days overdue and the amount overdue.
There is a configuration setting 'Clear Arrears Flag' under Receipt Entry > File > Configure to 'Clear the lot from the arrears notice log when a receipt reduces the lot balance to less than or equal to the Clear Arrears Flag Tolerance setting'.
Arrears Notice Fee Setup
The arrears notice fee setup refers to any fees the Strata Manager may charge for issuing the Utility arrears. These steps will ensure that the correct accounts are configured globally, and offer a local setup option for those buildings that require such a setup.
- From the Utility Sub-Group, search or select Utility Billing.
- Click the Arrears tab, and click the Arrears Notice Setup button on the right.
- Click File > Arrears Fees Setup.
- Click the Change button next to the Manager Account Code field, which should be the strata manager's creditor account code (usually 08200002).
- Click the Change button next to the Fees Account field to select the building's income code for these types of fees, which will display on the Financial Statement.
- Click the Change button next to the Invoice Code field and select 18 (other).
- Export to: This can be either TRMax or No Export.
- If TRMax is selected, the Invoice Code field should be the Invoice Code number for the arrears fees that has been set up in the Edit Invoice List menu, in GLMax.
- If No Export is selected, the fees will post to the account code in the Fees Account field, and immediately create a Standing Journal to credit the Strata Management Company creditor account, 08200***.
- Next to the Invoice Code field, click the Change button to select an invoice code for the utility arrears fee.
- Choose either the Global to set the above settings for all buildings, or Local radio button to just set them for the current building.
- Click Save and Close.

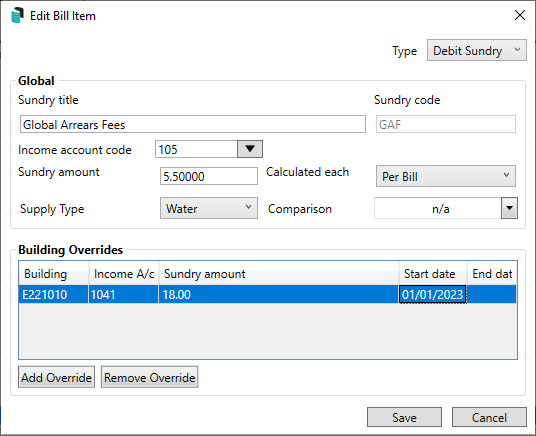
Global Utility Arrears Fee Tariff
This section covers setting up an arrears schedule globally for all buildings. The steps below include how to create the Debit Sundry Tariff used for the setup, including the income account used, amount charged for the arrears notice, supply type and the calculation style (per bill).
- From the Utility Sub-Group, search or select Utility Billing.
- Select the Tariff Maintenance tab.
- Click the Add button.
- From the Type drop-down menu, select Debit Sundry.
- Enter the Sundry Title. Enter the Sundry Code (this Code will be used to define the tariff type from the list of tariffs).
- Select the Income Account Code from the drop-down list.
- Enter the Sundry Amount, which is the fee for the selected cycle.
- Click the Calculated each drop-down list to select whether the sundry item is calculated per bill or daily.
- Click the Supply Type drop-down list and select the appropriate type.
- Click Save to make this debit tariff available in the list.
- Repeat for any further arrears notices that are to exist in the schedule. Example, Notice 2 is $15.00, Notice 3 is $25.00 etc.

Local Utility Arrears Fee Tariff
This section covers the process for setting up an arrears schedule for buildings with a different fee schedule than the global arrears schedule, whether the days, amount or arrears fee charged.
Before setting up a local arrears tariff, the global arrears tariff should exist first as outlined in the Global Utility Arrears Fee Tariff above.
- From the Utility Sub-Group, search or select Utility Billing.
- Select the Tariff Maintenance tab.
- Select the Arrears Fee tariff from the list.
- Click the Edit button.
- In the Edit Bill Item window, click the Add Override button at the bottom of the screen within the Building Overrides section.
- Select the Building from the list, and click OK.
- Double-click the cell under the Income A/c column to enter a code if it needs to be different to code in the Income account code drop-down field in the Global section.
- Double-click the cell under the Sundry Amount column to enter an amount if it needs to differ from the Sundry Amount field in the Global section.
- Enter the Start Date and End Date (if applicable).
- Click the Save button.
- Repeat if there are any other arrears fee tariffs in the list.

Utility Arrears Schedule
Following through from the Global Utility Arrears Fee Tariff setup above, each arrears tariff required should include a notice / letter set up where the templates are selected, including the deposit slip. The below will guide you through this process.
Arrears Notices can be included within the setup and the Bill Title changed to match the Utility Type. Letters can also be included with customised text as noted below in the Utility Arrears Letter instructions. If a letter is preferred, configure this first before completing the notice setup.
- From the Utility Sub-Group, search or select Utility Billing.
- Click the Arrears tab and the Arrears Notice Setup button on the right.
- Click the Global Settings button (it will turn green) to set up a schedule for all buildings.
- OR
- Don't click the Global Settings button to create an arrears schedule for the currently selected building.
- Click the Insert button.
- Click the required type of Arrears Notice Template, then click the Select button to confirm the template selection. To preview any notices, select them and click Preview to review the layout of the template.
Tip: Arrears Notices are hard coded for field output and are all types without Letter in the Description. - Highlight Deposit from the deposit area, then click the Select button to make this the default.
- Click Close.
- In the new window
- Enter the Days Overdue, the basis of what the system will use to calculate the days overdue and produce arrears notice(s) with.
- Enter the Amount of Arrears, the amount the system will pre-check for the outstanding balance when running this process.
- Select the Arrears Fee Tariff from the drop-down list.
- Click Save to finish entering this arrears notice in the schedule.
- Select the notice or
- Repeat for any further notice types and ensure that the arrears fee tariff is selected correctly for each type.

Include Journal arrears in Not Due Calculation
When ticked, the arrears calculation will include amounts billed, but not yet due, as well as any balance in the 'Other' invoice code.
Include Other balance in Arrears
When ticked the arrears calculation will include any balance in the 'Other' invoice code (Recommended).
Print Notice only if there are Levy Arrears
When ticked, the Arrears Notice menu will only observe balances from overdue levies (in the Levy Management menu), and will ignore balances in the Overdue Interest and Other invoice codes (Recommended).
Default Overdue Days (used for Other)
This is the number of days a balance can remain in the lot's Other invoice code before the Arrears Notice menu observes the balance and produces an arrears notice. This setting is only observed when there are no overdue levy or invoice balances.
Utility Arrears Letter
This section describes how to edit an existing Utility Arrears Letter from the available list and customise the text to meet the required standards. Using an arrears letter is the alternative option to an arrears notice.
- From the Utility Sub-Group, search or select Utility Billing.
- Click the Arrears tab and the Arrears Notice Setup button on the right.
- Click the Global Settings button (it will turn green) to set up a schedule for all buildings.
- OR
- Don't click the Global Settings button to create an arrears schedule for the currently selected building.
- Click the Insert button.
- Click the required type of Arrears Notice Letter, then click the Select button to confirm the template selection.
Tip: All templates with the description including the word Letter within it are a letter type. - Highlight Deposit from the deposit area, then click the Select button to make this the default. Click Close to the template selection window.
- In the new window:
- Enter the Days Overdue, the basis of what the system will use to calculate the days overdue and produce arrears notice(s) with.
- Enter the Amount of Arrears, the amount the system will pre-check for the outstanding balance when running this process.
- Select the Arrears Fee Tariff from the drop-down list.
- Click Save.
- From the Arrears Notice Setup menu, select the relevant letter that has been inserted from the schedule.
- Click Edit Letter / confirm Edit Letter.
- From the notepad window, the template used will have pre-populated text and merge fields. Amend this text to be applicable for the type of letter being sent.
- Please refer to the Notepad .LET Merge Fields article for formatting and merge field instructions.
- When finalised, select File and Save.
- Click Edit Letter, click Preview to preview the letter (recommended to check the letter is formatted as desired and includes merge fields).
- Click Finished once checked and the letter is as required.
Utility Arrears Overlay
- From the Utility Sub-Group, search or select Utility Billing.
- Click File / Configure Arrears Overlay.
- Select the relevant template, then click OK, and the new configuration screen will open.
- Edit the Message field if required, as well as the Position.
- Click Save.

Arrears Pre-Issue Report
The Arrears Pre-Issue Report is one type of report available for running before issuing the arrears. This report includes the days overdue, the amount unpaid, the last notice date and type (which will indicate the next notice type to be generated for the current process), and the arrears fees of what was charged for the previous notice. The other fields include the Legal Action date and Account Manager.
- From the Utility Sub-Group, search or select Utility Billing.
- Select the Arrears Tab.
- Click Pre-Issue Report. From the preview window, select Print Report to produce report to screen, Show In Excel to export the results or OK to close the preview window.

Click Report Setup to configure the displayed columns of information.
Arrears Manager Report
The Arrears Manager Report lists the Total Balance; Aged Balances; Lot number; Unit Number; Phone and Email; Last Arrears Notice issued; type of Last Arrears Notice issued; and lists the different account balances for Utilities, Security Deposits, Fees etc.
- From the Utility Sub-Group, search or select Utility Billing.
- Select GoTo / Arrears Manager.
- Tick and select the required options for configuration as required, and click Close.
- The Arrears Manager window will display with any relevant lot accounts and details.
- Click the Show in Excel button to export the table to Excel.

File / Set No Send Arrears Notice can be applied to exclude a debtor from receiving arrears. This is a manual action to add and remove the debtor from this area.
Overdue Report
The Overdue Report lists the Total Balance; Days Overdue; Lot number; Last Notice Date; Type of Last Arrears Notice issued; Arrears Fees; Legal Action Date. This is similar for output as per the Pre-Issue report described above.
- From the Utility Sub-Group, search or select Utility Billing.
- Select GoTo / Overdue Report.
- Enter / review the Days Overdue.
- Include Already Legal Action; this will be set to 'N' for No. To see the accounts that have been added to Legal Action, change this to a 'Y.'
- Include Already Payment Plan; this will be set to 'N' for No. To see the accounts that have been added to Legal Action, change this to a 'Y.'
- Set Clear Flag; This should be left as an 'N'. If this is changed to a 'Y' it will reset the arrears schedule once the process has been produced.
- Minimum Arrears Amount; Enter a minimum arrears balance to report on.
- Include Already Issued Arrears; By default this is set to 'Y'. Change to an 'N' to include arrears that have already been issued.
- Select OK.
Aged Balance List
This report can be run from the Utility Sub-Group building, and will offer the standard column reporting for Current, 30+ Days, 60+ Days, 90+ Days, 120+ Days and report the last arrears date. There is also the option to change the Template to SABLIST1 - Second Debtors Aged Balance List - which will output the Email Address and the Last Invoice Date.
- From the Utility Sub-Group, search or select Utility Billing.
- Search or select Aged Balance List.
- Click OK.
Tip: Adjust the Utility Aged Balance List Template selection to SABLIST1 - Second Debtors Aged Balance List.
Legal Action Overdue Accounts Report
This report offers the ability to report the legal action style report, and can be set to include Electricity (Sub-Group) only, or both the main and sub-group arrears.
- From the Utility Sub-Group, search or select Utility Billing.
- Select the Arrears tab and click Legal Action.
- Options / Overdue Report / Tag all buildings.
- From the reporting parameters, set the Include Electricity field to Only. Address any other reporting fields as needed.
- Select Yes or No message: Do you want to save Include Electricity Only as default? Apply a sort preference if desired. Click OK.
- Click OK to view Overdue Report on screen.
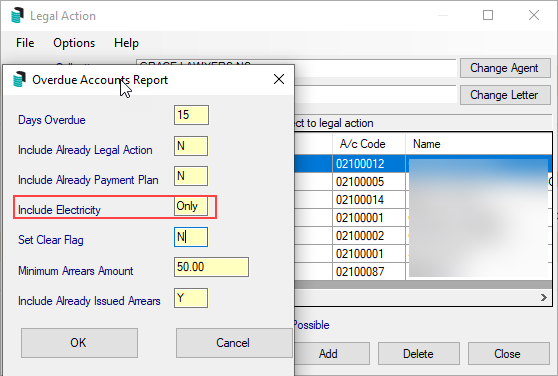
- From the preview window, select Print Report to produce report to screen, Show In Excel to export the results, or Cancel to close the preview window.


Click Report Setup to configure the displayed columns of information.
Processing Utility Arrears
After setting up the Sub-Group arrears areas, this process can be applied to each sub-group building.
- From the Utility Sub-Group, search or select Utility Billing.
- Select the Arrears tab and run one of the desired arrears report: Arrears Pre-Issue Report, Overdue Report, Legal Action to confirm which debtors will receive an arrears notice / letter. Save this report to refer to when completing the process.
- Based on the results of the report, ensure that the building selected is included in the report. If not, change to the first building on the arrears report and go to the Arrears tab.
- Review Screen or Printer mode and ensure that this is selected to the correct output.
- Review the Message tab, and include any relevant messages to print on the notice (printing availability will be based on the template in use).
- Review the Conditions tab and set Email/Print as per Contact Preferences (click Set as Default to save this setting as the default).
- Click Print Arrears. Based on the screen / printer output, these notices will either come to screen for preview, or print / email directly. Check at this stage and ensure output is as expected, and click the Print icon to generate both the email and hard copies. If printer is the output method, all debtors will print / email without a preview.
- Stored Reports can be checked from the Sub-Group to confirm that these have been sent as expected if required.
- Repeat for the next building as per the arrears report, and process each building with the above steps.
Processing Recoveries for Utility Arrears
If the tariff for the arrears has been set to charge, when running, the process will create a TRMax recovery record ready to process in a similar way that the main levy arrears process occurs. Please review How to Process Recoveries for instructions on recovering these fees. These fees will be available to collect when the process is applied, and the arrears fee for the debtor will be included in the amount payable on the current bill, but not printed on the account until the next billing cycle.
Example of Arrears Notice: Includes the amount overdue, and the account total includes the arrears fees.

TRMax Recovery available from the arrears process:

The Meter Maintenance tab confirms the standing charges for this arrears process. These will print on the bill when the next billing period is entered.

Credit Utility Arrears Fees
If the Utility Arrears fees are to be reversed, the following process can be applied to remove the standing charge from the account.
- From the Utility Sub-Group, search or select Utility Billing.
- Select the Meter Maintenance tab and select the debtor that the arrears fee is to be removed from.
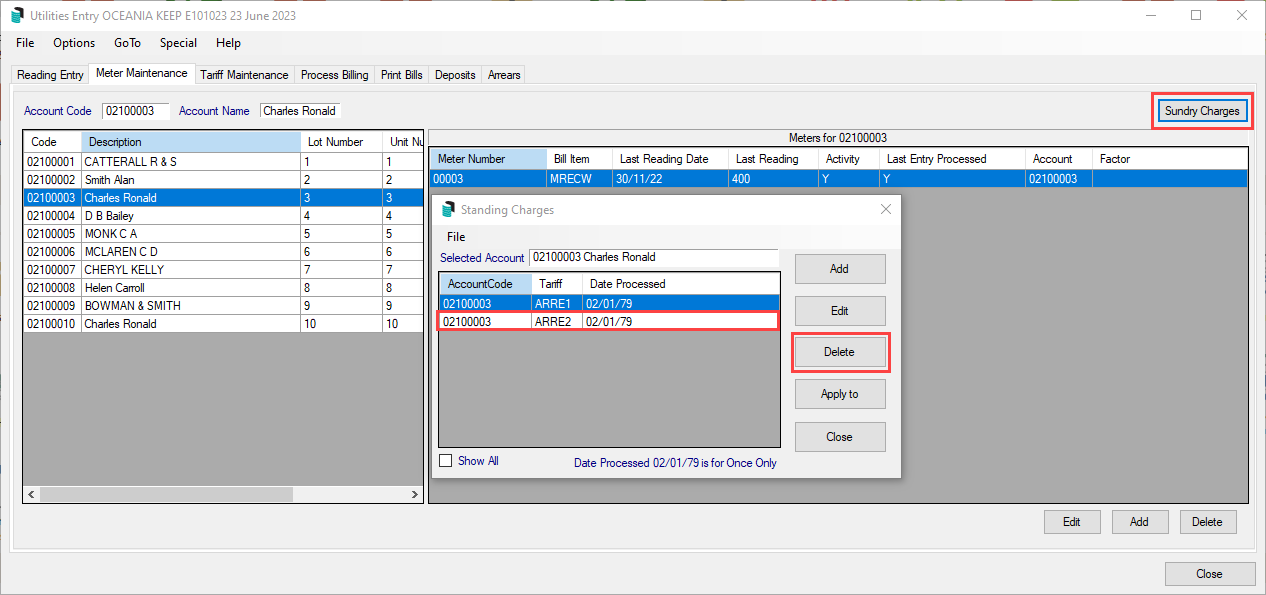
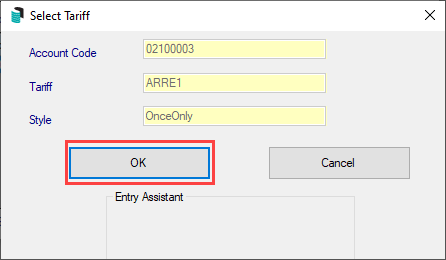
- Click Sundry Charges, and within this list will be any re-occurring tariffs, including any of the arrears tariffs. Select the arrears tariff that is to be removed and click Delete.
- From the Select Tariff screen, click OK to delete the tariff and click Yes to confirm.
- This will remove the arrears fee for the account.


