 |
The instructions in this article relate to Transaction List. The icon may be located on your StrataMax Desktop or found using the StrataMax Search. |
Local Transactions replaces the legacy Transaction List. This report can still be used and includes all transactions for a property and is available to be set for a current month, current financial year, or old financial year.
To export all or specific transactions to Excel, it is recommended to use Local Transactions or Global Transactions. This is especially useful for exporting GLMax (company) transactions, as it will produce the data faster than a Transaction List.
 | Local Transactions |
Using Local Transactions for a search similar to the one below will assist with reviewing transactions. It is recommended that this search be saved for regular use. To load this saved search, use the Load/Edit Delete Search button and pick from the list. This search can be saved for all users, groups, or a single user. When referring to the search, the fields of restriction can be adjusted at the time to include the relevant transactions.
This search captures the most common type of transactions and includes fields to allow dates, descriptions, and account codes to be selected where needed. The Columns display is achieved using the Advanced area, which provides for relevant fields. The Sort Order offers control of the results, with the Advanced (left) option allowing the number of results to be set.

To save this search, use the Save Search As button at the bottom of the window and include a Name. Select who the search should be available to, and if this should be the default view when the screen is open, tick Save as Default. If edits are made to the search, click Save Search to update the search.

The Report button opens the Transaction List screen where you can distribute or save these results as a PDF report. If Excel is preferred, click Export at the top of the window.
Producing the Transaction List
This screen is designed to produce a PDF transaction report (Excel is an option) and can be used for a single account, multiple accounts, or account code ranges, or the entire general ledger. We also highly recommend using Local Transactions or Global Transactions for a more powerful, flexible method of producing a table of transactions that can also be saved as a PDF report, and exported to Excel.
- Search or select Transaction List.
- By default the current building will be selected, but users can click the ellipsis button next to the Building field to select multiple, or all buildings if required.
- Individual separate account codes cannot be selected for multiple or all buildings - only the entire account code general ledger, or an account code range, which must be set up in the 'Configuration' window (see step 4. below). For individual account codes across multiple or all buildings, please use Global Transactions.
- To select specific account codes, click the ellipsis button next to the Accounts field, and then tag the required account codes to be included.
- This field is not available when multiple or all buildings have been selected. Please bear in mind that this field and the Account Code Range Start and Finish fields in the 'Configuration' window observe each other. So, if these account codes aren't aligned with the range, the report will be blank.
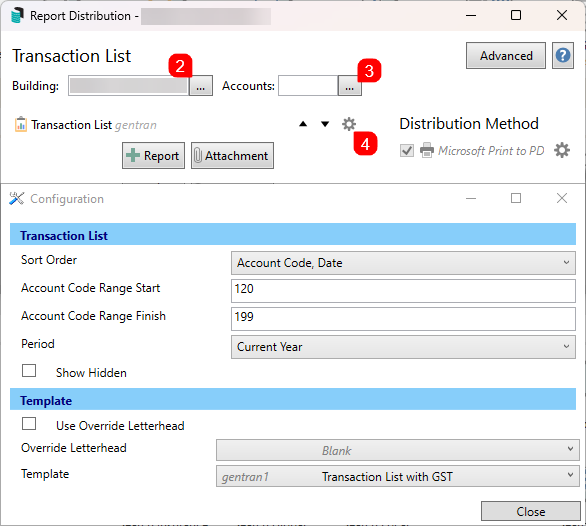
- Click the cogwheel to open the 'Configuration' window to make amendments if required, and close once done:
- The Sort Order will determine how the data on the report is sorted.
- The Account Code Range Start and Finish fields can have account codes numbers typed into them to specify the range of account codes that need to be displayed on the report. To include the entire general ledger of accounts, simply leave these two fields blank. Please be aware, if the numbers in these fields and the account codes selected in the Accounts field in the main screen aren't aligned, the report will be blank. Please refer to Account Code Explanation for more details on account codes and ranges.
- Select a Period if anything other than 'Current Year' is required.
- Show Hidden displays transactions that have been hidden using Transaction Report Manager.
- Use Override Letterhead can be overridden here.
- The Template can also be selected if required - one with and one without GST.
- Back in the Transaction List screen, click the Proceed button and the 'Report Publish' window will appear. Review the report and click the Proceed button in the bottom right to distribute the report to the selected recipient, or click using the various buttons in the top right:
- The Save button will save the report to a Windows folder
- The email button will open the 'Compose Email' window with the report already attached. This is useful if it needs to be emailed to a recipient who isn't saved as a contact in StrataMax.
- The DocMax button will save the report in DocMax.

The Transaction List Report has a few columns, some of which are self-explanatory. These are others:
- Type: Defines the transaction type. For example, a Creditor Invoice includes the column Reference with 'DA'. The payment type indicates a payment from that account and uses the column 'Reference' with either 'B' for a direct posting from the Bank Reconciliation or 'F' for EFT/BPay Payments.
- Transactions that include no GST will have no additional journal line for GST.

Transaction List Template Options
Two template options display the information in the Transaction List. These templates can be set globally, affecting all users. The letterhead cannot be applied to this report.
- Search or select Transaction List.
- Click the cogwheel.
- Refer to the template area and select from either:
Transaction List (gentran)

Transaction List with GST (gentran1)

