This article covers the Meeting Overview screen in Meeting Hub. This screen only becomes accessible whilst a meeting has a status of ‘Notice Issued’, 'In Progress', ‘Reconvened Meeting’, ‘Meeting Adjourned’, or 'Meeting Held'.
Meeting Overview

For meetings with statuses of ‘Meeting In Progress’, ‘Meeting Held’ or ‘Minutes Issued’, the motion section shows the result of the motion and each can be opened to the in-meeting management page.

'Ballot Only' meetings will also present a 'Finalise Meeting' button once the voting window has closed. These will also allow users to set the committee members for the meeting.

Meeting Alerts
Various alerts in either yellow or red may be displayed at the top of the Meeting Overview screen to notify users to different pieces of important information, some of which may require the user's action. Click the text in the alert to review the details and take the required action.
Quorum
This is displayed for meetings with a status of ‘Meeting In Progress’, ‘Meeting Held’ or ‘Minutes Issued’ and shows the following information: Quorum Present, Quorum Reason, Quorum Statement and Quorum Required.
Template Groups (Minutes)
This section is used to display and select a minutes template. If no template exists, then you cannot generate the meeting minutes, and you will need to add a template using the blue Add button.
If you would like to replace an existing template, you will first need to delete the existing template by clicking the delete (rubbish bin) button, and then add a new template by using the blue Add button.
Details
In the 'Details' section on the right, you will see the Meeting Status, Date and Time, Location, etc. It also contains the Update Meeting Status button, which is used to change the Meeting Status.
The Rollback To function available from Update Meeting Status will allow a meeting to be rolled back to a prior status. When rolling a meeting back, a message will appear warning the user of the results of this action.
In Meeting Details
This is displayed for meetings with a status of ‘Meeting In Progress’, ‘Meeting Held’ or ‘Minutes Issued’ and displays the details of the meeting that were collected whilst in the meeting.
Adjourned Meetings
When meetings have been reconvened, managers have the ability to view details of its previously adjourned meetings. Contains a list of all the adjourned meetings that are related to the current meeting. If selected the Meeting Adjourned page is shown in focus.
VoteMax Settings
This section of the screen displays any existing VoteMax settings that were determined when the meeting was created and set up. Pre-Meeting Voting settings cannot be changed once the meeting status has reached 'Notice Issued'.
The Enable In Meeting Voting settings can be changed until the status of the meeting reaches 'Meeting In Progress', which will occur when you are in the meeting Commence screen, you have entered the quorum, and clicked the blue Proceed button.
Notice Attachments
Lists any attachments included with the meeting notice, which can be clicked to display them.
Minutes Attachments
Allows you to manage existing attachments with the minutes as well as add more.
Voting Register Button
An offline voting register is available with two options; one to export meeting and voting data already loaded into Meeting Hub to an Excel sheet, and the other to print the report to a PDF. Instructions are available within the Excel sheet Voting Register, and it is recommended that the Voting Register is downloaded prior to the meeting after the VoteMax voting window has closed, as well as once the attendees have been recorded in Meeting Hub prior to the meeting commencing.
The Voting Register replaces the previously used Voting Tally function. Refer to the Offline Voting Register article for detailed instructions.
Commence/Resume Meeting Button
Click this button to start or resume the meeting and run through the in-meeting voting. See the In-Meeting Voting article for a guide on the process.
Adjourn Meeting Button
Click this button to adjourn the meeting. See the Meeting Adjournment article for a guide on the process.
Committee Election Button
Click the Committee Election button to view the Committee Election Details screen where you can delete Committee Nominations, or mark them as 'Elected Unopposed'.
Voting Simulation Button
If the VoteMax Status has been configured to 'Show Meeting and Enable Voting', then this button can be clicked to display a simulation of the VoteMax voting process that owners will see if they want to use VoteMax to cast and declare their votes.
Finalise Meeting Button
In a 'Ballot Only' meeting, such as a VOCM or Flying Meeting, the 'Finalise Meeting' button will be present once the voting window has closed for the meeting. After it has been clicked:
- The result of each motion is automatically calculated.
- A summary of the results is presented in the Meeting Overview screen. This summary also allows the outcome of a motion to be updated, including overruling the determined result.
- The meeting status will change to ‘Meeting Held’ and will move to the 'Recently Held' stage on the Meeting Hub main screen, where it can still be accessed for review.
Review Meeting Button
After a meeting has been finalised or closed, the 'Review Meeting' button will appear at the top of the screen. Clicking this provides the user the ability to review each of the motions, reopen the voting to submit the votes again if necessary, and close the meeting again.
Set Committee Members Button
In a 'Ballot Only' meeting, such as a VOCM or Flying Meeting, the 'Set Committee Members' button will be present where users can select the committee members that are present.
Attendance Register
To access the Attendance Register screen, the Attendance Register button needs to be clicked in the Meeting Overview screen, which only appears once the meeting 'Active' (under the 'Active' header in the Meeting Hub main menu), which happens when its status is ‘Notice Issued’, 'In Progress', ‘Reconvened Meeting’, ‘Meeting Adjourned’, or 'Meeting Held'.

Clicking the Attendance Register button in the Meeting Overview screen opens the Attendance Register screen where attendees are managed. This section covers an overview of this screen as well as its various features and functions.

If the meeting has already commenced, then when this screen is opened, a warning will be display at the top to let the user know that "Changes to an attendee and/or their votes may impact the result of a motion, including those that have already been decided."
Attendance Register Video
Please watch the video, Meeting Hub | The New Attendance Register for a full tutorial on how this screen works, and how to best manage attendees.
Attendance Register Overview
The Attendance Register automatically synchronises individuals from the building's Roll and Office Bearers screens. This provides managers with a complete view of everyone who may attend the meeting, including those who have not yet confirmed their attendance.
There are visual onscreen cues to differentiate between those who have and those who have not confirmed their attendance.
- If their attendance has not been confirmed, there will be no text under the Attendance Method column and there will be a row of buttons under the Voting Method column. Also, their names will not be blue and hyperlinked.
- If their attendance has been confirmed, there will be text under the Attendance Method column as well as the Voting Method column. Also, their names will be blue and hyperlinked. If required, names can be edited by clicking on them and updating the details.

Attendee Alerts
In some cases, an alert will appear on the Attendance Register screen. An alert appears when there are inconsistencies with the financial status in the Attendance Register and StrataMax. Or when multiple attendees have been added for a single lot. Hover the mouse cursor over the black triangular warning icons to display the explanation for the alert.

Link Attendance Record
The 'Link Attendance Record' button allows managers to choose whether all linked records (such as an attendee’s additional roles or capacities) should be automatically selected when any one of their associated records is selected.

Financial in BCMax
The Financial in BCMax column will identify whether the data currently available in StrataMax suggests that the lot is financial. A lot is considered financial if there is no overdue amounts for the lot account. Sub-Group debts including Utility Billing are not included in the calculations. If the current data determines that the lot is financial, a 'Yes' will be displayed, and a 'No' if not. This column is for information purposes only and does not affect vote counts.

Financial
The Financial box is always ticked by default but can be changed to determine whether or not the attendee is considered financial for voting purposes. This will be the case even if the Financial in BCMax column for this attendee displays a ‘No’.
If the Financial in BCMax column has a 'No' for an owner and the Financial box is ticked, an alert will be generated to prompt the meeting hub user to review the attendee’s financial position and, if appropriate, switch off the ‘Financial’ flag.
This will ensure that the attendees vote will be correctly included in the vote calculations for any motions which are legally required to include votes cast for unfinancial lots.

Eligible to Vote
The Eligible to Vote box is used to change lot's voting eligibility for any reason that is not related to their financial status (e.g. if an owner attends the meeting along with their co-owner and only one is eligible to vote, so the other can't be). This tick box affects the meeting quorum, which will change as soon as the screen is saved.
Do not change this tick box if the attendee is not eligible to vote because they are not financial. If the attendee isn't financial, simply untick the 'Financial' box instead. This will ensure that if motions are voted on, which legislatively require the inclusion of non-financial votes, the vote calculation results will include the non-financial votes. If you mark an attendee as ineligible to vote, their votes will always be excluded from vote calculations and tallies.
By default, the Eligible to Vote box is always ticked unless:
- The attendee has been added to the Attendance Register with a Voting Method of ‘Non-Voting Attendee’. In which case the box will not be displayed at all.
or - The box has been unticked by a user.
or - The attendee has been added to the Attendance Register with a Capacity of 'Other'. The tick will be removed from the box, but it's still visible so can be ticked by the user if required.
Managing Attendance and Votes
This section covers the various methods to manage attendees and their votes.
Confirming Attendance, Voting Method, or Apology
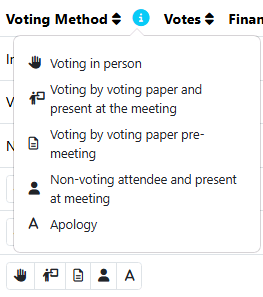
To confirm an attendee's attendance method and voting method, simply click the required button under the Voting Method column. To see a description of what each button means, hover the mouse cursor over the blue info icon.
 |
Present at the meeting and voting in person. |
 |
Present at the meeting and voting using a voting paper. |
 |
Present pre-meeting and voting using a voting paper. |
 |
Non-voting attendee who is present at the meeting. |
 |
An apology. |
Remove Attendance Confirmation
Attendees with a voting method of VoteMax Pre-Meeting cannot have their attendance confirmation removed.
To remove an attendee; click the red Rubbish Bin button on the far right. If the attendee has already vote recorded, a message box will prompt for a reason to be selected and notes to be entered. If the attendee has no votes recorded, click Yes to confirm removing their capacity. The Quorum calculation will immediately change once saved.
Add Votes
Click on the + icon under the Votes column for the lot to add votes.

Click on the appropriate voting Yes, No, Abstain button for each motion, or alternatively keyboard shortcuts can be used - press 'Y', 'N' or 'A'. When a keyboard shortcut is used the next motion is automatically selected and identified by the > next to the motion number. The up/down arrow keys may also be used to move between motions.
When entering votes for a Motion With Alternatives or Vote On Options Only, where the voter has voted Yes; only the Alternative or Options will need to be set as Yes.
In a Group of Same-Issue Motion you will need to select all buttons; Yes, No, or Abstain.
Any votes that are not marked as Yes, No or Abstain will be recorded as an Abstain.
If a Committee Election has been made visible in VoteMax for pre-meeting votes, then you will need to select the Committee Election tab and record the committee election votes for the attendee before you can click Save.

View Votes
Click on the icon in the View Vote column to view an attendees votes. If the icon does not appear, this means no votes have been recorded.

Withdrawing Votes
Once votes have been entered by the owner through VoteMax or manually by the user, votes cannot be edited. However, they may be withdrawn and entered again.
To withdraw votes follow the below steps:
- Select Manage Attendees.
- For the required lot, click on the icon to View Votes.
- Select Withdraw Votes.
- Enter the reason why the votes are being withdrawn and select Yes.
If an attendee was added for multiple lots or voted online for multiple lots based on their StrataMax Portal account, withdrawing votes will withdraw votes for the multiple lots.
If the meeting is already in progress, then those existing votes can be withdrawn as well, but if the meeting hasn't been closed/ended, then it's still possible to edit the votes in each motion individually. If you still attempt to withdraw votes when meeting has already commenced, several warnings will appear in the Withdraw Votes screen, like this:

Reinstating Withdrawn Votes
Withdrawn votes may be reinstated only if they were originally cast via the voting method VoteMax Pre-Meeting. To reinstate withdrawn votes follow the below steps:
- Select Manage Attendees.
- Locate the attendee you want to reinstate votes for.
- Click on the Reinstate Votes icon in the votes column.
- Click Yes to confirm reinstating votes.
Votes may also be reinstated in the Edit Attendance window.

Add and Update Multiple Attendees at Once
Each attendee in the Attendance Register has a selection tick box on the left-hand side, which can be ticked to manually select multiple attendees. In addition, there is also a tick box located in the top left of the attendee list, to the left of the Add Unlisted button.

Selected rows are visually highlighted, and a record count is shown when selections are made. Once multiple attendees have been selected, several new buttons will appear: Update Attendance, Financial (the '$' button), and Eligible To Vote (the 'Thumbs up' button).
The Update Attendance button will display two drop-down fields, Attendance Method and Voting Method - both of which must be selected before being able to click the Apply button.

The Financial ('$' ) button will display 'Set Financial' and 'Set Unfinancial' options.

The Eligible To Vote ('Thumbs up') button, will display 'Set Financial' and 'Set Unfinancial' options.

Add Additional Capacities | Proxy, Power of Attorney, etc.
These steps explain how to add additional capacities.
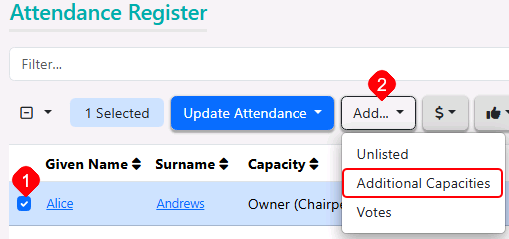
- Tick the selection box next to the relevant attendee who is going to be the additional capacity. For example, if the owner of lot 1 is a proxy for lot 4, tick the box for lot 1.
- Click the Add... button and select 'Additional Capacities'.
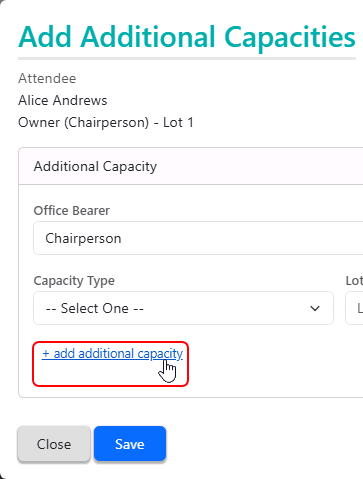
- In the 'Add Additional Capacities' window, click the blue + add additional capacity text.
- Click the Capacity Type drop-down menu to select the appropriate type, then type in the Lot Number(s), which should automatically populate the Unit Number(s). Multiple lot numbers can be typed in by separating them with commas. In this example, the owner of lot 1 is acting as a proxy for lots 2 and 4. Notice the lot information for each lot is automatically displayed on the right side.
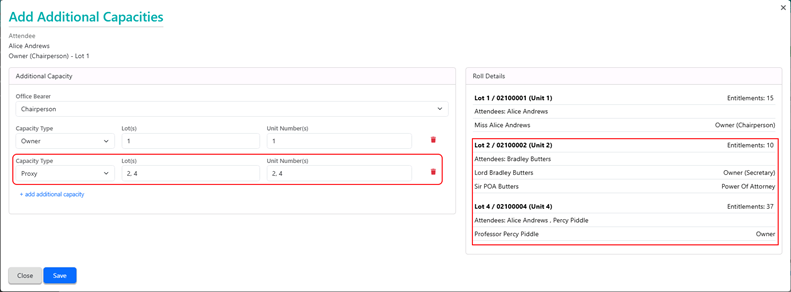
- When all additional capacities have been added, click Save and the window will automatically close. Back in the Attendance Register screen, the additional capacities will be listed, and the votes can be added.


Download Sign-in Sheet
A Sign-in sheet is able to be downloaded in the form of a Word document, which allows attendees to write their own details as they arrive at the meeting.
