This article covers the necessary steps, and various settings required to use the Legal Action menu, which allows Strata Managers to engage external debt collection agents to set up a payment plan, or set up a payment plan for owners without engaging an external debt collection agent.
Debt Collection Agents
First step is to set up the debt collection agents. As mentioned previously, as well as having an external debt collector, an internal debt collection agent can be set up for when an owner has agreed to a payment plan without an external debt collection agent getting involved.
- Search or select Legal Action.
- If the table of applicants automatically appears, click the Add/Remove/Edit button. Or if the Legal Action menu appears, click the Change Agent button, then click the Add/Remove/Edit button.
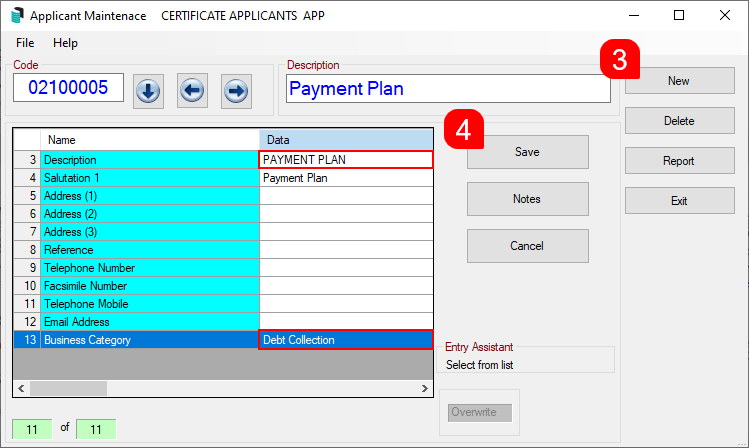
- In the Applicant Maintenance window, click the New button.
- Enter as much detail into each field as possible - Description and Email Address should be entered at the very least, and the Business Category must be set to 'Debt Collection'.
- The Reference field must be left blank.
- Click Save once all fields are complete.
Payment Plan Setup
Sometimes owners who are far in arrears will choose to negotiate payment terms in order to avoid getting a debt collection agency involved. Once these payment terms have been agreed, and (optionally) the owner has set up a direct debit, and to ensure they are not issued further arrears notices and are keeping to the payment terms, the account can be added under a configured Payment Plan agent. These records update current balances and any activity on the account, allowing managers to manage these payment plans.
- Search or select Legal Action.
- If the table of applicants automatically appears, click the Add/Remove/Edit button. Or if the Legal Action screen appears, click the Change Agent button, then click the Add/Remove/Edit button.
- In the Applicant Maintenance window, click the New button.
- In the Description field, enter 'PAYMENT PLAN'.
- The Reference field must be left blank.
- The Email Address field can be left blank.
- The Business Category must be set to 'Debt Collection.'
- Click Save then Exit to close Applicant Maintenance window, then in the Select Applicant screen, click the Cancel button to go back to Legal Action.
- Click File > Configure.
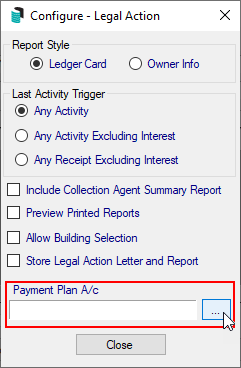
- In the Configure window, click the ellipsis button [...] next to the Payment Plan A/c field to select the 'PAYMENT PLAN' debt collection agent that was just created, then close the Configure window.
- That concludes the set up for placing owners into a payment plan without engaging an external debt collection agent.


Legal Configuration
- Search or select Legal Action.
- Select File, then Configure.
- Select the configuration options:
- Report Style - Select the report to include with the Initiation Letter to the Debt Collector.
- Last Activity Trigger - Select which activity will update the Activity Date & subsequently issue updated reports to the Debt Collector.
- Include Collection Agent Summary Report - When printed update Ledger Cards for the Debt Collector; tick to include the Collection Agent Summary Report.
- Preview Printed Reports - Preview any reports to screen when produced.
- Allow Building Selection - When printing reports; if ticked the Building Selection list will appear to allow user to tag selected buildings.
- Store Legal Action Letter and Report - When adding lots to Legal Action; if ticked a copy of the letter and reports will be added to Stored Reports.
- Payment Plan A/C - Select the Debt Collector A/C that is used as 'Payment Plan'.
- Press Close.

Debt Collection Merge Letter
The second step is to create a merge letter to instruct the debt collector to commence debt recovery. The letter should be kept generic as the additional report (Ledger Card or Owner Info) will be included with the letter to provide further information.
- Search or select Legal Action.
- Click the Change Letter button.
- The 'Report Selection' screen will appear with a list of existing .LET documents/letters.
- If the required letter already exists and is displayed in the list, select it, and click the Select button and acknowledge the notification window about the 'New Legal Action Letter'.
- If there isn't a suitable letter in the list, click the Merge Letters button and follow the steps in Create New StrataMax (.LET) Letter and refer to the .LET Merge Fields article for a list of merge fields.
- You can also copy and paste the following into notepad, changing wording as required:
&TopMargin=550
&LeftMargin=150
&RightMargin=2250
{LetterHead}
{Font=5}

<Today>
<NameAndAddress>

Dear Sir/Madam

{BoldOn}PLEASE COMMENCE LEGAL PROCEEDINGS{BoldOff}

The Strata '<Building-3> <Building-5>' wish to engage <General-3> to pursue the lot for the outstanding amount.
Refer to attached documents for further information.

On behalf of {BoldOn}<CompanyTitle>{BoldOff}

Kind Regards
ABC Strata
- Once the letter has been created in the Merge Letters screen, it will appear in the 'Report Selection' screen - click the Select button and acknowledge the notification window about the 'New Legal Action Letter'.
Below are the different formatting codes required for setting up the 'Legal Action' letters.
Debt Collection Letter Merge Fields
For an example of how this all looks, open one of the sample letters supplied with StrataMax (BCMax)
Special Merge Fields
| To insert the letterhead specified for this building at the top of a page type: | {LetterHead} |
| To start a new page type: | {PageBreak} |
| To insert the plan name type: | <CompanyTitle> |
| To insert today’s date type: | <Today> |
| For a structured name and address with post code type: | <NameAndAddress> |
| To insert the CTS number type: | <CTS> |
| To insert the regulatory module type: | <RegMod> |
| To insert the plan number type: | <PlanNumber> |
Document printing setup is always typed at the start of the letter. By default, paragraphs that stretch over more than one line are now formatted 'Justified'. Similar to word processing programs, this means that the text will be spaced out evenly to print with nice straight edges down both the left and right sides of the letter.
*Distance measurements are always in 300ths of an inch, i.e.: 1 inch = 300 dots.
| &TopMargin=300 | where 300 is the number of dots from the top of the page. |
| &LeftMargin=150 | where 150 is the number of dots from the left of the page. |
| &RightMargin=1950 | where 1950 is the number of dots from the left of the page. |
| &Justify=X | Replace 'X' with one of the following: '0' means No Justification: '1' means Left Justification: '2' means Left and Right Justification. |
| &LineSpacing=X | Replace 'X' with a number for the point size. The default Line Spacing for Merge Letters and Certificate text is 2 points or can be manually controlled with this command. To change the default setting for line spacing see: Set default line spacing for merge letters. |
| &MainFont=3 | where 3 is the font number from the Font Details list. |
| <Building-XXX> | Inserts data from Building file where XXX is the field number. To assist in writing a letter, it is possible to print a list of the fields in 3 categories: 'Building', 'General' or 'Insurance'. |
Formatting Merge Fields
In merge letters, you can make text in the letters bold, underlined, or a different font. To change the size of printing or otherwise manipulate the printed text, you may use the following commands enclosed in squiggly brackets (eg {Font=3}):
| Font=1 to Font=11 | Select which of 11 pre-defined (and customisable) font and format combinations to use. EG Font 5 may be Arial, bold and underlined. |
| ULineOn | Underline switched ON. |
| ULineOff | Underline switched OFF. |
| BoldOn | Bold switched ON. |
| BoldOff | Bold switched OFF. |
All text following the command and before another one will be printed in the format of the command it is following. Each time you want the text to change formatting, you have to put in another command to turn the formatting off, or change back to another font.
Examples:
This {BoldOn}is{BoldOff} bold.
Produces: This is bold.
This {ULineOn}is{ULineOff} underlined.
Produces: This is underlined.
To specify one font for the main part of the sentence and a separate font for 'is in'
{Font=2}This {Font=1} is in {Font=2}different fonts.
Produces: This is in different fonts.
Data Formatting Codes
Use these Data Formatting Commands with the Field Codes.
| -Trim021 | Removes leading 0210000 from owner account codes. |
| - Less(xx)Days | Adjust inserted data (if a date) by the number of days inside brackets. |
| - Plus(xx)Days | Adjust inserted data (if a date) by the number of days inside brackets. |
| - Less(xx)Months | Adjust inserted data (if a date) by the number of months inside brackets. |
| - Plus(xx)Months | Adjust inserted data (if a date) by the number of months inside brackets. |
| - WordDate | Prints date in words. |
Example:
<Building-12-Less(42)days-WordDate-12>
The example above will show the financial year end plus 42 days in the following format: 12 July 2017. If the date format is not specified, BCMax will use the system date format of your computer.
The field number ('12' in our example above) must be the same in both field positions.
Legal Action Report (Payment Plan Report)
- Search or select Legal Action.
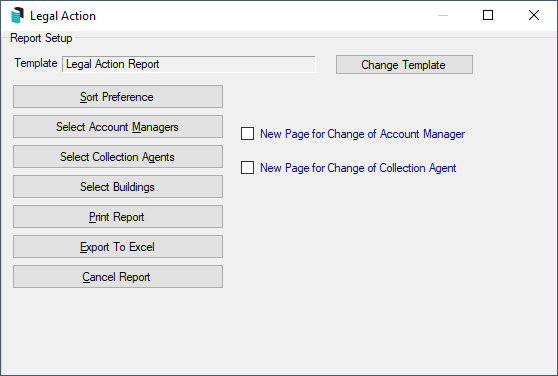
- Select Options, then Legal Action Report.
- Select Change Template - there are two reports to choose from:-
- Legal Action Report
- Legal Action Report – Managers Names
- Click the template that you would like to use and click 'Select as Global'.
- Click Select Buildings and tag as required > OK.
- Select Print Report or Export to Excel depending on reporting requirements.

Agent Summary Printer Setup
- Search or select Reports / Utilities Global.
- Click Utilities and also Legal Action.
- Select Options, then Agent Summary Printer Setup.
- Select Printer.
- Select Paper Source to select tray.
- Press OK.
Set Legal Action Words for Ledger Card
- Search or select Ledger Card.
- Select Tools then Edit Legal Action Words.
- Type the words that you would like to appear on the Ledger Card.
Note: In this example, 'Legal Action' is the word that is appearing on the Ledger Card. You may not want the words 'Legal Action' to appear on the owner’s ledger card, so change this to suit your office policies and requirements.

