 | The instructions in this article relate to the Master Chart Filter. The icon may be located on your StrataMax Desktop or found using the StrataMax Search. |
Please note that the Master Chart Filter will not be available if you have been updated to StrataMax version 5.6.96 or beyond. The functions in Master Chart Filter have been included in the new Account Maintenance screen.
General ledger account codes exists in the Master Chart, and each building has a copy of them in their local chart. When a new account code is created in the Master Chart, the Master Chart Filter is then used to add the codes to one, several, or all buildings. And when a change is made to an existing account code in the Master Chart, the Master Chart Filter is also used to filter (copy) those changes to one, several, or all buildings. This can be applied to the name, or any other relevant information for that account code.
This maintains consistency in the chart of accounts throughout the portfolio and enables the global payment run. Depending on the number of codes and buildings selected, this process may take some time to complete. If a large clean up of the chart of accounts is required, bear this in mind and consider running the process in batches.
The Master Chart Filter is primarily used to:
- Add a code to one or more buildings (income, expense or creditor codes).
- Filter changes made to the Base or the Master Chart building, include Sub Accounts (sub groups such as Utilities) and the Old Year.
- Delete codes from the Base Building.
- Apply an Account Category to account codes (NSW for the Statement of Key Financial Information).
- Updating or adding a tax code to account codes.
Master Chart Filter Configuration
This section covers the configuration in Master Chart Filter.

Change Address + Others must be set for these to work
Filter Creditors Prompt/Preferred/Banned Field
Any changes made to the Creditors Prompt/Preferred/Banned field will automatically be filtered to all other creditors with the same name and number. This also includes any creditors that are Inactive (see Inactive Creditors for more info).
Filter Creditors EFT Active Field
Any changes made to the creditor's EFT Active field will automatically be filtered to all other creditors with the same name and number.
Settings
Block Delete of Prompt/Preferred/Banned Creditors
When ticked, the deletion of creditors that have a 'Y', 'P', 'R', or 'B' in field 28, Prompt/Preferred/Banned, in the Creditor Maintenance menu, will not be allowed. A warning prompt will then appear when trying to delete any of those creditors.

Adding, Editing or Deleting an Account Code in the Master Chart Building
Adding, editing or deleting and account code in the Master Chart, follows the same process that is covered in the Account Maintenance article. The same process can be completed in the Master Chart building.
- Use the Building Selector and click Select Master Chart Building.
- Search or select Account Maintenance and locate the code to delete.
- Click the Delete button (red cross) on the right, and confirm the deletion.

Adding an existing Account Code to all Buildings
To add an account code from the Master Chart to all buildings follow these instructions. The Master Chart Filter can be done from either the Master Chart building, or within a particular building as long as the account code exists in the Master Chart building.
It is imperative to check that a filter is not required before adding a new code to all buildings. If other codes are tagged and the Add Codes button is clicked, then all of the codes tagged will be added to all buildings tagged.
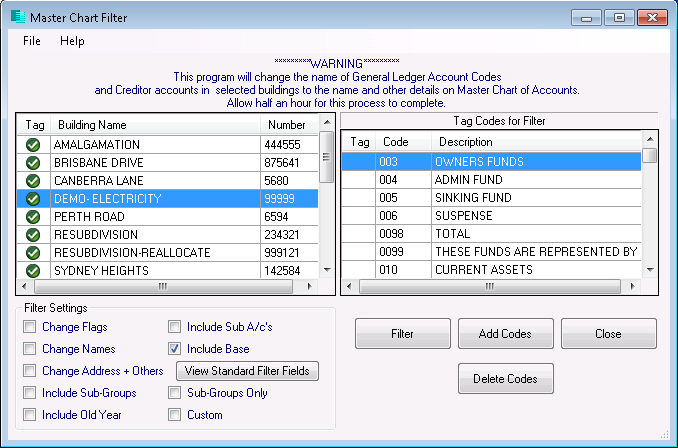
- Search or select Master Chart Filter.
- On the left is a list of all the buildings. Tag one or more buildings as required or Ctrl + A to tag all buildings.
- On the right is a list of all the general ledger codes. Tag one or more account codes that will be added.
- In Filter Settings untick the Include Base box if you don't want the codes are not added to the Base Building. Or leave it ticked if you do.

- Click Add Codes, then 'Yes' to confirm that the selected accounts are to be added.
- A list of the account codes that have been tagged to be added to the selected buildings will appear. This is an opportunity to untag any account codes so that only the tagged codes will be added.
- Click Close.
Master Chart Filter Options
Master Chart Filter allows for changes to be made on a general ledger account code or a creditor code to be filtered to the buildings that use those codes. This enables the chart or accounts to be consistent between the Master Chart and each building's chart of accounts. Below are the options available under the Filter Settings.

Change Flags
This option will change any of the Type, Heading, Account Type, Report Group, Tax Code, Non-Mutual Item, Restrict Access, Update Code, End Report Flag (XY_), Account Group.
Change Names
This option will change the name of the tagged account code (primarily used for creditor records).
Change Address + Others
This option refers to the address and other fields in Creditor Maintenance records.
Include Sub Groups
Refers to applying the filter to any Sub-Groups that may exist to the tagged buildings.
Include Old Year
Will include the Old Year for any changes made.
Include Sub A/c's
Will include any Sub Accounts that exist within the building.
Include Base
This option if ticked by default. Any changes made will filter through to the Base building.
Sub-Groups Only
If the filter is to apply only to the Sub-Group this will ensure that these filters are only carried through to that type of setup.
Custom
Will allow for custom fields to be tagged to filter through to the buildings.
Standard Filter Fields
The Standard Filter fields are the fields that the Master Chart Filter will look at to filter the changes when Change Address + Others filter setting is used. These apply to creditor codes.

Custom Filter Options
In Master Chart Filter, instead of using the preset filter options, a Custom Filter option can be selected where only the tagged fields in the custom setup will be filtered. Select Custom in the filter settings, then in the File menu > Custom Setup, tag the fields to filter. This is especially relevant for the Tax Code field as this is the only way to filter it.
- Search or select Master Chart Filter.
- On the left is a list of all the buildings. Highlight a building, then Ctrl + A to tag all buildings.
- On the right is a list of all the general ledger codes. Tag one or more account codes that will be filtered.
- In Filter Settings, tick 'Custom'. Untick 'Include Base', so the codes are not added to the Base building. Keep it ticked if the account codes are to be added to the Base building.
- Go the File menu > Custom Setup. Tag the fields that will be filtered.
- Click Filter.
- Review the account codes that will be filtered, then click OK to proceed.

Master Chart Filter | Delete Codes
Within Master Chart Filter the 'Delete Code' function will delete the tagged codes from buildings if the code has not been used for two years. It is recommended this step is run first, which will reduce the number of account codes in the local buildings to be checked during an Account Compare.
Only account codes in the Master Chart and Base Building can be deleted, except locally used codes that do not exist in the Master Chart.
Strata Cash Management Periodic Payments
If there are any StrataCash Periodic Payments set up that do not result in activity against the Creditor Code – i.e. transactions / invoices to the creditor code, the account will be deleted from the building and potentially causing payments to fail or be delayed if not re-added back to the local building. In these instances the Period Payment will need to be corrected.

- From the building selector, select Master Chart at the bottom of the screen
- Search or select Master Chart Filter.
- Tag required buildings (usually all – ctrl + A)
- Tick the Include Base box if you wish to delete codes from the Base Building as well.
- Click Delete Codes.
- If you ticked the Include Base box, click 'Yes' to confirm you are using the Base Building.
- Tag all codes (Ctrl + A) then un-tag any account codes that you do not want to delete.
- Some system codes are not able to be deleted and will be de-selected automatically as per below.
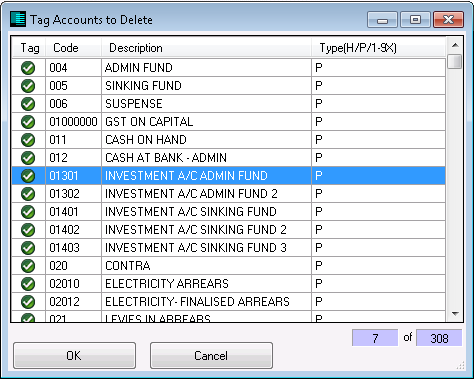
- Some system codes are not able to be deleted and will be de-selected automatically as per below.
- A list of accounts required by the system will be displayed, these account codes will not be deleted, click on OK.
- When prompted ‘Are you sure you want to delete the selected accounts?’ select Yes.
- The list of accounts for deletion will come to screen, select OK to proceed.


A log displaying the deleted account codes can be viewed or printed by selecting File > View Log. It is recommended the log is added to history once viewed or printed.
If any accounts have TaskMax activity that is less than two years old, the below message will appear. Select Yes if you wish to delete the account or No to retain the account. You will then be prompted whether to apply the same answer to all instances of this message.

